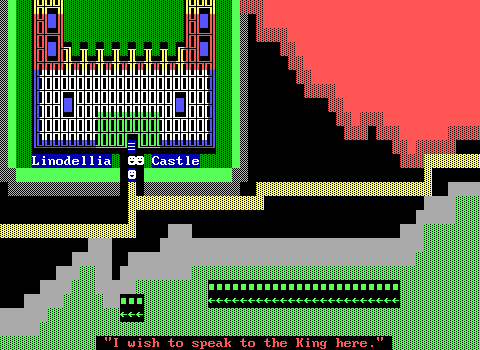


The hallway ends with two doors. The top one won't open until all the monsters have been defeated on this floor, with players having to figure that fact out for themselves. Rivera goes for it with the detail in a way that few ZZT games would bother to, helping to give the game a real sense of identity even this early on. Good thing too, since without cheating, this is likely where most adventurers adventuring in Adventure are about to meet their end.

Contrast with the prose on the other doors which are comical BEWARE OF DOG signs. There are three of these doors scattered around this level of the cave, all living up to the signage. They serve as a friendly warning not to bother with these places if you lack a saber. Make sure you don't bother with that hunting knife back in Tre 'La. It's true what the trees were saying about it not being needed, in fact, nothing in the game reacts to it! It exists solely to make players spend too much money and render the game unwinnable.

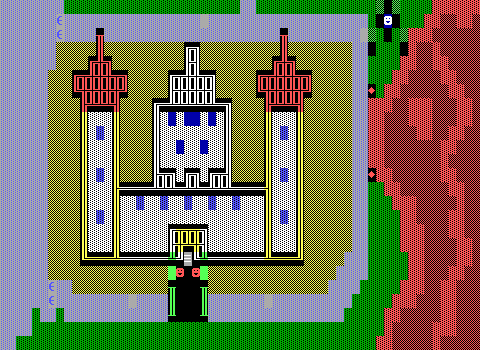
Things start off just great. A spinning gun is set up as a trap to deal with any intruders, and invisible walls are placed around the room making it very easy to just immediately take a whole lot of damage before even waking up the worm.
And while I think that sucks quite a bit, I do have to acknowledge the very clever combination of built-ins on display here. Invisible walls for non-maze purposes, are like a dream come true to me at this point. They're used in several boss chambers like this one as a way to keep players on their toes. You can't always move where you want, and need to be able to react to the surprise of being blocked quickly lest you suffer otherwise.
If this game wasn't so dramatically stingy with its health, I'd be praising this wholeheartedly. It's only mean because a surprise hit or two from the gun represents a significant chunk of David's vitality. The impact can always be lessened with a tactical reload too.

The great and powerful Wormie meanwhile doesn't actually do anything until provoked. Their leathery skin deflects any shots, bouncing them right back at players foolish enough to not use a bladed weapon for their assault. Curiously, the description for this refers to David's shots as "bullets", implying that David is indeed using a gun rather than the more common ZZT fantasy-friendly ranged weapon of a bow. Then again, Rivera has been reluctant to try and reskin existing ZZT elements, with lions, tigers, etc. (You don't have to make an "Oh My!" joke every time.) keeping those names intact.

This doesn't mean that the first touch counts a free hit. This just wakes up the worm without wasting a bullet. Once noticed, the worm will begin to attack the player with quite the variety of attacks.
Much of the combat is your typical ZZT boss fight, with the worm shuffling to the player, biting if they get close. The worms are all unique enemies, though their behavior doesn't change that much between them. I had the misfortune of starting with the hardest worm to defeat, and suspect most players would start here as the initial onslaught of tigers and their bullets would get players to quickly dispatch them and end up just outside the door.
The worm moves towards the player constantly, sometimes backing off for just a moment. They move at cycle two which does give players the chance to outrun them, provided they don't trip on any invisible walls. Since the worm won't fight until provoked, you can opt to explore the entire battleground thoroughly, uncovering all the little traps in advance.
Should the worm catch up to David, they'll take a bite for fifteen points of damage.
For players trying to keep David alive, the strategy should be simple enough. Move in: Stab. Move out.
In practice, this is a lot easier said than done.

The game's emphasis on detail mean that delivering a hit causes a multi-line message to pop up, requiring players to close the window and then immediately step away. Due to the lack of idles in the code, there's no delay between the worm reacting to being hit like this and it returning to its main combat loop. This means that when the window is closed on the worm's next tick, they'll immediately check if they're next to the player for a bite attack. It ends up being extremely difficult to stab the worm and not immediately suffer a counterattack. It takes four hits with the saber to kill a worm, which can easily mean losing sixty health if you're not constantly reloading until you get a safe stab in.

One of these stabs is an exception, jumping to a different label where the worm breaths fire instead. This also activates if the player happens to be in contact with the worm at a later part of its combat loop which makes it jump to this attack rather than the usual bite. The fire-breathing attack just means throwing a star at the player. So instead of having to hopefully dodge the follow-up bite by employing fast reflexes, they instead get to merely hope that the star that spawns in doesn't get to act on the current game tick. If it gets to move, it will already be next to the player and be an immediate hit. If it doesn't, the player still has to move out of the way as they would with the worm directly.

These battles are atrocious. You simply cannot get away with trading blows like this for all three worm fights, making it mandatory to either buy a healing potion or agonizingly savescum your way to victory. This is where the deaths start piling up. The door also closes behind the player once they enter, so retreating is never an option. David and the worm enter, and only one of them will exit.
Some of the worms behave slightly differently too, both in terms of the exact movement pattern they use which hardly matters, but in how they breathe fire. One worm is generous enough to never breathe fire. The worm on the right that I first fought throws two stars when they breathe fire requiring not only the unlikely dodge, but also to keep actively running around in a small room with an angry worm, invisible walls, and some of ZZT's notoriously long lasting stars.
Don't fuck up.

As a reward for defeating each worm, they drop a single gem. Wow! That's three whole health to recover for defeating them all! They also directly hand the player eight gems, which of course come without the health increase.

The only bit of kindness extended on this level is in the form of an obvious spike trap with a health potion on the ground. Picking it up restores a critical fifty health, and also causes the spikes to close in on the player. Thankfully they do move slowly enough and there's enough latency between touching the object and the spikes starting to move that it's basically a freebie.

Don't get tunnel vision focusing solely on your health and the worms! The final worm was defeated in the middle of my final torch's duration meaning just the slightest hesitation would mean having to fight a worm in total darkness. A quick retreat to the weapons shop to grab six torches for two gems is made when the last torch runs out. Even after making the purchase I returned back to this level and found my way to the bronze door before lighting a new one. Ever tick of torch time is sacred. Don't waste them.

The bronze door grinds open now that all the worms have been defeated, revealing this level's treasure room, which if course is not without dangers of its own. A line of blink walls offers one last attempt at stopping players that have dared to make it this far. The timing is generous, making this trap feel half-hearted in comparison to the meanness of invisible walls and spinning guns that came before it.


The reward is the first stick of dynamite the player was promised, and the most foreboding scroll I've ever read, indicating that this is merely the beginning of what's to come...

Which is to say, breaking the game because I put the dynamite into the keg, clearing the flag, instead of first opening the door on the second level. It's so very easy to do this! Cheats make it easy to un-stuck yourself at least.

Despite the previous scroll, the second level's initial onslaught is a lot kinder to players. All that ammo collected on the previous floor had no real use by the time it could be reached, so players can actually be well-equipped this time. The layout of the cave benefits players as well. This time the long hallways are populated with ruffians that won't be shooting projectiles through the darkness. Although you can still be surprised by their appearance in torchlight, the odds are good you'll be shooting down halls that are just a single tile wide, hitting every shot without fail.
There are some more wild tigers protecting a few valuables once more, but relative to the player's starting position in the northwest, their movements are going to keep them trying to move north or west towards the player, keeping them reasonably contained until players explore the right third of the board.
The screenshot with the lights on and the invisible walls revealed also shows that there are two health potions available down here. What looks to be another spike trap by the left potion both is and isn't. The previous level used objects that detected when the player was next to them, displaying a game over message about David's impalement when activated. Here, Rivera just uses pushers that are temporarily blocked by invisible objects which vanish when the potion is touched. Either way, players caught will still have to reload a save. In this instance they're trapped in place rather than having their health removed. It's less descriptive and slightly more annoying have to confirm wanting to quit the game this way, making it a strange step down for a game that previously was committed to descriptive text whenever possible.
The other potion has no discernible way to reach it. It will be visible in torchlight when the gems on the right are being collected, giving players a hint that there's more to the walls of this level than meets the eye. You could also make the argument that one of the trees in Mystery Woods mentioning a secret bonus on this floor is referring to the potion, which while it might get players to bump walls looking for secrets, isn't what the tree is actually talking about.
Touching an entire perimeter in hopes of finding a fake wall has never been enjoyable, and it's even less so here where it means covering less ground per torch lit. I opted for the file viewer to just point me where I needed to go, lest I otherwise just reload a save instead. The actual entrance is all the way up top at the start of a short ping-pong-path of invisible walls. Once again, actually benefiting from this hidden item requires sacrificing torch time.

A new floor means new boss monsters to deal with. Worms out. Spiders in. There's a little less excitement with them. Their doors lack the warning signs from the previous floor, and the creatures don't talk so they come off as not as spectacular a creature to do battle with. They are still far more difficult than they needed to be, so there's consistency there at least.
As with the worms, the spiders require players to have a saber to be able to do damage. This sort of equipment check seems like it shouldn't be necessary since players had to have a saber to get this far. I only bring it up because players have to have a saber. David can get enough gems on this floor to be able to buy himself a short sword, and should he do this before actually defeating all the spiders, they'll be invincible to the stronger weapon, creating another potential reset.
The spiders are split into two rooms here, one with just one spider, and this one with three. They behave basically the same as worms, though they obviously don't have a fire breathing attack. Instead they throw a web at you. By throwing a star. No refuge here.
Well, there is one saving grace. A coding error that finally goes in the player's favor. The first time David swings at each spider, the objects aren't coded to return to their combat loops. The strategy is definitely to hit two spiders once and ignore them afterwards so that you really only have to deal with one of them at a time. To compensate, Rivera's spiders maintain the issue with the worms where a successful blow means a star in the player's face and a single-cycle window to escape from a follow-up bite. Players have to have enough health to deal with three spiders before they can leave the room, so you may want to drink both potions before playing exterminator.
There are no invisible walls or spinning guns at least!
When defeated, the spiders give the player four gems, and turn into one as well making them a great source of cash, necessary to buy the short sword that's needed for the true obstacle of this level: The Evil Knight. Even getting that far is quite the stretch. I had so very many game overs, and even in instances where things seemed to be going my way, it takes so little to just suddenly lose it all.

At least somebody still gets a cool sign.
I did head into the fight with just a saber the first time to see what would happen. The prose makes a return here, and the room itself gets amped up via some dead bodies and what I suspect is meant to be a golden throne that the knight sits on.

It certainly establishes the knight as the most fierce foe seen thus far. Any attempt at melee breaks the saber, with bullets still being a non-starter.
My screenshots get a bit messy to follow, with all the half-finished attempts at fighting spiders and the knight, and playing was just as confusing. Did I buy the short sword yet? How many gems can I actually spare? The answers are no and not enough. After one failed attempted I figured maybe I could try and spend some money back in Tre 'La at the inn for extra health. The inn is actually a mandatory part of Adventure, and the specifics will be shown later, but long story short, the game does not provide enough gems if you pay for anything other than the cheapest room that restores the least amount of health. It might not even provide enough if you use the inn at all. So this is a good time to mention that I never purchased a health potion or ale. The inn was the only time I paid for health and it cost me the ability to complete the game.
And yet, that health gave me just enough health to actually survive the fight! It should come as no surprise that the fight with the knight has plenty of near impossible to dodge attacks. This is when I finally broke down and cheated for fifty gems (via SolidHUDs modified cheats) to be able to buy the short sword while still having my nap at the inn. A fun thing to do for the rest of this article is look at my gems count and subtract fifty! (Or thirty if you want to pretend I didn't stay at the inn.) My one time cheat solves all my monetary woes, but consider what would need to be done to actually have the proper amount of cash.

Despite having no magical powers, fiery breath, or webbing to their name, they still are able to throw stars, just without any attempt at explaining the attack. You can't catch a break in this game.

There's not even the satisfaction of a victory. The knight flees at the last moment leaving the player with nothing more than a key to the next room. The level isn't over yet.

The lower left corner has two locked doors, with one key coming from the knight, and the other from the spiders. Rather clumsily, the spiders' key doesn't show up until you touch the door to exit the room with the three of them, and the key appears in a spot outside of torchlight making it easy to miss if you don't find yourself wondering if there was supposed to be more of a reward than just some gems.
When the first door is opened some bullets are fired by invisible objects that bounce between two ricochets. It's a basic trap that's easy to get past unharmed.

The additional room on this floor is just to house this tiny room with some blink walls and the next stick of dynamite. The scroll is a little nicer as well, simply wishing the player good luck on the next level.

Floor number three is kind of a relief from the terrible melee combat seen in the previous floors, but it doesn't mean that players can expect to free of misery. All that extra ammo Rivera has been providing finally gets a chance to shine as the bulk of this floor is made up of built-ins, with just a single boss to deal with, that is actually not quite as awful as all the rest.
The theme for this floor is locked doors and hunting down their keys which also makes this floor the first completely linear level.

With the other paths locked away, the only way forward is into the middle of the board where the boss of this level lies.


The invisible walls return! There are some lions as well making the room more threatening than just facing off against the ice monster.

Of course, nothing is ever easy in this game. Sure, all the weapons needed to complete the quest have been purchased, but there were some funny colored rings for sale in the item shop up top! It's another instance where if you challenge an enemy without a critical item, you just lose. There's no opportunity to retreat. You can make the safe assumption at this point when you see a large door with a warning message that there's something required to survive, but players that do turn back before entering have a really awkward path through the caves. They finish the second level, head to level three to pass the dynamite check, head back to the top level to insert the dynamite into the powder keg, head down to the third level again to see the door and realize they need an item, and then head back to the top level yet again. That's a lot traveling, and a big part of why Adventure starts off as such an incredibly slow game.
Then there's the question of which ring is the correct one. Is it red to counter ice with fire? Or is it blue to absorb the ice? While David can chat up that shopkeeper, they can only learn about weapons, with the functionality of the rings being left unstated. The pricing should be a hint that Rivera wants players to buy a blue ring first as it's the cheaper option, though the red ring is listed first in the list of items for sale. I was properly fed up with the game well before this point, and as soon as I was killed by the ice monster just immediately checked what item it wanted to avoid buying the wrong one.

The blue rings works its magic, allowing the fight to proceed where it actually feels different than the previous boss encounters. The ice monster actually shoots bullets rather than deflecting the players' which are instead just absorbed. Attacks are countered with bullets instead of stars so you can actually defeat them in a reasonable number of attempts. The next-to-last attack causes a brief moment where the monster runs at cycle one and will throw an almost overdue star.
The more reasonable design doesn't have all that much of an impact when you're fighting them with just eight health though, so there were still plenty attempts to be made. Had this been an earlier boss, I might have given Rivera the benefit of the doubt, just considering this to be a very challenging game, and not an impossible one.

The reward is the key to the left side of the level where a bunch of impatient enemies have been waiting for their turn with David. Still near-death, the only real option is to play perfectly (or cheat). The path is a little bit wider too so your shots can miss. Careful pacing is required to get through in this state, but it's a cakewalk compared to all the objects fought thus far.


The doors on this level give enemies plenty of time to pile up so even opening one can just result in your death for choosing the wrong cycle to move on.

Also, the entire time on this board you're hearing a duplicator going off, a sound that induces feelings of absolute terror when health and ammo are so limited. While the ammo reserves were doing well, and there's more to collect on this level, those reserves go by fast, returning things to how they were on the first level with every shot needing to hit its target.

The final push leads to the next stick of dynamite, requiring a few battles with bears to not immediately be attacked after grabbing the items in front of them. In a game with better resource allocation, I'd be fine with shooting a gem over risking my health. Here, the ammo count is so low that spending two shots isn't worth it, nor is losing a precious gem.

For one last twist of the knife, there is a health potion on this floor that the player can never reach. A single gem and ammo pickup also can't be accessed in this small chamber which lacks any fake walls or hidden objects that open it up. Looking at the fake walls on the board, there is one by the room, but it's one tile too far to the left. This is twenty-five health that players can only stare at longingly.

Learning from past mistakes, I headed to the final floor to open its door with the dynamite in hand, then headed back up top to buy the red ring. The shop keeper will buy back the blue ring back for nine gems, knocking off roughly half the price of the twenty gem red ring that will undoubtedly be needed for the cave's final floor.