I have never learned a lesson in my life, and as such after playing Adventure Part 1 and being astounded at how a game could be so cruel, and then somehow turn things around enough to be a pretty enjoyable game overall I immediately begin thinking about the sequel. Would I ever learn? Even if the original Adventure might have gotten better as it went on it still had its share of awkward bosses, bugs, and ways for the game to suddenly end. I didn't even have the excuse of nostalgia for it, with all the good parts of the game being locked away from me for years.
I simply couldn't deny that the game, partially because of all its flaws was one of the most captivating ZZT experiences I've ever had. Every step of the way I was waiting to see if it would relapse into its initial torturous ways or continue to get better and turn into a memorable game. With a little bit of time passed now since that playthrough, I can more confidently say that Part 1, while it gets good, never gets great. Were it not for the harsh start it would be an enjoyable game that probably wouldn't be considered a classic.
As for Part 2, well, after the experience of the first game I knew that if I didn't get to it right away the odds were good that I would never actually check it out. Lo and behold, I wound up with more than 10,000 words on the game written before realizing that it too needed to be split in half like its predecessor. Much of what applied to the original game's design has been set aside. In Part 2 there's no guild. No cave excursions that take an hour to get through. No wandering around mountains with enemies scattered carelessly. This is a game that looks at what it did well the first time, and commits to doing it even better this time around. Part 2 could very well have been one of the all-time greats. Rivera was surprising me left and right with well designed dungeons, varied castles, pretty scenery, and a story that kept me hooked, especially towards the end. That's not even getting into some of the bigger surprises in the game that have done so much to redeem Rivera's name in my eyes.
Good intentions alone however, are not enough to make a masterpiece. Rivera bites off more than he chew with this one, leaving players with a game that's fun to play from start to finish, only to have enough coding errors scattered throughout that it can't stand with the giants. Players will find themselves repeatedly needing to open the cheat prompt in order to see it to the end. Game-breaking bugs do plague this game, but there's more to it than that. Some of Rivera's truly ambitious designs aren't quite finished, calling back to the first game's early boards where if you don't do exactly what Rivera wants, you'll wind up unable to proceed.
At least this time what Rivera wants isn't supposed to be the only way through. Adventure Part 2 is game full of choices to make. There's no doubt in my mind that he wanted to cover every possibility he could conceive of while giving players the freedom to do whatever they liked whenever they liked. He just didn't seem to have the energy to get it all together in the end. It's much easier to feel sorry for him here, with an impressive game besmirched by bugs. Adventure Part 2 is a would-be classic that winds up becoming a game best enjoyed by ZZTers experienced with digging through code.

Choose Your Own Adventure

The defining feature of Adventure Part 2 is its unique style of non-linear gameplay. Typical non-linear ZZT worlds like Town of ZZT or Nightmare present players with an open world that can be conquered in whatever order players choose. These games provide different experiences to players that choose to tackle the paths in a different order in subsequent attempts, but in the end everything will be seen by the time the credits roll.
Adventure uses the much less common form of ZZT non-linearity where the choices players make will lock them on to one of multiple paths. Almost immediately after starting the game players will arrive at crossroads with the choice of whether to head to the kingdom of Liondellia or the kingdom of Xranth. The leaders of both of these kingdoms won't agree to an alliance until the player completes a quest for them. These quests are unique, and whichever one players accept first will be the only one they get to do. This is something I can only recall having been done before with The Lost Pyramid giving players the choice of two one-way paths with a different set of challenges to complete to reach their goal.
Designing a ZZT world around this really means committing to the idea that players will enjoy your game enough to want to play it a second time to see what they've missed. After the many missteps seen in the original Adventure, with its poor combat systems and lack of resources, this is a very tall ask of players. Rivera's capabilities certainly improved as the first game went on, and the trust earned in the latter portion of that game is still maintained here. Thanks to the significant improvements in resources, the idea of playing this one a second time isn't all that absurd.
It gets a bit more complicated than just picking between which kingdom you'd like to visit first though. After finishing up with these initial two kingdoms, players are soon presented with another one-time decision that impacts the rest of the game, further complicating the way the game's story unfolds from playthrough to playthrough. As you'll learn in detail in the next article, Adventure Part 2 has its share of bugs, and they end up having an unfortunate impact on some of these choices. One choice ends up determining whether or not players can complete the game without opening the cheat prompt. Another whether or not they'll encounter bugs which require considerable effort to work around.
And then there's a character that tries to serve at the mediator for all the player's choices to properly keep the game's state on track who struggles to do so. You'll almost certainly have to open the cheat prompt regardless of how you approach the game.
Supply Chain Issues During These Unprecedented Times
One of the (several) complaints I had about the first Adventure was that the shopping situation was so dire. The first part included the inn and a store in the starting village of Tre 'La and the two more shops on the top level of the eastern cave. These shops had lousy pricing for what you could purchase, along with numerous mandatory purchases that made it difficult to justify spending your money. Things only got worse after the eastern cave was destroyed, reducing the game to just what Tre 'La offered. While the players funds improved afterwards, the only way to get back to Tre 'La to spend any of that money meant a very lengthy trek essentially backwards to the very start of the game.
In Part 2, Rivera still mismanages things. Three of the kingdoms visited in the sequel have stores available, and for the kingdoms that don't, there's generally a good reason players can't buy from them ranging from being overtaken by the Shadow Master's orcish army or being on fire after being attack by the Shadow Master's orcish army. What shops can be utilized continue to be unhelpful overall. The improved balance of the game means that players will be able to avoid being anywhere near as desperate for items as they frequently were in the first game, but now that players are given the chance to buy items regularly, it feels frustrating to see that the prices make them almost meaningless to include.


During my playthrough, the most gems I ever had on hand was sixty-five. Not even enough to buy two healing potions throughout the duration of the entire game. Those potions only heal twenty health as well, being an awful return on investment. Though they're still leagues better than the ales which restore just a single hit point so perhaps I shouldn't complain too much.
The only purchase players might want to make is for some rope, though even that item only comes into play in a single situation that's dependent on going to Xranth before Liondellia. Each shop includes a joke option of a sold out key that would be used to open up the various doors in the castles that players are purposely locked out of. These shops aren't worth the gag.
Thankfully, unlike Part 1, Part 2 doesn't require players to make any of these overpriced purchases in order to get through the game. Thanks to the generous donation of some legendary weaponry from the old man in the first game, players are also of the hook for buying weaponry to defeat certain enemies. This means that while the shopping certainly won't be satisfying, players are free to buy whatever they like with the little money they have without having to worry that they'll be unable to complete the game because of it.


As the story-line unfolds, it only gets worse. Eventually players are cut off from the game's first kingdoms entirely, leaving them with a shop whose prices are so absurd that even protagonist David Daron himself voices his opinion on the matter. I don't think it's even possible to get this many gems to use any of these shop functions, but if you find a way to, Rivera will let you make the purchase at these prices.
To his credit, this final shop is linked to an in-game event where the king requests that the shopkeeper give out some provisions freely. There's still a protest though, as he has a short spiel about how everybody in the castle is struggling and paying what you could for the items would still be helpful. David Daron, with his moral alignment that can only be described as "lawful-goody-two-shoes", is given the option to exchange all his gems for the supplies. Players have to benevolently accept the offer if they want to get anything at all.
United Kingdoms Part One
David's quest, as given to him by the old man from the previous game, is to defeat the Shadow Master, an evil being that wishes to conquer the world by force. This task falls onto David's shoulders as he's in some way the chosen one, though no character ever goes so far as to say those specific words.
The Shadow Master, while hyped up quite a bit in the first game, didn't really make much of an appearance short of running off in the starting cave. In Part 2 he has no presence at all, expressing his power indirectly instead. The threat to the world is made rather clear even if he's missing in action as while he may not show up, his newly raised army does. From afar the Shadow Master commands an army of loyal orcs that are all too happy to loot, burn, kill, and repeat as needed. The only way the army and Shadow Master can be dealt with, is to unite all the kingdoms of the land under one banner lest the world as David knows it be plunged into an age of darkness.
David gets to be the hero capable of dealing with any threat the army or other nefarious characters can muster. Despite his skills as demonstrated in the previous game, his role often comes across more as messenger than hero as he travels from kingdom to kingdom seeking an audience with each ruler. He'd hardly need to do anything heroic were it not for the constant demands of these royal figures. Everybody's iffy about the alliance until David can do a few favors, mostly recovering stolen treasures. As his reputation is established, other kingdoms are more willing to take him at his word. Surely the kind of person who fought with the goblins and battled a troll must be worth listening to...

Like Part 1, which splits the game up into two major chapters, in the sequel Rivera also divides his game cleanly. Players initially are limited to Liondellia to the west and Xranth to the east. Not long after these two kingdoms have accepted David's proposal to unite to defeat the Shadow Master, he'll be able to get beyond the southern gate which holds three more kingdoms: Winchester, Arantinuel, and Angmar.
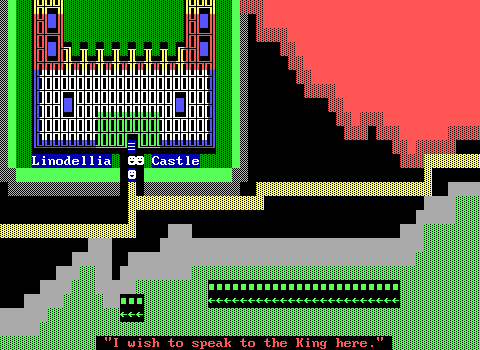
Liondellia

Of the starting kingdoms, Liondellia is probably the more likely starting point for players at the beginning of their journey. A trip to Liondellia castle means passing a pleasant green forest, and sticking to a well-established trail as opposed to Xranth with its harsh marsh. For an added sense of continuity, the path continues beyond the castle, but players are prohibited from heading in that direction. It happens that the road leads back to the kingdom of Zahn from the first game, which has already been convinced of the need for an alliance. Given the size of Part 2's map, the idea that it could easily connect with the original game does wonders for making players realize just how vast the setting of Adventure as a whole is meant to be.

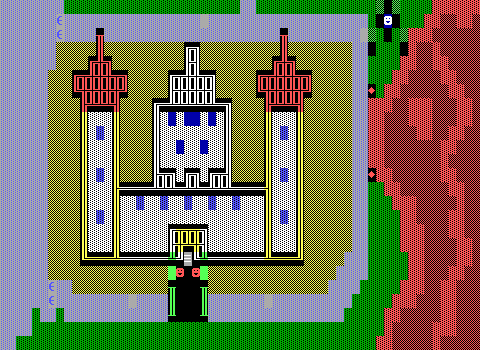
The interior of Liondellia, and all the castles really, are patterned after castle Shre-La[1] from the first game. There's a lot of decoration off in the corners, and its all deliberately placed behind doors which have no key, allowing castles to look like busy populous places without Rivera having to spend the time coding all these areas that have no impact on players or the game's story.
When not designing inns, Rivera seems to have little interest in making players spend a whole lot of time touching everything on the board just to fill the world up with objects. By keeping players focused on their quests and goals, the game feels like it's always moving forward. It's kind of refreshing to not have to check every painting for the novelty of it.

The incredibly terse non-essential dialog can be kind of funny at times. A few NPCs meander about the castle in fixed patterns, yet this is the only one that can be talked to, and this is all they have to say. Rivera makes it quickly clear that there's nothing to see here. Just get on with the questing already!

But Rivera also can't resist a joke. There's one instance here of an environment that can be explored more in-depth. I managed to catch that one of the doors had a black background and must be an object instead. This is the sole castle door in the game that can be opened, all to fit in some of that iconic humor seen in ZZT worlds.


There's a legal obligation to include a toilet in every ZZT world. Not even Rivera is an exempt. Even with the moments of humor seen in the first game, I would have expected there to be toilet humor in the form of barging in on somebody!
"Welcome to my castle! I see you used the
password to get in, so you must have some
important business to tell me."
"Yes, I am a "she". The password, 'King'.
Everyone knows a Queen rules here, so
our password is King. Did you not know?"
"Aha, so luck saved you this time! If you
had requested to see the Queen, the guards
would have struck you down at once. I
do not wish to join with any other
kingdom, but if you perform a small
service, I might change my mind."
"Wonderful! The family Scepter has been
missing for quite awhile, due to...
unfortunate circumstances."
she pauses.
"If you can retrieve this item, I will aid
your cause. Take this key to open the path
in the mountains. Goodbye and good luck."
• • • • • • • • •
David is revealed to be incredibly lucky. The queen only allows those that know the password to be allowed into the kingdom. David lucked into it thanks to his patriarchal biases assuming that surely a man must be in charge. It's a bad password regardless.
After laughing off the fact that he was nearly executed on the spot, the queen quickly changes the topic to the stolen royal scepter and how its recovery might get her interested in this alliance thing. Reluctantly David agrees and receives a key to the mountain fortress where the scepter is likely to be found.
When David accomplishes this quest, she'll agree to the alliance and write up a scroll for David to present to the king of Xranth to get him to do the same. All of this is dependent on David talking to Queen Liondellia before the king of Xranth.
Alternatively, players that head to Liondellia second will have a scroll from the Xranthian king and be able to use this to convince her to join without proving your worth.
The Mountain Fortress

Recovering the scepter means climbing the mountains David had been opting to go around to reach the castle. At one point the path splits with another road leading up the mountain, but only after clearing out some breakables to clear a path. At the summit, players will be put into another action screen which adds blink walls as a new obstacle to overcome. These blink walls end up making things easier for the player as they're positioned in a way that the enemies on the board will ignorantly wander into them and be destroyed without players having to lift a finger.
David's job is instead to find a way up the fortress itself. The ground here is prone to rock slides and the path is obscured by rocky terrain necessitating finding fake walls and shooting through some breakables to make it to the fortress itself. Unlike Part 1, there's no instant death from quicksand or causing a rock slide here. Players need only to uncover the path through and nothing more.

Blink walls can be tricky since ZZT's system for timing them is difficult to understand without seeing it in action. Blink walls have a start time to fine-tune when they toggle state, but how much time is needed for a player to cross, especially horizontally like this is mostly a matter of trial and error. Rivera does it right here, with players making dashes towards the source of the ray and quickly stepping out of the way before getting hit.

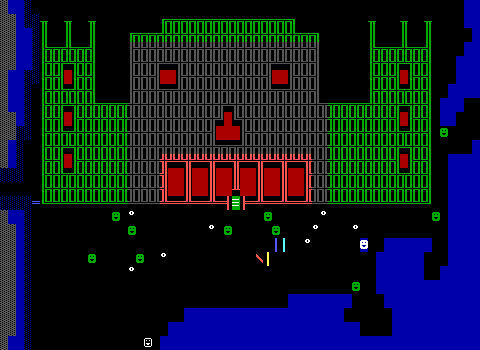
As for the fortress itself, it seems to have fallen into disrepair over the years, and has now been retaken by nature.

The walls of the fortress are crumbling and earth has come pouring in. Rivera does a fine job creating a memorable scene as players in the dark slowly discover now-buried skeletons, get attacked by giant centipedes, and even come across a skeleton that died from an arrow trap. It looks like many have tried to conquer the fortress before, and none have succeeded.
If there was somebody running this place before that stole the scepter, they're certainly gone now. The scepter can be found almost immediately after entering, looking like easy pickings as long as you can deal with the centipedes. After touching the item however, another trap springs, locking the door and shoving the player into an enclosed area where the only way out is through.

Survival is the challenge rather than an elaborate boss battle with some thief. Players arrive in the lower right corner of the catacombs and proceed down a hall with some "spooky!" text. In Part 1, Rivera's use of text like this was very haphazard, and I felt it was out of place compared to the serious prose used in text boxes. For Part 2 my feelings on it haven't really changed. This time Rivera is better about using it to label locations so players know what castle they're looking rather than silly messages like this one or letting players know that a room filled with lions is the lion room.
Admittedly, it did give me a laugh thanks to the text only appearing when players have gotten near it with a torch ignited.
What follows is one of the most challenging action sequences in the game, which again, is a statement of how vastly improved this game is compared to the original. It can be tough to tell, but the doors here are of different colors so players need to get through the board in a specific order, starting from the left. Most of the fighting comes from lions and tigers, with some statues as a unique gimmick for the fortress.

When touched, these statues will do something. Most frequently, turn into a tiger, which depending on the cycle the statue was touched may get the chance to immediately move into the player and harm them. There's no way around awakening statues as some of them turn into the keys needed to advance deeper into the catacombs. Making matters worse, when shot these statues will throw a star. In the darkness players may accidentally miss their target and hit a statue instead, but the real thing to worry about is how often the board's tigers will shoot them.
To try and ease the player's troubles Rivera provides a healing heart and a potion which provide twenty and eighty health, enough to mitigate the damage as long as you live long enough to reach them. One of the statues is unique and gives players some ammo instead, which from its placement is probably due to the fact that players can ignore the area entirely, so this rewards them for exploring thoroughly instead.
The scariest aspect of the board isn't the stars hurting the player, but running into one of ZZT's own bugs where it's possible for stars to crush tigers in ways that lead to odd behavior. You might witness a star managing to move across a solid wall, or run into the ever-threatening super tigers where a tiger takes on a star's data and begins moving at cycle one and shooting constantly. This is kind of a situation where you'll likely just have to reload due to the sheer number of enemies and how quickly you can be killed from a distance by one of these tigers.
It all manages to work out in the end. An unwarranted reload from stat issues means players retreading ground will know which statues have the keys and be able to avoid the rest. Yes, it's kind of messy, but it still manages to be a fun dungeon and serve as a pretty good introduction to what Adventure will ask of players in this game. Some effort plus tolerance for some bugs.
At the end of the second board, the passage leads back outside and players can head back to Liondellia to return the scepter to its rightful owner.
Xranth

Players that instead opt to start with the eastern swamp will eventually reach Xranth. At the very start of Adventure Part 2, the player's ammo is still fairly limited. Traversing the swamp requires a lot of shooting out paths by destroying breakable walls. While enough ammo is provided for players to make it thorough, it does feel more challenging, with much less margin for error. It's very easy to just see the very first board of swamp and "Nope." all the way to Liondellia instead.

Where it gets interesting is the gate just outside the castle grounds. An Xranthian guard is loaded up with checks for various events in the game to determine a number of different possible conversations to have. Players that start by going to Xranth will listen to David and the guard discussing his quest to unite the kingdoms, allowing him to pass freely. However, for those that have the Queen Liondellia's scroll, David instead explains that he has an important message for the king. In response, the guard explains that all messengers must first complete a quest before entering. It's another case of stolen treasure, recovering the crown jewels from a troll to be found in a cave within the swamp.
If David is able to go directly to the castle, the king will have a different quest ...also to recover the crown jewels. Rather than sending David south to the troll's cave, they'll be tasked to recover it instead from the goblins in the western forest players pass on the road to Liondellia.

Xranth's interior is essentially just a repaint of Liondellia, offering a nearly identical experience[2]. The shop is too darn expensive. The majority of rooms are just to insinuate that the castle is larger than what players get to concern themselves with, and the king is happy to join the alliance once David has proven his abilities, whether that be in the forest of the goblins or by having already aided Liondellia.
Unlike Liondellia, the king isn't the type to have anyone struck down that doesn't know a password, instead opting for the guard at the gate as his main line of defense from solicitors.
The Swamp Cave

Players that need to visit the swamp cave before they can enter Xranth will find themselves in a winding dark cave that matches the motif of the swampy region they're made their way through already, but with far more traversable paths. This allows players to focus on the action rather than tunneling their way through in the dark. As with the fortress, this is another linear design. It's a lot easier to make your way through though with centipedes being the main enemy and the water providing effective cover to shoot at them while being protected from harm.

Which isn't to say Rivera doesn't want the player to do any more tunneling. The second board is almost exclusively digging through the swamp to reach the lair of the troll that resides within. The board potentially could have been a fiasco with players running in circles trying to find a valid exit. Rivera manages to prevent this by carefully spacing out the ammo on the floor to guide players forward even with their limited amount of light. Though unlike the outdoor swamp boards, the walls and water are spaced much more loosely, allowing players hoping to find secret passages or supplies to waste a lot of ammo going towards the board's boundaries.
Once David makes it through the muck he still has to contend with a number of spinning guns that cover hallways so narrow that there's no hope of dodging. Either you cross safely or you take damage. Rivera has tuned the guns to use the lowest firing rate and middle intelligence so while this sounds like it could be another source of contention, none of these guns managed to actually land a hit on me. That's good for my health, but that it made the guns feel like a needless inclusion. I'd much have preferred some objects in a slightly wider hallway that fired in a fixed pattern, turning the hallway into a test of dexterity rather than one of luck, even if the odds as things are are significantly in the player's favor.

The troll's den gets some very ZZT labeling and gameplay to match. Adorning the walls are torches that flicker and keep a room lit for a change. Another short obstacle course awaits before David can fight the troll, taking him through a far nastier gauntlet up top with blink walls and spinning guns that shoot at ricochets. The idea is to tread carefully, waiting for your moment to advance past the next wall or two and stop in a safe column.
It certainly doesn't go that way. These guns fire slightly more than the previous ones which is really all it takes for them to become a threat. With no room to dodge while the blink walls were firing, I found it best to just ignore them and try to cross the room as quickly as possible. David is rewarded a few meager gems at the end, which aren't nearly enough to make up for the health loss. My first attempt saw me dying on the way back with my second attempt faring better. So it's still luck above all else here, especially with the ricochets adding longer delays before a crossing is actually safe, but now luck is working against the player.

The right side plays better, using conveyors to force players into a series of blink walls whether they're ready or not before another ricochet and gun crossing comes into play again. This time there are gaps of safe spaces that allow players a chance to wait before making their move. This time sliders must be pushed out of the way to make it through. These sliders themselves can offer protection from the guns as well, which helps make this a much better execution of a similarly-styled challenge.
At the end this time are a few purple hearts to restore twenty health each (and yes, they do play the extra long Caves of ZZT heart jingle) plus keys allowing them to escape safely via transporter as well as to enter the troll's throne room.

The troll was the first boss battle of Adventure Part 2 for me, so I was rather nervous if Rivera would fall back into his old habits.
He doesn't!
He plays like the bosses of previous games, requiring sword attacks to defeat and often retaliating to them with stars. Unlike the previous game, Rivera actually locks the object after each hit and makes them step away from players before firing back. This does an excellent job of keeping players from just mashing attacks until they win regardless of the damage taken. Since the main loop doesn't add more stars, it's perfectly acceptable to get in, attack, and get out, playing evade the star (and troll) until the star dissipates and it's safe to attack again.
When defeated, he drops a key to the vault in the next room that holds the crown jewels and some regular jewels. The ricochets are also turned into regular walls as well? I do not understand why.

Before reaching the exit players need to be sure to raid the vault! Don't be outsmarted by the troll though. The gems are fakes, triggering booby-traps if touched that cause the walls of the vault to endlessly shoot inward. It's a death sentence and you won't get anything out of the attempt. Props to Rivera for calling these objects "Troll gems", not knowing how prescient a description that would become.

The world's most obvious trap is revealed when the crown is touched. Not swapping a few gems out beforehand causes the pedestal itself to begin moving and shooting! If you made a grab for the gems and then raced to the crown, the situation only gets worse.
I was surprised Rivera didn't prompt the player for how many gems to put on the pedestal. Five gems are taken away and placed onto the pedestal instead. From there, the crown can be delivered to the king of Xranth. Bad luck if you're broke, though the gems on the previous board alone are almost enough to make the swap safely.