Well here we are again. It's time to finish The Silly World of Dan Shootwrong once and for all.
In part one we checked out the church, the house, the horrible horrible sewers, most of the northern park area, and the eastern military base. That's been enough to reclaim five of eight pieces of the vandalized statue of Mr. Shootwrong. The body (from the house), the left leg (from the septic tank), the bow (in the Rat Trap), the right arm (in the back of a military medical tent), and the right leg (which I never mentioned in the previous article, but it's just found on the starting board by examining the wheelbarrow).
So that leaves our hero here in the middle of the town still in search of the head, the left arm, and the arrow. On paper, that should mean we're more than halfway through this unforgettable adventure, though with the amount of backtracking that's both mandatory and due to my own (un)intentional exploits, it's hard to really say for certain.
In addition to showing off the rest of the game's statue hunt, I also want to spend some time on a few humorous moments the game has to offer that I purposely neglected in the first half. They're not enough to change my overall opinion of the game, but they will make it clear that Shootwrong really had the potential to be a regarded as a lost classic.

Time to get a move on then. Right now, I'm out of keys, and out of leads.
The Most Beautiful Words In The English Language: Cellar Door

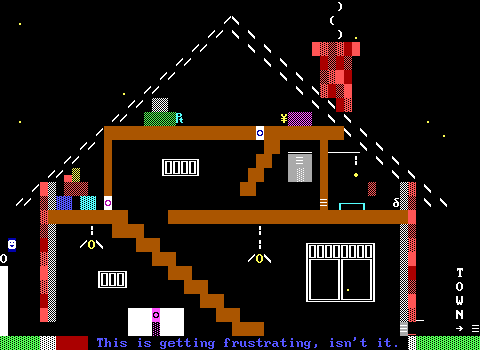
I've never actually been truly out of places to go though. After all this time, there's still a part of the house that hasn't been explored. Not the locked attic, or the password-protected mirror, but the basement. From the very start of the game venturing down here has been an option, you just have to realize that it's there.
In my case, this is communicated by the custom HUD I use outright displaying that there's a board to the south here. From there it's just a matter of finding the fake wall and heading underground.
Thanks to the generous design issues seen throughout Shootwrong, it's easy to see something like this and assume that it's some awful secret without the slightest indication that it's there in normal play, but this isn't really the case. There's no need to make up complaints when Shootwrong is happy to provide plenty as-is.

Firstly, way back in church the usher will hint at checking under the doormat for keys. (I'm lost as to what the HH in parenthesis here is meant to mean.)

Second, the septic tank also leads to the basement via a one-way exit. Granted, this board really isn't designed to give the player any ideas that there's more on one side here (and only on one of the two tiles). Although, the fact that you can't return to the sewer maze makes this a safeguard for players who didn't pick up the greasy mess in the maze that's needed to drain the tank and access the passage exit.
Anybody reaching the tank and finding themselves unable to head north is likely to assume that they're just stuck given what they had to put up with to get there though.

But enough of how to find out that it exists. What's important is what's actually down there. The basement continues the sideways perspective with a flying player technique seen in the house as well, with some brown stairs made of text leading down into the darkness that the player may opt to follow or not.
Torches are readily provided, which is a pleasant surprise. I would've expected to demand the player buy some from the shop.
There is a safe here in the wine cellar
and in it is an item you may need. There
is a red block at the other end next to
the "P" in the word PUSH. Don't push it
until you have set the combination by
pushing the purple blocks. You get only
one try. If it is wrong you have to
restart (or restore) the game. MORE>
You might use the pause button (P) in
order to save torches (there are more
torches for sale at the town store).
• • • • • • • • •
The wine cellar consists of just this one board, and it's one of those rare instances where I don't have a single thing to complain about it, all thanks to this scroll on the steps that provides hints on how to figure out the combination. I appreciate the added suggestion that you can pause to get a look at the player's surroundings without the torch burning out as well, though the torches in here are more than enough figure out the combination without the technique.

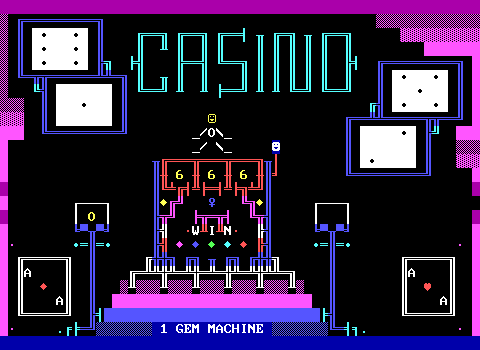
What Clark has done here, is rather clever. The safe in the medical tent seen in the previous article was a fully digital design with each digit entered by touching a dedicated object. Here he's using the design as seen in Town's bank. This is a deliberate decision as what it does differently is allows the player to actually see a bit of the sliders and boulders used to actually open up the main door.
This is no guessing game as in the abundant vaults of the LandLand games. This is a puzzle of deduction. The player is expected to move into the grooves on both sides of the vault and count how far the boulders they can see need to be pushed down to line up with the horizontal pusher/slider chain that's just outside of their visibility. You can see that the first digit's boulder needs to moved down four spaces while the second digit needs to move down six, cluing the player into the first two digits.

From the other side, the last digit can be directly determined as well, ending the combination with a five.
4-6-X-X-5
According to the clues, no digit is repeated, and the digits add up to eighteen. This limits the possible numbers to 0 + 3, 1 + 2, 2 + 1, or 3 + 0. By this point, brute forcing the last two digits is reasonable enough, but you don't even have to do that if you're keeping your eyes open the entire time. The digits adjacent to the unknowns are a six and a five, so while you're inputting those numbers, you're moving deep enough into the device that you can see the remaining boulders and get the last digits.
This is a great take on Town's vault! It offers a distinctively ZZT solution to the puzzle, and doesn't require knowing British history. If only the rest of the game could be this enjoyable.

The reward for this is the blue key to the attic! Finally, we can meet the ghost. Additionally, by going underneath the staircase, the player can explore beneath the vault where they'll find a single regular gem (hidden behind the message here) and a red gem that's actually an object that gives ten.
My sole complaint here about this board is just how hidden it is. This could be the very first place the player explores, but only if they think to check for a fake wall. Learning about it requires either getting stuck in the septic tank in which case the player already hates this game, or by spending money at the church to learn about it, thus negating the benefit of these gems.
If the basement's existence was made explicit, it would be a very wise move for the player to begin the game by going here to get some critically needed gems early on to purchase their rope and backpack with. Instead, it's an excellent puzzle that doesn't come up until this game's damage has been done.

Armed with the key, the attic has two objects on display to examine, plus the ghost that appears and vanishes at set intervals.

On the left is some old medicine that the nameless protagonist is more than happy to chug.

At least the results are entirely expected.
Quaffing the poison tells an object to begin slowly draining the player's health. This kind of poison mechanic can be found in various other ZZT worlds, though this is a notably early example of it. It's also quite generous, with the player losing just one health point roughly every 1.5 seconds, as well as only being active on this board if the player happens to run away from the house afterwards.

Which you may have to do if you actually are starting the game here. The antidote is found hidden in some of the stacked breakable boxes. No ammo, no antidote. Unlike the battery which which hidden in a similar manner in the closet on the floor below, the antidote can't be destroyed by shooting it. Alas, if the player does shoot it twice, its code will end up zapping the touch label, preventing it from being used. Here it's a bug, for the battery it's a feature.
The whole purpose of the poison and antidote is just that if you then shoot past the antidote after it's been consumed, you can gain access to the very edge of the attic and find an invisible ten gem bonus. Is that worth the gastrointestinal distress? I mean, maybe early on it is actually.

The ghost isn't as interesting a character as I would have liked. There's something silly about how they fly around in the attic the whole time, wholly appropriate ghost behavior, but then the player just flies up next to them to see what they have to say.

Amusingly, on the other side of the attic is a Japanese coin represented with the yen character. It's a cute little way to make the coin more unique than using your choice of circular characters. (Or an actual cent symbol!) I suppose it's a way to ensure that the player doesn't interpret it as money for shopping with, but this is a game that has consistently been referring to gems for pricing and currency as opposed to games which will use the element and call them dollars, credits, or whatever else.

Well well well well well...

I would never throw my Japanese coin in a wishing well.

In exchange, a purple key pops out. This will be needed to unlock the top of the carnivorous plant greenhouse eventually. Getting to the greenhouse takes quite a bit of time in a non-glitchy playthrough like my own, so it would be a fun flip to the script to have the player lug around a purple key for so long.
Several Hours Bad Luck

It's the boards like this one that make me wonder if Clark just found ZZT too late to submit a board to Tim Sweeney's ZZT contest or if he just didn't care to. This is exactly the kind of board that would have been included in Best of ZZT. It's a self-contained puzzle board, with an incredibly colorful look, clever theme, and it contains no real reference to anything outside of it that makes it ripe for dropping in basically anywhere.
It also fits right in in that it's a dreadful little puzzle that I do not want to play.
If you'll remember my rules from last time, I gave myself freedom in how I got through Shootwrong. If a board could be exploited in my favor, I did so to spare my sanity. The mirror puzzle can be busted in the player's favor, and after learning one of the little tricks the board was playing I felt entirely justified in doing so.
This is a shame because the puzzle is another very clever one. The board is divided down the middle, effectively mirroring itself as best as possible. This isn't a case of two separate halves that look the same until the player starts their work, no, whenever Clark was capable of doing so, any action on the left half of the mirror happens on the right as well. Unlock the three doors, and the objects on the other side (lacking backgrounds due to the game predating STK graphics) disappear as well. Detonate the bombs in the upper left quadrant, and while the ones in the upper right can't explode, they too vanish with the explosion.
The main puzzle itself is mirrored as well, with transporters allowing things to actually desync as items sent from one half of the mirror to the other.

For the keys, it's the ones on the player's side that are reflections. Touching them makes them disappear as they're revealed to be fakes. This is an unfortunate conceit as the object of the puzzle is to shove around the actual keys, but you can't push objects and there's no way to make them emulate the real key's movements.
The goal here is to touch your side's arrows which will then move the reflection's as well. The challenge is to find a way to do so in one attempt as the arrows can only move forward. You'll need to chart out a path that lets the keys be pushed through transporters successfully. This is more involved than it may initially seem as those transporters aren't blocked in the direction they point, so rather than transporting things across the mirror, they'll just push a key in the direction they're pointing until they've been blocked off.
Quite a few number of boulders are here to make it possible to block things off. That's easy enough on the left half where the player can do some pushing themselves, but on the right everything has to be handled with the arrows.

The object in the lower left can be used to destroy the transporters when you're ready. Its mirrored equivalent is the statue's head, though nothing tells you this.

I gave it an honest go and while I was probably not on the right track, I was enjoying figuring this one out quite a bit. Having to compensate for the keys on the right by pushing nothing on the left made for an interesting challenge of tracking everything mentally. If I could get three boulders between the transporters on each side, and then push one last boulder plus a full row of keys I'd have this figured out.
Of course, this screenshot is taken seconds before disaster. Those pairs of transporters both have matching invisible walls beneath them! The cyan boulder the player is standing under here can't actually be pushed north! Why isn't this wall visible? What is the point of doing it this way other than to frustrate the player and make them waste their time? Why does Clark keep doing this?

So instead, I broke his little puzzle.
I pushed my boulders, ignoring the arrows almost completely, until I could cram so many up top that the transporter that the player could travel through themselves. On the other side I could just grab some extras there in order to make it possible to be transported back to the leftmost transporter and walk out. The entire upper half was rendered moot, and I got three keys out of the deal that I wasn't supposed to have, including a red one for the western path (because again, I missed the one in the septic tank and was unaware it was there.)

Also I could at least have some fun shooting the mirror (bombs work as well) which causes the majority of the left half of things to be destroyed.
There was something strange though. I couldn't pick up the head. As the game didn't tell me that's what it was, I didn't think it was anything other than the reflection of the transporter destroyer. I was perplexed. What purpose did this complex puzzle serve if you couldn't get anything but keys out of it, and in a way that seemed very much unintentional?

Fast forward quite a bit as I tried to figure out what was going on here upon looking up where the head could be found.
I did an awful job of getting screenshots when I figured things out, but the end result was that my method of transporting the player across, while demonstrably unintended as indicated by the invisible objects that surround the head, was still a valid one. What wasn't valid was using the mirror's keys elsewhere.

With those keys in hand, in order to get the objects that Clark cautiously coded in to vanish and allow access to the statue's head, those three doors need to be opened as intended. From there the boulder (actually an object so that the mirrored version can be pushed simultaneously) needs to be pushed so that the ricochets can be used to destroy the breakables (again actually objects). This clears a path to the top of the board and allows the player to traverse through the looking glass. It's crossing the top that gets a hidden object to sense the player and remove the objects surrounding the head.
From there the player can grab the head and the wall to the right of the passage will turn into a fake, allowing the player to exit.
Another message will show up at this point saying you're free to shoot the mirror now and see what happens if you like. I think Clark was proud of it.
But I'm more proud that I broke his toys.
It's also worth mentioning that if you do break the mirror early, the passage will remain blocked. Only when the exit path is clear is it safe to do so.