The Silly World of Dan Shootwrong is the worst ZZT game I have played.
That's the clickbait. I have never seen a game simultaneously show so much promise, forward thinking, creativity, and wonder only to always and constantly burn any goodwill that it might foster to the ground. You look at this game, and it's beautiful. The boards are some of the best visuals 1992 ZZT worlds have to offer. The world mixes its art and its gameplay resulting in a journey through the file viewer that will sell you on the game immediately. You will find yourself enamored, unable and unwilling to resist its charms. Then it will bare its fangs and reveal its true malicious nature. By the end of Shootwrong, I was a broken mess. Don't make the same mistake as me.

The Unknowable Bill Clark
To add to the mystery, Shootwrong is not a game of longstanding notoriety. Despite its 1992 origins, this world was unknown for the longest time, only brought to light in 2019. This could have been a moment to share with others. A shining example of what efforts in obtaining and preserving long lost ZZT worlds could give us. It looked like the sort of world that would have immediately become a hit, a pioneer in ZZT's early years that would go on to influence and inspire creators for decades to come.
Dan Shootwrong was found on an archived site that offered an assortment of ZZT worlds in a few bulk zip files. We do not know who author Bill Clark is. All that remains of whatever work he may have done with ZZT is Dan Shootwrong, a name that has become synonymous not with quality, but with ZZT worlds that present themselves as being a quality work which quickly fall apart when actually played.
From playing this world from start to finish there aren't many clues onto Clark's experience with game development beyond this title. A few things about this world stick out, but even they shed little light onto this game's origins. What I can say confidently is that Clark was likely a musician to some degree. Various ZZT renditions of classical music are performed here and there. I also suspect him to be a religious man, or at least somebody whose life overlapped with church often enough to have left an impact on him, but that's best left for the actual church in Shootwrong. Other than that, information is as sparse as it can be. There are no credits listing any now-archaic methods of contact, nor are they are thank yous to friends or testers.
Dan Shootwrong
Things begin innocently enough. As a 1992 ZZT world, there isn't a whole lot out there to take influence from, and as such the game doesn't feel like it's too far away from the roots of Sweeney's original worlds. I would say if anything influenced this world, it's more likely to be some of the files contained within the ZZT's Revenge collection. In particular, Darby's Crazy Town with its central statue as well as both Smiley Guy and its standalone sequel Toxic Terminator. The Smiley Guy comparison is a tad ironic, given its positive and upbeat atmosphere, which stands in sharp contrast to the much more bitter flavor of Shootwrong.

Dan Shootwrong in the game's story is a piece of local history. A man who accidentally shot himself with his own arrow, giving the man a posthumous status of local hero. A statue commemorating the man watches over the town from the town square, or did, until vandals broke off the various pieces and scattered them all over town.
The player's job, as an unnamed protagonist, is to find these pieces and restore the statue back to its proper state. While not purple keys, this is still the same conceit. Unlike Town, or more similar derivatives, Shootwrong's quest differs most notably in that you're never told how many pieces there actually are. This has the unusual effect on the player where they have only a vague idea of how much progress is being made. Finding pieces gives it away somewhat, surely after picking up the "left arm" you'll be finding the right as well. In fact, there are a total of eight pieces to collect, an exorbitant amount compared to the unwritten rule of five purple keys. Two arms, two legs, a head, and a body seem clear enough, but you'll also need to track down both Dan's bow and his defective arrow.
Once again Shootwrong fails to be properly grasped when observed from a distance. The entire game comes in at a little under fifty boards. Still a pretty big world, but hardly a behemoth. Considering the extra pieces to collect, that would line up about with what you'd expect out of Town if it were bumped from five keys to eight. As I've learned from the moment I started counting boards in files on the Museum, they are numbers that can't be trusted. The timestamps on my screenshots for the game reveal that the entire experience was close to six hours of playtime (and that's with judicious use of cheats to zip around an early tedious obstacle). That is massive for a single file ZZT world, and the way it accomplishes this feat is with board after board consisting of slamming one's head into a wall until it finally cracks. (Ideally, the wall does the cracking.)
The worst thing about Dan Shootwrong is that unlike most bad ZZT worlds, where perhaps you can optimistically say that with a bit more time put into development that you might be able to get something good out of it, Shootwrong could so incredibly easily have been a classic. This is a game where tweaks to the design wouldn't just make things a little smoother, they would undoubtedly transform this game into one of the best of the pre-STK era. It's unbelievable to me that this was made in 1992. This is a game that could very well have been the pinnacle of of ZZT games that are one step removed from Town, still abiding by its rules of items to collect to unlock a final reward and giving the player freedom to explore its environment but more complex in terms of who lives in this world and what do they do there. The sting of disappointment after disappointment from this game is unlike anything else I've seen in ZZT.
The Second Attempt
When Shootwrong was uploaded, I immediately wanted to check it out, and promptly tried to stream the world. It was a disaster of soft-locks, restarts, and an utter lack of progress which I had no interest to return to. The idea of replaying this game and actually finishing it this time was one borne out of necessity when a work in progress article just wasn't clicking, and I wanted to play something worthy of an "April Fool'sy" game instead. Shootwrong's modern legacy made it a perfect fit, and while I knew what I was getting into, I still April Foolishly thought that by using all the tools at my disposal I could share this world while sparing my mental well-being.
Most obviously, I wasn't streaming it. When you're on camera, stopping to think means stopping anything interesting from happening. None of that please. This playthrough would be entirely at my leisure.
I also afforded myself some allowances as for how to play the game. I typically try to play ZZT worlds as they are. I avoid cheating for resources until I absolutely have to. I don't go digging trough code until I feel like I'm exhausting my options for what to do next. I wouldn't hold back this time. The moment I encountered the slightest resistance in this game, I ran to the file viewer. Code was studied. Fake walls were revealed. Flags I lacked were traced to where they could be set. Lengthy backtracking would be bypassed with SolidHUD's ?PASSAGE cheat. My only rule was that I had to find a valid solution for any puzzles, intended or otherwise. I wasn't here to provide a pure honest playthrough of Dan Shootwrong. I was here to provide a warning for those who follow.
Again. It still took about six hours. Six hours while knowing immediately how charge a battery. Six hours being aware of what the "mysterious white key" was for. Six hours where every path to a maze's exit was on full display. I cannot begin to imagine the experience of playing this game in 1992 when a lot of ZZTers may not even be aware that cheating is possible.
Small World

After introducing the player to their quest, Shootwrong opens in the town square with four adjacent boards and four buildings. The unique art-style of the game is already on full display. Clark is far more willing than most to use multiple objects to make one thing, and any new player will be quite impressed upon discovering the purple wheelbarrow outside of a brick house. The house itself is doing some rudimentary shading in a pre-STK world. Clark will repeatedly impress throughout this game with his visuals that rival others of the era like Chris Jong.
While all four passages are open from the very first moment, all four of the board exits are actually closed with strict requirements for each one to open, which means that while the player can in theory quickly open up several of them, it's far more likely to not know how to do so and end up making the game feel significantly more linear than it actually is.
The number of times I opened a new path, made it one or two boards down before having to turn around make for a lot of frustration as the celebration of opening the world up a bit more is ruined with the realization that you hardly opened up anything and are once again seemingly out of options for things to do.
The town square provides the player with access to a home, a store, a practice hall, and a church. The west is locked with a simple red door. The north is blocked by the "red twins" who refuse to move until their lost rubber ducky is returned to them. The east is an electronic gate that lacks a battery. Lastly, to the south is city hall, this game's equivalent to Town's palace, whose key can only be found after recovering all eight statue components.

The practice hall serves as a miniature tutorial for how various elements in ZZT work. The player is taught about various items, given a live example of transporters, keys, doors, energizers, and more. Clark is surprisingly welcoming to newcomers, providing information anybody playing a bit of Town will come across quickly, and even going so far as to occasionally add a line to popups that there's more text below if you scroll down.
There's no reason for the player to be apprehensive yet, but it will become clear soon that ammo is going to be tight for awhile. Some text explains that you can experiment with shooting the walls. Reaching each of the purple objects spread out across the room's border will reward the player with seven gems each (save for the already exposed one that only gives two). Money is also tight early on leading to an awkward triage of deciding whether to shoot ammo to get gems, or conserve ammo and be unable to afford some mandatory purchases.

A second room shows some more examples of ZZT elements with a focus on how pushing works along with an introduction to duplicators and even ricochets. A single scroll explains how to interact with objects, teaches the player about shooting over water, demonstrates how hyperlinks work, and provides the critical information about only being able to carry one of each color key. It also reveals that this limitation carries over to statue pieces as well making them fully purple key replacements as they have to be turned in ASAP in order to resume collecting the rest.
The scroll offers a choice of a purple or red key to demonstrate hyperlinks. This is a scroll, not an object, so if you don't pick anything, you don't get anything. Shockingly this is okay, as both options cause invisible objects that only look like keys to appear. Neither may be collected. A fake green key is also used as the example on the previous screen as well.
As a two board tutorial to get your feet wet with what to expect from a ZZT world, this is all well and good. The main issue is that because ammo is tight, a brand new player that actually does go around shooting the creatures or playing with the ricochets is just burning ammo for no reason. Put these things in a game with better sources of supplies and you'd be fine.

With some pocket money in hand, checking out the unlabeled store next to the practice hall seems like a good idea.
The shop is much more alive than most ZZT shops. Several unique items are only available for purchase once. They're represented by objects that disappear when purchased. Stores like this are always a treat, existing as more than just a simple menu of choices stuffed in a vendor object. Some more of Clark's more unique designs are on display with this little two-character stool.

The prices are not looking great. All items other than keys are fifteen gems, which is a pretty steep price right now. Not only is it a large commitment of gems, but the raw economics are rough. 1.6 shots per gem is not a good exchange rate. The torch situation is tough to call at this point. The price is high, but there's no telling how many dark boards they'll be needed for, or if this is something like City of ZZT where torches are deliberately a rare item.

Led Zeppelin this advice ain't.
At this point I was completely unable to buy anything and just left.
At some point I would return to try and purchase a key with the hopes of unlocking the door to the west. You're provided a list of all seven key colors, and every single one informs the player that the store is currently sold out. Thanks.

Everything is moving along just fine so far at least. The prices in the shop are bad, and ammo/gems are tight, but in 1992 it's more surprising for a ZZT world where that's not the case. At this point the safety of the town gives way as the player enters their first challenge.
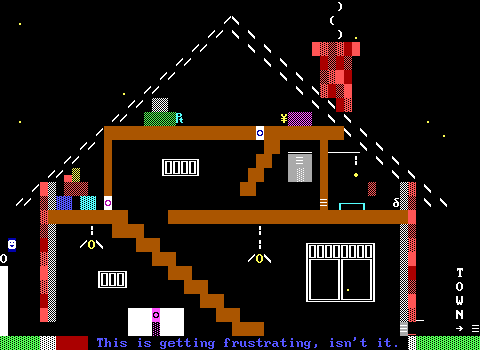
This beautiful house.
One thing Clark does that even this early on gives his games a unique look compared to the rest is a focus on using text for decoration rather than objects. As games get more complicated, this becomes more important to do as you're working with limited board memory and a stat limit that makes pure decoration expensive, yet even when the numbers look good Clark will frequently opt for text instead of objects. Because of ZZT's limited stats and memory I usually avoid directly comparing ZZT art to ASCII art, but Clark is happy to make a roof for his home look like it's straight out of a GameFAQs guide for The Sims.
Where the design gets more unusual is in the frequent usage of a sideways view while still letting the player roam freely. It's quite unexpected that there aren't invisible walls pinning the player to the floor, instead allowing them to essentially fly around the room in order to examine things that you'd expect to be out of reach.
And because this is a game from 1992, all that brown is just yellow text. This means that getting to the gigantic and lovingly-wrapped present behind the stairs will require finding another way into the house.
As far as ZZT houses go, this one is very different. The closet is stacked full of boxes, and the attic appears the same. Sometimes, a ghost appears in the attic for a brief moment, enticing the player to find its key sooner rather than later. A mirror on the wall behind the attic staircase is blocked off as well, requiring a secret password before the player can venture inside! This board is doing an incredible job at making the player want things they can't yet have. So much is locked away right now, and I can't wait to find out what's inside.
Lastly, we have this lovely bathroom which while tiny here will soon change dramatically in scale as the player enters the unlocked passage door to receive their first punishment from Shootwrong.

Is it possible to not fall in love with this game early on? The background may be sparse, but this is one of the most exquisite ZZT bathrooms I've ever seen in all my life. The amount of detail on display here is just unprecedented for a game this early. A light-switch on the wall. The ZZT towel with frays at the end! That towel rack has more effort in it than entire ZZT worlds.

Oh, and of course the bathtub is slowly filling because the faucet is dripping! The water drops are an actual animation that pass through the top objects that make up the tub, creating an environment that can't be captured just by a still image.
Meanwhile, while you're trying to take this in, the game is there warning you not to fall in as the player balances precariously on the rim. This time the player is stuck beneath some invisible walls (white text for a cleaner design than actual invisible walls) and upon straying too far along they'll hit an invisible object and "slip", falling into the tub where they're left to float on top of the water.
This would be the perfect moment for the game to introduce its cruelties and having the player drown if they don't figure out what to do, but Clark remains committed to keeping you interested in sticking around for just a bit longer. The solution here is of course to shoot the plug in the drain, but there is no actual time limit. The only timer here is to pop up a message asking if you'd like a hint, something that happens throughout the game when you may be stuck. The advice it provides is a simple "Use your gun."
Hope you got some ammo from the practice hall actually.
Down The Tubes

Now it begins. The tranquil bathtub cruise has struck the iceberg, and it runs very deep.
This is the part of the game where you realize, it's not going to be perfect, and that's okay. This game is more than thirty years old, and this awful maze the player finds themselves in is indeed going to be brought up in any review of the game, but it's a flaw that's been done before. This game isn't even pioneering the multi-board maze. Just like Smiley Guy's Deep Throat, what follows is a set of nearly identical boards with plenty of exits to try.
Clark is an innovator however, and will make sure that this is a maze you won't soon forget. Some of the writing is cutesy early ZZT flavor text, a name for the board without opening the editor, or some description of what the player is up against. Most of it is what appears to be solutions to the maze? Every time I try to follow them as directions, I wind up nowhere.
As far as these mazes go, this is a big one. The main maze (yes main) consists of seven boards. Usually just one of the exits will advance you deeper into the maze, with the others returning you back to "Drain 2" which make it ultimately less of a maze and more of a guessing game to find what path doesn't send you back to basically the start.
The good news at least is that the identical layout from board to board means that each board offers up thirty ammo, which if you're willing to go out of your way to grab it can increase your bullet count significantly.
The bad news is that the sewer rats may appear to be lions, but they are actually some surprisingly rough original objects. Using custom enemies like this in 1992 is a surprise, and if these rats were in a dungeon crawler and not an identical maze, I'd be praising the game's unique enemies. Some of the rats die in one hit, while others take two. Yet some are much more vicious and require those shots to be in quick succession or else they'll revert to full health. The rats all look and behave identically, just trying to endlessly move towards the player and bite them if they get close enough. Since you can't tell what you're dealing with it's very easy to think that these are some buggy enemies that sometimes become invincible. Monsters that the player has given up on fighting combined with narrow choke-points and mandatory navigation to continue onward quickly turn Shootwrong into a frustrating experience.
Now not only is the player expected to figure out how to get out of this maze, but even with a solution in hand they'll have to take extra long routes to try and avoid dealing with these more menacing rats.
This is just the start though. In my own playthrough I've already made multiple critical errors just in getting here.

The maze actually has three different exits. The first places the player outside of the house this all started from, but this time on the left side. Some invisible objects prevent the player from jumping to the roof, but breakable walls at least mean that the player can shoot into the present room. There's a little apprehension as to whether or not this is intentional or a lucky side effect of ZZT shading, though the hints the game will provide about this board make it more clear that it's expected.

At least the present can be unwrapped! Knowing what I know about this game now, I'm quite surprised that the white portion of the present doesn't vanish when it's opened. Inside is a statue piece! The body of Mr. Shootwrong.

Whoops! You can't just pick up the pieces. You need to have purchased a backpack for fifteen gems at the store before doing this! Sorry. Load an old save, buy the backpack, and do that maze again. Thanks.

The second exit to the maze leads to the septic tank!
I'm at a loss for words here. This is the grossest looking ZZT board I've ever seen, and it's entirely made with default colors. I'm impressed? I think? Like I do not enjoy being on this board. I want to leave this board.
Alas I don't have that luxury. The only way out is through. Noxious fumes put the player on a time limit here, but unlike the tub drain letting it expire results in your suffocation. This is averted by picking up "an old nasty gas mask" inside the tank.

Somehow, Clark asks the player if they'd rather wear it or just put it in the their backpack. Likely even by the time you reach the gas mask you'll have already received a second update about the fumes making you dizzy. This choice exists only to punish a player for seeing it and thinking the choice must have been offered for a reason.
Not that it matters for me, because while the option appears, if you don't have a backpack yet you can't doom yourself by putting it in there. If you do, then yes, you may put the life saving item into your bag and perish.

Once more Clark goes for the more impressive objects over than expected early 90s usage of built-ins. Toxic fumes rise from the... water, harming the player if you stand above one and block it. Firstly this deals ten damage, with a special case to only deal with if your health is below ten. This hardly matters in practice as after damaging the player it immediately tries to move north again resulting in the player's health draining incredibly fast if you bump one.

Should you fight your way to the valve at the end, it's stuck and can't be turned. It's cool though, Clark put an obtuse exit here to the east on a single tile that connects to a secret passage in the house's basement. So if you get here and don't have anything to loosen the valve, you may still leave, and you know, go through the maze again.

Back on Drain 5 one of the decorative objects up top is described as a "greasy mess" with a sound effect and "YUK!" message when you touch it. Little did I realize, I was supposed to touch it a second time in order to be offered the choice to take it with me. In some ways this is a mean trick, but it's actually quite consistent with the rest of the game. Every object you can take doesn't let you do so the first time you touch it. This is just so early that I wasn't aware of the rules of this game. Fortunately no backpack is required here.

Now the valve can be greased up and the tank drained which frees the enemies trapped inside.


It also frees up a piece of the statue! This screenshot was taken way later in my playthrough when I had a backpack allowing me to pick it up. In the muck you can also find a red key which opens up the path to the west. It's entirely on me, but I completely overlooked it in my playthrough, not realizing until I had completed the game entirely thanks to some tricks in my favor letting me get some keys I wasn't supposed to be able to hold onto. This also means my order of playing this game is going to be all out of whack as I could be going west after finishing the drain, but was unable to do so by somehow not seeing the super obvious and not remotely hidden key.

Thank you. I feel a little better about this board.

A third exit in the maze brings you to this intricate slider puzzle, identifying itself as The Rat Trap. I think it's known by now that I do not enjoy slider puzzles, but I can acknowledge the skill involved in creating them, and Clark does not slouch here. While it looks quite simple, it's surprisingly complicated.
You have a few goals here. At the bottom of the screen is the primary goal, a statue piece of Shootwrong's bow. This is its own little mini-slider puzzle that's a challenge to even get to. I'm sure you're meant to solve this in such a way that the pusher point up doesn't cause trouble when it's pushed all the way up, but you're probably already siding with me when I tell you that I just pushed the rightmost boulder down, touched the bow, and ran out thanks to pushers operating at cycle four. The slow speed of pushers will be used again later on to once again beat Clark's puzzles in the best way: making them skippable.
You also need to get two white keys in order to exit the board as the entrance locks the player inside. The rat's eyes are your next goal. Here's what the player doesn't know:
- The rat's face is mostly made up of normal walls. The only way inside to get at the keys is through a fake wall on the bottom-most row of the face on the right side.
- One of the keys isn't actually a key!
The second white key is actually found to the south, where the drain boards continue, albeit in a much more favorable arrangement than the initial maze.
Still, playing this without foresight means having to figure out how to get to all sorts of rows until you find your way actually into the rat face. Then you learn the other key is fake, and hopefully your solution allows you to move to the south freely still. Touching the rat's whiskers will give a message saying that it tickles and to try the nose next which could be a useful hint except if you're able to touch the whiskers you're either where you need to be, or just opposite of it.
Thanks to things like the lack of a backpack initially, I never actually 100% solved this one as intended. I was able to find a way to go south, but never managed to be able to arrange things in such a way that I could get the second key and still reach the exit. The path to the south is pretty easily missed, but Clark does try by having some flashing arrows pointing downward on the bottom of the screen.
From my screenshots of this board, I spent an hour here and on the boards below.

As a reward for getting through part of the Rat Trap, you get to play some smaller puzzles instead.

The first set of boulders is pretty straightforward, and I was able to get through on my first try. No complaints here.

Even Clark seems to be aware of what he is asking the player here, and he just outright offers to give you the solution. Without even so much as making an attempt, I immediately accept the offer.

OH. MY GOD.

You know what though. The directions worked perfectly. I literally was hitting keys without even looking at ZZT, just reading a copy of the solution from the file viewer. Oh yeah, that's another thing. In 1992 you'd have to write that down since you couldn't reference it while running ZZT.
It's still preferable to actually trying to solve this incredibly cramped boulder puzzle. Again, Clark is creating something incredible here. This is the most intricate puzzle of this type I've ever seen. He's just using his talents for evil.

The drain somehow still continues. This time, not as a maze, but an infinite loop. Both exits from the secondary puzzle result in a board that looks like this, a long hall with two rats. This first one has some minor corruption with a bit of garbage in one of the rat's code. Since this board just loops until you turn back there's no damage done. It would be such a shame if the game was broken because of an issue with ZZT's buggy copying of objects.

As best as I could accomplish, the solution requires using boulders on the outside to be able to allow for extra trips across the top of the board. You'll note that I have no way of getting to the south board from this state. Similarly, the right side requires some more boulder positioning to be able to get a row to be able to shift and let the player reach the rat's nose.
One last thing though, to really hammer in what kind of design I'm dealing with here, are these two boulder/slider combos that lock away the bottom row of the board. They look identical, but the boulder on the right side is actually an object so you can't push it. There is no indication of this and it was a source of yet more frustration when I very much wanted to be able to slide it around to reach the fake wall.