In 2019 I created a ZZT RPG called For Elise, as a bit of a return to a GCS that I hadn't dabbled in for at least a decade (and even then, only briefly, and my only release was mostly just a one-note joke based on something that was popular at the time. What I've written up here is some parts a reminiscence on how this game came about and some parts Weird Coding Tricks (Doctors hate him!), so hopefully there's something in here for you. Onto the postmortem!
How It Happened
I made a decision to work on a ZZT game in the middle of a chat with KKairos. KKairos was just working on, or had just finished, Kerfuffle!, and seeing that game made me wish I had created a proper ZZT game back in the day. I also found out about the Worlds of ZZT Discord around the same time, and ZZT seemed to be having a resurgence of sorts, so the timing felt right.
I first wanted to work on a space exploration/trading/combat game, a sort of Elite de-make, but when I started trying to put it together I realised that it would be rather difficult to complete the game I wanted to make, and it might help having some experience first. The solution I ended up with was to create something a lot simpler, but one that would nonetheless require gameplay systems that were rarely seen in ZZT.
When it comes to ZZT creations, KKairos was probably most known for his procedurally-generated dungeon crawlers, the Dungeon Guru Nostalgia games, and since I was talking with him at the time, my mind ended up drifting over to roguelikes. Certainly, the procedurally generated component of roguelikes is probably what they are best known for, that and their use of ASCII graphics, but neither of those are new to ZZT. I was interested in shaving off another component- the turn-based movement and combat. I was also looking through Chronos30's ZZT Encyclopedia for ideas, and one of those engines was a coordinate tracker that would track the player's coordinates on the board by using a player clone surrounded by objects, which would increment or decrement a counter (torches or ammo) when the player moved in that direction. This was a bit of a fragile engine, which fell apart if you had any obstacles on the board you deployed it on, but if you just wanted something to happen each time the player moved the approach had a lot of potential.
I had already decided that I didn't want to make one of those games where the player is stuck in a corner, touching objects to make some player avatar object move around the screen, as those always felt clumsy to me (perhaps from trying to use them in an era where I didn't know how important #cycle 1 was). I just wanted the player to be able to move around normally, and everything else would move around with the player. This lead to some difficulties later, but I don't regret the decision.
Making a turn-based grid-based RPG with roguelike-based combat was the nucleus of the idea that spawned For Elise, and now that I had the idea, all that's left is the easy part; making the game itself!
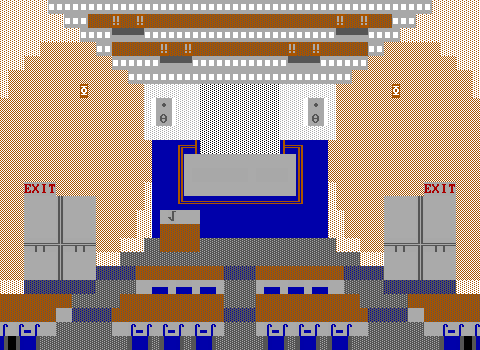
The Title Screen

When I make games, the title screen—or opening screen, main menu screen, whatever you call it—is usually one of the first parts of the game I make, if not the first. I've more or less always done things this way, and if I had to come up with some retrospective justification for it, I would call it a motivation trick. The idea is that every time I open the game, I have this cool title staring at me, and it feels criminal not to have an awesome game behind it. Its effectiveness is debatable, and I certainly have plenty of title screens with no game behind them, but nonetheless this is something I compulsively do. Anyway.
For the past several years, whenever I created a title screen I would write '妹SOFT' on it. It started out as a joke (because we used to have these ZZT and MegaZeux "companies" and we would put their logos on our games, right?) but I guess over time it started to become its own identity. Either way, it's what I do and I certainly wasn't going to break that tradition now. Of course, this being ZZT, unless you're running it on a PC-9801 you likely don't have access to the 妹 character or anything remotely like it, so I would have to write it out, probably with half-chars. Which I did.

The size of the logo and the complications involved with switching boards while on a ZZT title screen (unless you're using a customised build of ZZT.EXE) meant that, if I wanted to actually give my game a name that would show on this screen, it would have to somehow fit on the same board. I opted for making the rest of the title out of tiles that could be programmatically created in ZZT-OOP, which limited my palette a little, but ended up not being a problem.
In order to simplify things for programmatic generation, I opted to make a title out of gradient chars. To create the initial design I used a paint program, created a 60x25 canvas and starting throwing pieces of text in various fonts onto it until I had something I liked. Then it was just a matter of quantising the image down to 8 colours or so, which I would then replace with various dark and light purple gradient characters. These are both easy to create programmatically in ZZT (light purple can be accessed with a normal #CHANGE command. Dark purple needs you to use the naturally dark purple ENERGIZER as an intermediary, but is just as simple. If I wanted light purple with a dark purple background, on the other hand, that would cause more problems). Once I settled on a design I liked for the text, I then began to work out a process for transitioning from the "company" logo to that title.
(By the way, the mystery behind the name For Elise? Well, I was just typing various things into the paint program I was using with various fonts to construct the title screen, and I liked how 'for elise' looked. Plus, after I made the title, it was too much of a pain to change later so this never happened. Also it's a fine piece of Beethoven music and I'm sure he wouldn't mind.)

I make use of dual approaches for hiding the title screen text behind the 妹SOFT logo. You can see one of them easily enough by viewing the title screen in any editor that shows invisible walls. In this case, each invisible wall colour except white was used to represent one of the possible gradient shades of the For Elise title text. After I made the logo go away I could just #CHANGE these. The parts of the title screen text that go behind the logo, on the other hand, presented a more challenging problem. I can't remember if I actually counted how many tiles would need to change into things and decided ZZT didn't support enough stats, or if I was just being cautiously conservative. Either way, there would have been too many. The strategy I decided on was to have the 妹SOFT logo made up of several objects that would be in charge of changing multiple parts of the logo into invisible walls of the correct colour.
The tiles that make up the logo already have some influence over the kind of type I can use to represent them. For instance, a solid white or half-white half-black tile? I can just use an appropriate element of white text for that and save a stat. Half-white half-blue tiles can be represented with blue text. The solid dark blue tiles can be represented with solids, but the blue half-char tiles need to consume a stat, so I might as well make these tiles the objects and have them execute some useful code.
The objects that make up the "company" logo have code similar to the following:
:t
#put n PURPLE INVISIBLE
#put e BLUE INVISIBLE
#put w GREEN INVISIBLE
#put opp flow GREEN INVISIBLE
#put flow EMPTY
#become RED INVISIBLE
What I realised was that I could have individual objects responsible for converting several of their surrounding tiles into appropriately-coloured invisible walls, as well as themselves, and if I used this process I could cover the entire logo without blowing out my stat budget. This particular object, for example, is responsible for six tiles including itself. FLOW and OPP FLOW are also useful- these are the directions used to represent an object's walk momentum, so to speak, in ZZT. However, because ZZT doesn't bound walk vectors to cardinal directions, this can be used to give these objects more reach than may be expected. This particular object happens to have a walk direction of (-8, 1), which means that #PUT FLOW will put something at -8, 1 relative to the object, and #PUT OPP FLOW will put something at 8, -1, in the opposite direction. Providing I set the walk vector so that the object is continuously walking into something that blocks it (at least until it's time for that object to disappear) I could have some objects responsible for tiles a great distance away.
To make optimal use of stats, I went over all of the tiles that absolutely had to be objects (because they were dark-blue half-chars) and tried to have those cover as many neighbouring tiles as they could. Once I had done this with all of the tiles that had to be objects, I started selectively choosing other tiles to turn into objects. I went about this greedily, choosing the tile that would be able to cover the most neighbouring tiles if I turned it into an object, turning it into an object, then continuing until I had covered the entire logo. I made use of a custom script to carry this task out-- something that will become a bit of a theme in this write-up. I'm the kind of game developer that's more comfortable in front of a source code editor than a level editor, and I also try to handle problems in a generic way, even if I never end up reusing my solutions.
Once I had covered the entire logo, I could just send up sending all my objects to the :t label and that would turn the 妹SOFT logo into variously coloured invisible walls, which I could then later use to fade in my snazzy For Elise title text. I added some other things to the title screen, like blinking objects and colour-changing unconnected line segments (for stars/glitter, I suppose), just tinkering with things until I felt the title screen had enough going on, and I was done! With the title screen, at least. I now had to make a game to go behind it, otherwise all I would have to show for my troubles would be yet another title screen to join the pile of shame.
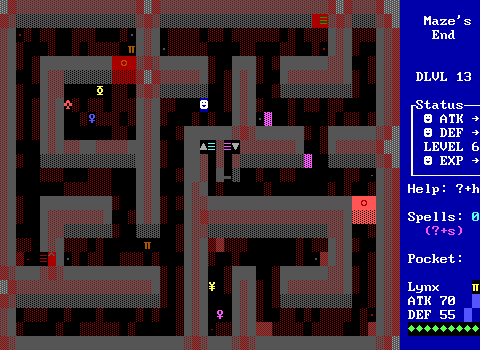
The Level Layouts
 6: The Sunless Sea")
Before you can start swinging a sword at monsters in a turn-based dungeon crawl, you need to have some dungeons to crawl through. I pretty much never considered random levels (like KKairos' DGN games or Computer Dungeon Slash) because of the other sacrifices I knew I would have to make if I went this direction. The nucleus of For Elise is turn-based roguelike-ish combat and that doesn't need random levels, so I decided to just go with static levels. On the other hand, one of the attractions of procedurally generated levels is that you don't have to make them yourself, so I went that way anyway! So yes, the levels are procedurally generated, just not in ZZT. Once again, I'd just rather write code to create a cave, rather than put the tiles down by hand.
I had two different overall templates for level designs- caves and mazes. This was also something inspired by roguelikes like NetHack, which mostly had either maps created from connected rooms hollowed out of rock, or screen-filling mazes. Here is how DLVL 1: Down the Rabbit Hole was generated:

DLVL 1 is a maze-type level, so naturally I would start with a maze. I used a very simple maze generation algorithm for this- start with a WxH grid of unconnected cells, each cell representing a contiguous region. I would then merge two regions by randomly picking two adjacent cells from separate regions and removing the wall between them. This would reduce the number of regions by 1. I would then repeat until there is only one region, and the result is my maze. Due to the obvious size limits associated with creating mazes that can fit on individual ZZT boards I did not have a great number of possible maze sizes, but I did have a few and a range of different ones can be seen in For Elise. DLVL 7: Flooded Grotto is a 4x3 maze with large rooms (to the point where it barely looks like a maze), while DLVL 12: The Labyrinth is a claustrophobic 12x8 maze that very much looks like a maze.

With my maze generated, I applied an edge smoothing filter. My standard approach when it comes to programmatically generating levels, whether it's happening live (for a game with random levels each time you play) or offline (as with For Elise), is that I don't just go and write one level generator right off. I tend to write a very simple generator, followed by a bunch of filters that can be applied or not as I choose, and gradually morph the level towards something I find aesthetically pleasing. This edge smoothing filter is a simple one- it just adds extra tiles to reflex corners and removes them from acute ones. This is simply performed to make the maze a little less rigidly maze-like (hence this is a filter I skip on levels that really are meant to look like mazes).

The next step is an erosion filter, meant to simulate the natural erosion of cave walls, to give them a more natural looking structure. This is a very simple filter, that simply removes edge tiles at random, but it works quite well in practice.

The next filter applied performs a texturing pass over the wall tiles. I have a few different texture filters, but for the most part these simply look at how far a wall tile is to the nearest space and applies a tile from an appropriate palette of tiles (manually selected for each individual area) based on a combination of that number and a random factor. There is also special handling for tiles that have an empty space to the south- these are usually given a darker colour to give the entire design a sense of depth and perspective (otherwise it would all look pillow-shaded).

I call this step 'adding doodads'- basically scattering random junk (again, from a palette designed on a per-board basis) around the corners of the board. I don't know what doodads are, but in the original StarCraft map editor you could place these little objects around the map to add variety and that menu called them doodads, so I went with that here. One thing is that my original doodad palettes had a lot of stat chars, but they were gradually phased out as I realised how precious memory usage was. Hence why you tend to see a lot of ricochets, statless duplicators, and so forth.

The last step was simply to texture the floor. I had a few different filters for this, most of them just took into account the distance between the empty and the nearest wall and some tried to incorporate a pattern as well.
For cave levels the process was much the same, but I started out with an initial cave layout generator, which would basically draw randomly sized and shaped overlapping ellipses onto the board to hollow out rooms in an entirely solid starting map.
There were some other filters used as well, such as ones for randomly adding lakes (pretty much the inverse of the cave generator- overlapping ellipses would be added to the current layout) and some different approaches to texturing, and I would use a different set of filters and filter settings on each level, in order to add variety to the different maps.
One of the things that can make generating random levels in roguelike games difficult is the need to ensure that the maps generated are actually playable and meet certain requirements (certain minimum size, etc.). Thankfully, because I was only generating these maps once, I did not have this requirement. Instead I simply tried a whole bunch of random seeds until I got a layout for each level that I liked, then I saved that seed. Occasionally if I redid the filter chain for a map I would need to go and find another random seed that worked, but for the most part it wasn't necessary.
The only map of this game I ended up creating by hand was DLVL 20: Inferno, partly because I wanted the final level to be a noticeable departure from the rest of the game, and the rest because I didn't feel like any of the random layouts I tried were impressive enough for a final map.
So, did this approach actually end up saving any time? Probably not. The game doesn't have a massive number of boards and the layouts are fairly simple. I'm sure that nicer results could have been achieved in less time by creating maps by hand. I just chose the other approach because it sounded less boring to me.
(As an aside, the names given to each dungeon level? I threw those in because I liked the way games like Softdisk's Catacomb Abyss series would give the levels flavourful names, like 'The Subterranean Vault'. Those levels had fairly simple layouts and graphics, but those level names stoked the imagination, and I felt something like that would make the player more interested in For Elise's maps. There are many references to things in the map names.)
Planning Around Limits
I was very conscious of ZZT's harsh limits around counters and flags as I was creating an RPG, a genre of game that naturally wants to keep a lot of state. As a result I knew I had to plan around this from the start. I did end up throwing out one flag slot (used for tracking how deep into the dungeon you had traveled, because I never used this information) and adding something else useful in its place, but for the most part I kept with my initial planning.
The utility of flags is that they keep their values between different boards, allowing you to communicate information from one board to the next. Hence anything that only needs to keep its value on one board was automatically out- in that case I would make use of zapped/restored labels, some invisible object's physical location on the board or some other mechanism for tracking that value. Flags had to be something fairly universal. For an RPG this normally means various things like your equipment, your spells, information about the current quest you are on and so forth.

I shied away from using flags to track the equipment the player was carrying, but mostly because I didn't want to repeat the code for calculating your equipment's effect on your stats on every board. That way when I decided to have a central 'town' board as a hub (that town board would later grow to 3 boards when I realised I couldn't fit all the stuff I wanted on it). If you could only acquire new equipment in town, I could recalculate your stats on the town board and save having to do that everywhere in the game. This also meant I didn't have to spend flags tracking the player's equipment. The equipment shop would keep track of that for me.

The player's experience level could have gone either way. I considered the following options:
- Use a counter (e.g. score) to keep track of the player's experience points and have implicit level-ups (e.g. if your experience is above X, your level is considered to be Y).
- Use a counter to keep track of the player's experience points and have the inn in town keep track of the player's experience level, like how the equipment shop works.
- Use a counter to keep track of the player's experience points and a flag to keep track of the player's experience level.
I decided against option 1, once again due to not wanting to repeat stat increase logic on every board. My choice was a mix of options 2 and 3; level-ups can only occur at the inn in town (hence level-up logic only needs to exist in one place), but I wanted your experience level to affect your maximum HP and the only way I could achieve that was to either not allow healing outside town or to have a flag with the player's experience level available at all times. I decided spending a flag on this was worthwhile.

Next came magic. I knew I wanted a spellcasting system early on so that the player was doing something more than simply running into enemies all day along. Initially I considered an MP-based system, but as this would require a counter and counters are in even more limited supply than flags are I decided a small number of spell charges could be counted using a single flag without wasting too much memory. For this I ended up using flags 'sc0' through 'sc6', which indicate the number of spell charges you have remaining. This way I could cheaply see if the player couldn't cast any spells (because sc0 would be set) and I just needed one object with the code to reduce the spell charges by checking a flag, unsetting it and setting another. The spells themselves were another issue, because I knew I wanted a lot of them. I went with a slot system here, where I would have some number of possible spells and only track a small number of them. I used flags for each spell, as well as three 'slot empty' flags, which could be used to determine if the player had space free for a new spell (otherwise I would need to count the number of spell flags set). Once again, the presence of the town as a central hub was useful; I would have a place in town where you could swap out your spells, and that board would then keep track of all the spells the player had learned in total.

Another thing I wanted in the game was quests. Quests would drive the story forward, as well as providing another means of progression (because I could give monetary and experience awards for their completion). If I restricted the player to only one quest at a time, I would only need one flag. I decided that flag slot would be overloaded, capable of holding either the fact that the player isn't on any quest at all (and is therefore qualified to take one on), or both the quest the player is on and the player's progression through that quest. Typically at a minimum there would be the initial quest flag, then another flag to indicate that the quest has been completed and can be turned in at the guild for rewards, but there were also quests with multiple stages to them and these would be tracked by changing the flags to different variations on the basic quest flag.

Finally, artifacts. Artifacts came about because I didn't want to waste a counter on money. As money is only used in town, it seemed to violate my principle of not dedicating a counter to storing things that are only needed on one board. This became complicated after the town turned into three boards, but I will go over that in a later section. In any case, if I was going to avoid using a counter for your money I would need to have some other methods of making money. I already had quests, but it seemed like the dungeon would be a bit lonely if there was no treasure to collect, so I ended up incorporating the artifact system. I would dedicate one flag to storing a single item that you could carry, and these items would be artifacts that could be sold in town for money. That was only the town board needs to keep track of the money you have and I have effectively traded 1 flag for 1 counter, which is a very good deal.
Now that all of the flags have been discussed (save one that keeps track of music, but I will discuss that later) I will move on to counters. ZZT has a total of 6 counters, although one is rather special and usually invisible to the player:
- HEALTH— this counter has two properties. One is that, if a game cycle ends with it being set to 0, the player will receive a game over. The other is that it can be instantly set to 0 with the
#ENDGAMEcommand. I ended up making use of this counter to store the player's HP because that way the game over behaviour is something desirable instead of something I have to work around. The presence of the#ENDGAMEcommand meant that limiting the player's HP when making use of healing spells was easier- I could simply take a certain amount of health to see if the player had at least that much, and if they did, I could just use#ENDGAMEto reset health to 0, then give the player their maximum health. - AMMO— I ended up using this for the player's Attack stat, to be used in combat calculations.
- TORCHES— I used this for the player's Defense stat, also to be used in combat calculations.
- GEMS— This counter was used for multiple things, including intermediate calculations during combat. I originally thought I could get away with just the TIME counter for combat calculations, but I eventually realised that I needed 2, so I ended up using GEMS as well.
- SCORE— I used this counter for experience points. This counter only really has two special properties: If the player gets a game over while this counter is greater than 0, the player will be able to enter their name into the high score table. The other is that ZZT does not have a built-in cheat code for increasing your score.
- TIME— This is a bit of an odd counter, and one that is used for the player's remaining time on a time-limited board. It has the odd property in that it resets to 0 if the player leaves the board or takes built-in damage. This means the counter is only particularly useful for intermediate calculations (or for detecting when the player enters the board). I used it for intermediate calculations during combat.
Originally the town was intended to just occupy one board, but with all of the functionality I needed it to have, I ended up splitting it across three. Because you can get or spend money on all three of the town boards this caused problems for my initial aspiration to avoid using a counter for money.
The solution I ended up going with was to use gems as money, but only while the player is in town. As all travel in and out of town has to take place on the central town board, I can record the player's gems into the zapped state of labels in an object on that board when the player leaves and restore them when the player returns.
While some of my initial choices for counter and flag allocations changed, having them assigned up-front meant that I knew exactly how much of a given thing I could support, and didn't need to start guessing partway through my project if I had enough flags free to do X, so I definitely don't regret this initial planning step.
Combat System - Mechanics

The combat system is perhaps the most fundamental part of this genre of game, so getting this right mattered. I knew how I wanted combat to play out—walk into enemy, take a swing at enemy, enemy takes a swing at you, rinse and repeat ad nauseum—but not how I would translate the player stats (just attack and defense, because I wanted to save on counters) into effectiveness in battle. Inspiration for that came from another source.
Around the time I started working on For Elise I had played a Japanese indie RPG with similarly turn-based combat, but one where the monsters would just stay in one place, and the goal was to find a resource-efficient way to defeat them, gain XP, level up, get better at killing monsters etc. The damage calculations in that game were just a simple DAMAGE = ATTACK - DEFENSE model, which has a lot of limitations, but is easily comprehensible and helps enable this puzzle-type element. You go from being unable to scratch certain enemies at all, to being able to deal with them after trading a certain amount of health, to being able to finish them off with no losses at all, and you can determine all of these ahead of time. This attracted me for a few reasons:
- I knew that there was an inherent limit to the size of For Elise (my decisions made in making the town the hub world effectively limited me to one ZZT world) and a more complicated system would not have necessarily brought benefits to the game's longevity.
- I was attracted at the idea of the player able to make logical decisions in terms of whether to engage in combat or not, and I figured this would add to the appeal to the game more than a randomised or less comprehensible system would.
- The arithmetic that needed to be performed for this kind of system is so simple even ZZT would be able to do it. (This is probably the one that clinched it for me.)
I decided I still wanted enemies able to move around like in a regular roguelike. This would introduce more strategy in terms of making the choice to either carefully evade enemies or to actively engage them, and it would make the game less visually boring. But with that settled, I then had another problem to deal with.
For this system to work, not only do I need to keep track of the player's health, attack and defense, but I now have to deal with health, attack and defense for every enemy in the game. How am I supposed to store that? Attack and defense are not really a problem as these can be static values, but health is a problem. I considered a few different approaches, such as only keeping track of one enemy's health at a time, but when I was thinking about the range of spell effects I wanted, this turned out to be problematic when considering area effect spells. In addition, it could confuse the player if they got into combat with multiple enemies at the same time and would expect that the damage they inflicted would remain.
Instead, I chose to riff on a classic approach to enemy health in ZZT. Label zapping!

A classic approach to create built-in enemies that require more than one shot to kill is to use a number of labels and #zap them one by one each time the enemy is hurt. This does not necessarily translate well to more continuous values such as health values that can become larger as the game goes on, but I had an idea about how to make it work. While I would still come up with a value for each enemy's HP, I would partition that enemy's HP into 9 discrete portions. If an enemy took damage, they would lose at least one of these portions. This meant that I could keep the number of labels that needed to be held by each enemy to a fairly small finite number. The number 9 was a fairly arbitrary choice- it was chosen because I wanted to use a 9-character long health bar to show that enemy's health in the sidebar, and it made sense to me that, if you attacked an enemy and their health bar didn't decrease at all, it means they took no damage. Hence the smallest unit of damage that could be inflicted is one char of the health bar, or 1/9th of the enemy's health.
My original approach to damage calculation worked as follows. Take the merman, for instance. The merman has an attack rating of 45, a defense rating of 30 and 81 HP (most enemy HP values are multiples of 9 since I settled on the division-by-9 approach.) If a player comes along with an attack rating of 50 and takes a swing at the merman, I would first subtract the merman's defense from the attack of 50, resulting in 20 damage dealt to the merman. When I then divide this by the size of the merman's HP multiplier (9, in this case, as 9x9=81) the player then ends up dealing 2 slices worth of damage to the merman. Hence the merman zaps two labels, and will die after 4 more hits. Taking 5 hits to kill a merman with a HP of 81 when you deal 20 damage per hit is correct in this case, and as a result the approximation rarely falls apart or becomes too obvious to the player. That said, I never explicitly show the exact HP value of an enemy, so even if the calculations are slightly out, it shouldn't interfere with the player's ability to comprehend the game's mechanics.
However, this approach did lead to another problem. If the player's attack rating isn't 50 but, let's say, 35, the player would probably assume they would be able to hurt this merman, but with the multiplier system this is not the case (only dealing 5 damage does not reach the merman's HP multiplier of 9), which is confusing. I therefore artificially adjusted the enemy defense values down from the ones shown on-screen. The displayed defense value now means the value the player's attack rating needs to beat in order to inflict damage on an enemy. In other words, while I may show that the merman has a defense rating of 30, in reality the merman has a defense rating of 22. This means that if the player has an attack rating of 31, attacking the merman will deal 31-22=9 damage, or 1 slice worth of damage. Again, because I never show the enemy's real HP value, this approximation is opaque to the player.
Because I have a proper counter dedicated to the player's health, no approximations are necessary here. Damage is calculated precisely based on the enemy's attack rating vs the player's defense rating.
Combat System - Programming
When it came to writing the code for the enemies, I was conscious of memory limitations and knew the code could not be too big, and my use of label zapping for tracking health had already limited what I could do, due to how ZZT tracks zapped labels.
In ZZT each object can contain its own code and that code is stored in plain text, which can eat up available memory very quickly and cause your board to brush up against the restrictive 20,000 byte board size limit easily. However, one workaround is to make use of the #BIND command, which causes one object to use another object's code, allowing that memory to be saved. However, label zapping and restoring works by making changes to the actual code of the object in question. Zapping a label replaces the : with a ' (used for comments), while restoring a label replaces the ' with a :. This means that if you have multiple objects sharing code, zapped labels will propagate. This may be convenient for some purposes, but in this case it is not helpful. Hence, whatever code I need to have for enemy logic is going to be duplicated across every enemy in the game, which is a serious investment.
I attempted to alleviate this slightly by moving some parts of battle logic over to separate objects that would handle all of the code for every enemy, which is where the bulk of the math was done, but the average enemy still consumed 600-800 bytes apiece, so I was still very limited.
In hindsight I probably could have designed the enemies in such a way that would shift the damage tracking into separate objects designed just to handle that, making the enemies themselves #BINDable, but by the time I realised how restrictive I would later find the memory limits it was too late to easily re-architect most of this, so I just went with it.
To illustrate how a typical enemy is put together, I am going to go through the code for one enemy, a Hellcat from DLVL 19: Lower Yomi. The enemy code is written extremely tersely, with no comments and with undescriptive label names to save on memory use, but the actual work being done here is fairly simple.
To begin with, the Hellcat's stats are as follows: HP: 252, Attack rating: 170, Defense rating: 60, XP given: 140. From the mechanic described earlier, we can deduce that the Hellcat's HP multiplier is 28 (28*9=252) and that the Hellcat's real defense value is actually 33, allowing a player with an attack rating of 61 to deal damage to the Hellcat.
:sq
#if alligned y
:z
#if contact a
?rnd
#c
:y
#zap y
#z
There is a player clone sitting in the sidebar, surrounded by 4 objects. These objects, when :touched, send every object to the :sq label, which is used to tell all the enemy objects to take their action as the player has moved. If the player's move is to touch this creature, this object will go to the :touch label instead and this code will not run.

The #IF ALLIGNED check is because the Hellcat is one of a few enemies in For Elise with a ranged breath attack, which it will launch half of the time the creature is aligned with the player. The rest of the time, even if the object jumps to the :y label, it will just #ZAP y and then go back to the :z label to continue processing. I won't go over the code for the breath attack, but it simply puts several boulders in the direction of the player and sends a message to another object which animates the effect and turns the boulders into stars so they can inflict damage to the player. Unfortunately this use of built-in damage meant that enemy attack and player defense could not be taken into account here, which is another reason why I only put this breath attack on a few creatures. It acts as more of an annoyance (due to the breath attack's ability to push the player) than a real threat.
The #IF CONTACT check is to determine if the enemy is adjacent to the player and can therefore launch a melee attack. Nearly every enemy in For Elise has a melee attack and they all work in much the same way. This code is handled further below, by the :a label. If the enemy is not adjacent, it moves. Different creatures have different movement patterns. The Hellcat moves randomly while other objects might just move towards the player, and a few that have unusual movement patterns (like ?rndp seek).
:sq
#restore sq
:sq
#char 177
/i
:j
#c
This bit of code is a little bit strange. There are two spells in the game called SLOW and STOP, the former of which causes enemies to only be able to move every 2nd turn, and the latter of which does exactly what you expect. These two variations on the :sq label are used by that. Creatures that are slowed get their :sq labels zapped every 2nd cycle by another object, while creatures that are stopped get their :sq labels zapped twice. As a result, if the object is sent to the first label, it restores the zapped :sq label and flashes its char for a cycle instead of moving. If the object has been zapped twice it will go the second label where the behaviour is identical but does not result in a #RESTORE. Every object will have this label #RESTOREd once the STOP effect ends.
:c
#restore c
#char 219
/i#e
Enemy objects contain two instances of the :c label, and objects jump to :c once they have finished their processing for the turn. The default behaviour of :c is to just jump to :e, which causes the object to unlock and restore its original character (as many events cause enemies to #CHAR to various things). The second form (the one whose code we see above) is used when objects are damaged by some kind of spell. After handling damage calculations, the object then changes char to provide visual feedback that the enemy has indeed been hit by a spell.
:a
#t:0
#a:0
#restore j
#h
This is the Hellcat's melee attack code. It is extremely terse, but a few things are going on here. #t:0 tells the objects named 't' in the sidebar to change their chars to show the Hellcat's name and stats. Each enemy on a level will have a different number. On DLVL 19, 0 is Hellcat, 1 is Kraken and 2 is Sigbin. If an enemy is attacking you, you want to know what it is. #a:0 sends a message to an object, telling it to perform the Hellcat's damage calculation and attack the player. Fun fact- as a result of this, only one enemy can attack the player per turn (because multiple enemies will just all send messages to the same object and only the last one will get through.) The rest of this code fragment is straightforward: #RESTORE j is used to ensure that, when the object jumps to :j after it jumps to :h, it will not show a 'this enemy was just attacked by the player' animation, which is another possible behaviour after jumping to :h. We will look at :h later, but basically, the jump here is so that the sidebar is correctly updated with the Hellcat's remaining health.
To continue following the damage calculation we need to now move to the @a object, found on every gameplay board with enemies on it. The @a object contains a section like this for each type of enemy on the board (so every Hellcat on the board will send the object to :0, every Kraken will send it to :1 and so on).
:0
#give gems 170
#take torches 170 a0
#give torches 170
#m:n0
#take gems 170
#g
As established before, the Hellcat's attack rating is 170. Counter manipulation in ZZT is a little bit limited- counters can only be given and taken, and the only way you can check the value of a particular counter is by attempting to take. If the counter is less than the amount being taken, the object will execute the failure command instead of taking anything. By combining these carefully many mathematical operations can be replaced; however, you need to be careful with them as too many commands will cause operations to take more than a single cycle to execute, which will throw off this game's timing. Gems are used internally to calculate the amount of damage to be inflicted on the player.
(Note: You can also check if a counter's value by trying to #GIVE too many of a counter. If that #GIVE would cause the result to go above 32767, the #GIVE will fail and the object will execute the failure command.)
We first give the player 170 gems, then attempt to take 170 torches. As torches represents defense, if we succeed in taking 170 torches we know that the player's defense is at least 170, which means they will not be hurt at all by this damage. In that case, we give the torches back, remove the gems and send a message to another object which will tell the player that the Hellcat failed to deal any damage and that's it. However, if the #TAKE fails, we then move onto the next stage of processing. This damage calculation is spread among several objects so that none of them spends more than a cycle doing the calculation.
:a0
#m:d0
#e
...
:e
#a2:a
If the #TAKE from before failed, we tell the @m object to show a message that the Hellcat did manage to hurt the player, then we send a message to the @a2 objects, which continue the calculation.
@a2
:a
#at:giv
#take torches 256 c
#give health 256
#restore at:i
:c
#take torches 128 d
#give health 128
#restore at:h
:d
There are multiple objects named @a2 that execute their steps in order of their stat IDs to accomplish the following:
- Take away all the player's torches and give them health instead. We know that the damage being inflicted is greater than the player's defense (the number of torches) so we do not risk accidentally healing the player this way. The objects that do this also remotely
#RESTORElabels in another object named@at, which is used at the end to give the player their torches back after. We attempt to take 256 torches, then 128, 64, 32 etc. to most efficiently remove all the player's torches and give them the same amount of health. The remote restores are essentially recording the on bits of the player's original torches value for restoration later. Starting at 256 and going down will only work properly if the player's defense will never exceed 511, which is safe considering bonuses from level ups and experience don't go that high. - Take away the player's gems and health at the same time, so that when the player runs out of gems, they will have (HP - gems) health. If the health subtraction ever fails, the objects immediately
#ENDGAMEthe player, reducing the player's health to 0. - Sends the
@atobjects to the:givlabel, to tell them to give the player all their torches back.
The end result is that I am using 6 ZZT objects to effectively perform the following pseudo-code:
health += torches
tmp = torches
torches = 0
health -= gems
gems = 0
torches = tmp
But, in the end, if it works, it works. The player's health is reduced by (damage - defense), which is what I was after.
The final object in this list is the @m object (actually two objects), which displays messages and plays sound effects related to combat.

To see how we handle the player attacking the Hellcat, we need to return to the Hellcat's source code and head over to the :touch label.
:touch
#lock
#take ammo 33 n
#take ammo 252 f
#give ammo 285
#d
Remember how I said before that the Hellcat's real defense threshold was 33, not 60? Here is where that number is used. #TAKE AMMO 33 is used to ensure that the player at least has enough of an attack rating to breach the damage threshold. If not, the object jumps to the :n label, which tells the @m object from before to send a message that we failed to do any damage to the Hellcat, then resumes normal processing. If we were able to take 33 ammo, we continue. The next thing we attempt to take is 252 ammo. If we have that much attack, we can kill this Hellcat outright no matter how much health it has, so we can give the player all their ammo back then proceed to the death code in the :d label. In most cases, however, this will fail, causing the object to jump to :f, which is where we will calculate how much damage is actually inflicted.
:f
#take ammo 28 g
#give time 28
#zap h
#f
:f is a loop that trades ammo for time in increments of 28, the Hellcat's damage multiplier. We give time so that we know how much ammo to give back to the player afterwards (so that attacking an enemy doesn't permanently lower your attack rating). Each time we successfully take 28 ammo, we #zap off one of the Hellcat's :h labels. It has a total of nine of these, for each slice of health. Once we can no longer subtract ammo, we jump to :g to continue processing.
:g
#ss:1
#give ammo 33
#restore j
#zap j
#self:h
#d
Here we send a message to the @ss object asking it to play a sound effect to signify that we hit the enemy. Then we give 33 ammo back to the player (that was from the initial 33 we took to check that the defense threshold had been breached), and we #RESTORE and #ZAP the :j label. This is to ensure that it is zapped exactly once. We will see how we get to the :j label shortly. #self:h is used by the object to send itself to the :h label. The reason we don't use #h is that it will fail and show an error message if every instance of the :h label has been zapped (which is the case after the enemy has run out of health). Instead, by using #self:h the jump is simply ignored if the label does not exist. If the label doesn't exist, we instead jump to the :d label, which contains the Hellcat's death code:
:d
#give score 140
#m:k0
#become fake
This code gives the XP that the Hellcat is worth, tells the @m object to display a triumphant kill message, then has the Hellcat #BECOME fake to just disappear against the background.
:h
#h:9
#j
:h
#h:8
#j
...
:h
#h:1
#j
These are the 9 health labels, and the number of them that are zapped indicates how injured the Hellcat is. This would be fairly concise code except for the fact that we want to see the enemy's health bar, so the act of actually jumping to the :h label is to check what the enemy's current health is. This will send an appropriate message to the @h objects, which will then place a number of gems onto the sidebar to show the enemy's remaining health. Where the :j label leads to depends on how the object got to the :h label in the first place. If the Hellcat attacked the player or was hit by a spell and then jumped to :h, it will have restored the :j label, which will simply cause the object to jump to the :c label, which may involve changing its char. On the other hand, if the object came here after being attacked, the first :j label will be zapped, so it will jump to the second label, which involves changing its char to the slash character (meant to portray a sword slash) first.
As an aside, you might be wondering when the player gets the rest of their ammo back? Well, there is no code in the Hellcat object for it, and the Hellcat doesn't send any object a message asking it to give the ammo back. However, there is code in two other objects (specifically, the two objects in the sidebar used for showing the player's current experience level). These objects check the time counter every cycle and exchange the player's time for ammo. Because the Hellcat's damage loop gives time each time it subtracts ammo, the player will get all their ammo back quickly enough.

:sdb
#if alligned kq
:sda
#if contact kq
#e
The last bit of code is for handling damaging spells. For Elise has 9 spells, which each occupy a unique slot on the axes of damage (100, 200 or 300 points) and area of effect (adjacent, aligned and everywhere). For example, ACID is an adjacent-affecting spell that deals 200 damage, HOLY is an aligned-affecting spell that deals 300 damage, and FIRE is an everywhere-affecting spell that deals 100 damage. The way these work is that the spell effect object first makes use of remote restoration and zapping to ensure that each enemy has its :kq labels zapped a number of times based on the damage of the spell (2 times for 100 damage, 1 time for 200 damage and 0 times for 300 damage.). Then, depending on whether the spell's range is adjacent, aligned or everywhere, every enemy object is sent to the :sda, :sdb or :kq label respectively. The :sda and :sdb labels selectively decide whether to jump to the :kq label or not depending on whether the object is in contact with or aligned with the player.
:kq
#d
:kq
#zap h
#zap h
#zap h
:kq
#zap h
#zap h
#restore j
#zap j
#zap c
#self:h
#d
The :kq labels are reached if this enemy is hit by the spell in question and determines how much to damage it. This code will differ from creature to creature as the exact behaviour depends on the creature's maximum health and its defense value, but because the amount of damage inflicted is constant (100, 200 or 300 points) and the Hellcat's defense is constant (33), there is no need for any calculations. We know ahead of time exactly how many times the Hellcat will have its :h labels zapped.
In the case of the first :kq label, a 300 damage spell (KILL, HOLY or NUKE) is enough (300 - 33 = 267, which >= the Hellcat's 252 health) to kill the Hellcat outright no matter how much health it has, so it just jumps directly to the :d label for death handling. For the second :kq label, it zaps three :h labels before falling through to the next :kq label. Because higher damage spells will always zap more :h labels than lower damage spells (unless they kill the creature outright) we order the :kq labels from most damaging to least damaging in order to take advantage of this fall-through behaviour. In the final :kq label, the object #ZAPs two more :h labels, then ensures the :j and :c labels are zapped (so we get both a slash effect and a solid char effect on the object, making it very clear that it was affected by this spell) before doing a #self:h and #d, to either report the creature's remaining health or to proceed to death processing, depending on whether the creature still has any :h labels left. The number of :h labels to zap is something we know ahead of time. A 100 damage spell will deal ((100 - 33) / 28) = 2 zaps of damage, while a 200 damage spell will deal ((200 - 33) / 28) = 5 zaps of damage, or 3 more than a 100 damage spell, which is why the 2nd :kq label zaps :h an additional 3 times.
You might guess that these creatures were not programmed by hand, and you would be right. Enough of the behaviour is similar between creatures that I was able to create a file of enemy attributes (stats, messages, sound effects, special movement code etc.) and generate creature code based on those stats. The code to automatically generate the status bar text showing the enemy names and stats was also automatically generated from the same data file. Otherwise keeping all these numbers correct and balancing them would become too time consuming.
Respawning
Because I was heavily limited to the number of enemies I could put on a given board, and because enemies are an important source of experience, I introduced a respawn mechanic to cause enemies to come back a limited number of times. This was handled by placing 'respawn point' objects throughout a given board.

The respawn objects are very small (after all, this mechanic is designed to save memory) and each one is tied to a particular creature on the board. Only certain creatures are eligible to have respawns, and only some boards have respawn points. Each respawn object has this form:
@r
'3
#bind c3
(note: these objects are pre-stopped, so they don't require an #END to ensure that they wait until they are sent to the currently-zapped label before they #BIND to the respective creature.)
:d
#give score 165
#m:k1
#lock
#restore h
#restore r:3
#r:3
/i#become fake
:h labels, restore the :3 label of an @r object, send that @r object to :3, then wait a cycle before disappearing. We #RESTORE the :h labels because we want the creature to come back with full health. Essentially, we are going to use the #BIND command to allow the respawn point to copy this object's code so that the creature can emerge once again later on. The reason we remote-restore the :3 label in @r before sending to it is that #RESTORE works in a funny way when used on a remote label. Essentially, it searches through every object named @r until it finds one with a zapped :3 label. It then restores it and stops. We want this behaviour because we don't want to activate all of the respawn points bound to this object, just one of them. When the newly respawned object dies again, it will be able to activate the next one, and so on and so forth.
The respawn points are placed in little "closets", which are designed to not stand out too much, but just look like the normal messy dungeon layout. Each respawn point is set with an initial walk direction walking towards the entrance to its closet. After the creature sends the message to the respawn point, the respawn point #BINDs the creature, then waits. The reason the creature idles for a cycle before dying is to give the respawn point time to steal its code. Once the original object dies, the respawn point will become the official owner of that object's code, so we don't need to worry about the typical problems associated with #BIND and zapping/restoring labels.
The start of the code of these respawn-eligible creatures is also a little different:
#b
:b
#zap b
:c
#e
:b
#lock
/i#if not wk b
#restore sq
#put flow empty
#walk i
:sq
When the creature initially runs, it first jumps to the :b label on the second line, then zaps it. This is to ensure that, if this object's code is run from scratch again, it goes to the second :b label (in hindsight, yes, this could probably have been handled in a simpler way by pre-stopping these objects, but oh well). This is precisely what happens when the respawn point #BINDs the object; it jumps to the second :b label and locks itself, waiting for the 'wk' flag to be set before continuing. Once the flag is set, it then destroys the entrance to its closet, stops walking, and proceeds with normal processing (which also involves setting its char to the normal char for that creature, which is important because respawn points are char 32 initially.) As a result, a dead creature does not visibly respawn until this flag is set.
The 'wk' flag is set by an object named @sx, which activates each time the player enters the board (helped by objects that sit next to the board exits and watch for the player) and every 2nd activation it has a 1/4 chance of setting the 'wk' flag, then clearing it next cycle. This means approximately 1/8th of the time you enter a board, any respawned creatures on that board may crawl out of their burrows, looking for revenge.
Spellcasting

I knew fairly early on that I wanted a large library of spells that could be cast at (almost) any stage of the game, and this carried with it some inherent complications. I covered the issues associated with keeping track of the spells you know previously, but the other issue is the memory expenditure associated with having code for handling this many spells on every gameplay board. The spellcasting code is based on checking the S flag, which can be set with ZZT's flag-setting cheat code ?+S. Once this flag is detected, it is unset and a menu is displayed showing the spells the player has equipped and prompting the player to choose one. This work happens in the @Spellbook object, which also carries some of the logic for carrying out the effects of spells. For instance, if you choose a damage spell, it will zap enemy :kq labels the appropriate number of times before sending them to :sda, :sdb or :kq, depending on the area effect. The logic travels through a bit of a labyrinthine sequence of labels to enable optimal code reuse. This was another reason why I had so many damage spells in the game-- byte for byte they were the cheapest thing to implement.
The next category of spells that was easy to implement was healing spells. For Elise has two of these; HEAL and LIFE, which heal 100 points of HP and all your HP respectively. These are handled by @Spellbook simply by giving the player 100 or 1000 health respectively (1000 being used because it was greater than your maximum possible health in the game. Although in retrospect I should have used 900 and saved a byte), then sending a message to another object to enforce the maximum health limit. This object checks the experience level flag, and then attempts to #TAKE health equal to the player's maximum health at that experience level. If the #TAKE succeeds, the player has at least that amount. To get the player's health down to the maximum, the object will #ENDGAME to reduce the player's health to zero, followed by giving the maximum. If the take fails, nothing happens, so nothing else needs to be done.
Two spells that fit into categories of their own are OPEN and TOWN. OPEN is very simple- it just changes all doors on the board to empties. TOWN is a little bit trickier and uses a few objects to implement. When the spell is cast, the two light-blue solid tiles in the sidebar are overwritten with player clones, which are each adjacent to a passage on two directions, meaning that when the player next moves in any direction, one of those clones will enter the passage, teleporting the player to the town board. On the town board, a series of objects with strange walk directions will then operate in order to push the player out of the lake they appeared in, no matter which direction the player moved after being teleported. Then, on re-entering the board, the player clones will be overwritten with light blue solid tiles again.

All of the remaining spells are time-limited buffs and debuffs. SLOW and STOP are debuffs that prevent enemies from moving as well as they previously could for a limited period of time. SAFE, GROW, WALL, POW and HERO all increase the player's stats for a limited amount of time. None of these effects can travel from board to board. @Spellbook does not handle these timed effects itself, but instead simply messages another object, @sx, which handles all of that.
The stat-increasing effects are handled by the labels :b, :c, :d, :f and :g, which zap their respective labels (attempting to double-apply the same stat buff will give an 'Already in effect' message and fail.), increase the player's ammo and/or torches, then restore a certain label (:bx, :cx etc.), which is used to remove the buff if the player leaves the board or the time runs out.
To handle time running out, the @sx object is sent to the :step label every time the player moves. This uses a two-level stepped zap/restore structure of :z and :y labels to count a certain number of steps without needing to use a counter. The 8th time the :z label is jumped to, the object restores all the :z labels and jumps to the :y label. The 8th time the :y label is jumped to, the object restores all the :y labels and times out any active effects. Because the object uses this method to count down every buff/debuff effect, a nice side effect is that, if one buff is about to run out, you can cast a different buff to restart the countdown. To handle expiring of effects, the @sx object then attempts to jump to each of the :bx, :cx, :dx etc. labels, which will take torches/ammo equal to that which was given by the buff that #RESTOREd that label in the first place.
Effects also expire if you attempt to leave the board. This is handled by objects sitting at each exit (and via special handling with the TOWN spell) - if the player comes into contact with those objects, they immediately send a message to the @sx object, telling it to expire all current spell effects. To prevent players from attempting to cast a buff or debuff spell while standing at the entrance (and being disappointed when their spell immediately times out), when you attempt to open the spell menu, the spellbook sends a message to each of these objects sitting at the exit to ensure the player is not currently in contact with one of them. If the player is, the player will not be allowed to cast a spell.
The @sx object handles the SLOW spell by using a zap/restore construct on the :step label to zap every creature object's :sq label once every two steps until the effect expires. To handle the STOP spell, the object immediately zaps every creature's :sq label twice. It then restores them twice when the effect expires.
All the spell effect messages are handled separately in the @j object, to avoid potential problems with single-line messages in ZZT opening up text boxes if you don't immediately follow them with an /i or #END.
In-game documentation

Because of the large number of nonstandard systems in this game, as well as the large number of spells, I wanted the player to be able to have access to comprehensive documentation at any time. As any kind of useful, descriptive text is naturally going to be quite expensive in terms of memory, I made use of ZZT's external HLP file support. By presenting the player with a text box containing a choice like this:
!-fe_intro;Read the introduction
...when the user selects that choice, this will cause the text box to display the contents of the FE_INTRO.HLP entry inside the ZZT.DAT file, and if it can't find it, the contents of a file named FE_INTRO.HLP in the current working directory. Town of ZZT attempted to use it to display an order form. Because these are external files, they do not count towards the 20,000 byte board limit, and I was able to write up explanations of the games systems, spells etc. in great detail and include them with the game.
My original plan was to replace the default ZZT documentation with them by packing them into a custom ZZT.DAT file (so that you could read the documentation by pressing the H key in-game), but I ended up deciding against this for a couple of reasons:
- At the time, the web version of Zeta running on the Museum would sometimes prioritise files from the original ZZT archive and sometimes prioritise files from the game archive whenever there was a collision. This was later fixed, but at the time it meant that sometimes For Elise's help version would work and sometimes it wouldn't.
- Users attempting to download and play the game, instead of playing it through the web player, would need to overwrite their ZZT.DAT file, which may be undesirable.
My solution ended up being that I used a flag as I did with the spellcasting system; the user could just type ?+H and an object would display a small help menu linking to these external files.
Music
Games need music, and as someone that is not particularly musically inclined, I turned to someone who is for this part. Lachesis is the current developer of MegaZeux, and is someone that I have worked with on many game projects, as well as on MegaZeux itself. She composed a fantastic soundtrack for the game using a custom tracker that she also created. This was prior to the Reconstruction, and although there were other tools for playing ZZT music sequences, none were particularly faithful. This required a fair bit of experimental reverse engineering into how ZZT plays music.

In the original release of For Elise, only the logo theme and town theme were included, but the later v1.5 release features the full soundtrack (as well as several improvements in optimisation in order to make room for it).
#PLAY statements work by adding the notes they generate to the end of ZZT's sound queue, where they will then be played as they are consumed. ZZT music takes the form of generating square waves at various frequencies at a maximum resolution of ~54.9ms, although the "drums" can be used to add some variety.
It is not possible to inspect the current length or contents of the sound queue. You just need to intersperse your #PLAY statements with idle waiting. Too much #PLAYing and you risk overflowing the queue and having subsequent #PLAYs silently dropped, which can throw your music out of order. Too much waiting and you risk the queue emptying, adding unpleasant periods of silence between #PLAY statements.
When the town board was split into three separate boards, this introduced problems with trying to play background music in town. The solution I used was one that, to my knowledge, has only been used by nanoco in Adventures of Link 2; using a flag to record which #PLAY statement was last played. This way, even if the player switches boards, the music object on the new board knows where to resume playing. While the setup is a little bit fragile, if you ensure that there is a little bit of extra padding in the sound queue at all times, the likelihood of the queue running empty is pretty low.
v1.5

A few months after the original release, I updated the game with a v1.5 release. The primary reason for this was to include the extended soundtrack, but I also took the opportunity to fix some bugs, add various quality of life improvements, and fix the endgame so that it isn't quite as easy to cheese. The additions required quite a lot of extra board memory to fit, but I was also able to find plenty of optimisation opportunities as well, so they were able to fit.
The revamped endgame was mostly in response to watching Dos' stream and seeing how all of the endgame bosses could be beaten with essentially the same strategy. To deal with this I listed down the various spells and combinations of buffs that could be used to beat the bosses and made each boss use a strategy that prevented at least one of those combinations from being used. The endgame now requires a variety of strategies to beat. However, to balance things out, the price of inn visits was reduced and several powerful spells were moved around so they would be introduced earlier.
Afterword
In the end I was quite happy with how this game turned out. There is always a gap between your initial expectations for a project and how it turns out, but in this case, I feel that it achieved everything I really wanted it to originally. Most importantly, it taught me a lot of lessons about how projects like these need to be planned out, especially when you are fighting limitations every step of the way and need to make cruel decisions about things to cut and things to keep at every set. I probably don't still have all of the extensive flavour dialogue I had written for shopkeepers and other NPCs in town to use but had to throw out because it used up too much space, but I do miss it. One of the 'themes' with the equipment shop was how the shopkeeper would sell you on the next upgraded shield by telling you how terrible the last shield he sold you was, and I had a lot of fun writing that dialogue.
I would say some of the things I would do differently next time are:
- Consider the possibility of splitting the game across multiple worlds from the beginning. I would clearly have to do a lot of things differently if I can't rely on the town being the sole hub for an entire game, but being able to freely go up to 400kb multiple times over would be a lot more freeing from a design perspective. I would then feel less pressure to do too much in too few boards.
- Try to work out different ways of adding varieties to enemy behaviour at the beginning, instead of trying to force it in at the end when every change you make is fighting the engine you created.
- Centralise things more. Individual enemy objects do not need to have the amount of copy-pasted logic in them that they have. I should have found a way to split things up.
Yet, while I would do things differently, I absolutely don't regret where the journey has taken me and I am very proud of the finished product. I learned quite a bit from making this game and I hope you found this retrospective and reflection useful.
This article was submitted as a guest feature by Lancer-X.
Other games by Lancer-X include: