It's time to finish up Gem Hunter 3, and with it, the entire Gem Hunter series. Last time, I courageously fought my way through six stages with a grand total of sixteen different ZZTers included in it. That's more names for players to recognize than creators of Town of ZZT Remix, the massive collab from 2021. How high can the count go? And can any of these characters actually do anything for this game's story which really hasn't advanced much at all over the course of file one?
Well, picking up where things left off, players are dropped onto a password screen to prove they've earned the right to be here. After a tedious scroll through the entire alphabet to spell out CARLIN, the game picks up pretty much where it began prior to any dimensional hopping. Just at the entrance to Masamune's volcano base built on the planet Snilloc Lihp. This is the #endgame.
The Mysterious Masamune's Castle
For file two players are officially done with hunting for gems. They're definitely not done with beating up ZZTers, which are at least reduced in number even if that's just because the second file is one stage rather than several.
Getting away from the idea of "dimensions", the last chapter of Gem Hunter 3 does a much better job of feeling like a proper entry in Tseng's little universe of games. Still, it does get off to a false start.
Tyrone and Kim are out. Now it's up to Gem Hunter, Qwerty, Nacut, Anita, and Reno to infiltrate Masamune's base, kick his ass, and rescue Torie. Ideally solving the mystery of this Mister Z character that's been pulling the strings along the way, which will only happen for players that found every gem in the first file.
As the team struggles to deal with some security lasers, Gem Hunter is tasked with finding and activating (not shutting down) two generators. It's a quick justification to get the player moving and gives them a short-term goal.
Or it would, if there was any enemy, puzzle, or obstacle standing in his way.

Yes, the first thing players do for this grand finale is walk to the left board and flip a switch. Then walk to the right board and flip a switch. This is impressively unnecessary, managing to be even more busywork than the freebie keys back in #darkdigital where you at least had an attempt at humor with Voidght's head-bashing and Tseng's self-deprecation.

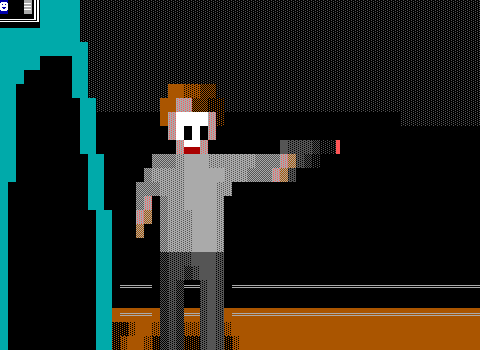
Maybe it's just a lackluster attempt to not immediately throw Gem Hunter directly into the fray. The moment the player passes the barrier they're taken to a new board to fight ZZTer Kev-San, creator of ZZT rock-opera Freedom. Kev's shtick here is his constant use of ending sentences with an ^_^ face that the characters call an "anime smiley".
A handful of ZZTers were fond of making this face in their posts. I don't think anybody was ever actually bothered by it. At least, no more than ending sentences with :). Here the annoyance is played up a lot more.

The arena for this battle is another one split in half by water. The robotic looking thing in the middle is supposed to be Torie being pinned to a wall with a giant anime smiley suspended above her that will fall if any of the bindings are removed.
It doesn't play into the fight at all other than adding some walls. Kev-San is pretty much another Meegalo, so nothing players will be wowed by by any means. Even less so for any player like myself that played Meegalo's stage last and have the encounter fresh in their minds.
On the bright side, I actually had health and ammo for the fight, making it far more feasible to win than Meegalo's.
Once Kev's health is drained, he prepares to really get serious, saying that it's time for Gem Hunter to die. But then...
KEV-SAN: Ouch! ^_^ My pinkie! You sliced
off my pinkie! You...! ^_^
SEPHY LEE ROTH: What'd I say, dude?
GEM HUNTER: Sephy?!
SEPHY LEE ROTH: Don't get me wrong, I'm
still going to kill you both, later, but I
figured I'd show Kev-san over there who
"The Man" was.
SEPHY LEE ROTH: My work here is done.
• • • • • • • • •
...one of the big three of the Triple Evil-ad, Sephy Lee Roth, appears, slices off Kev's pinkie for his failures, and decides that he's going to be the one to kill Gem Hunter. And Kev for failing to get rid of Gem Hunter in a timely manner.
The way this scene plays out had me wondering if it was intended to mimic Cyborg Ninja from the original Metal Gear Solid. At this point, it's a bit inconclusive. Later on though, Tseng slips in a handful of other moments that similarly draw from MGS and eventually one boss makes it a certainty.
Both Kev and Sephy run off, giving Gem Hunter the opportunity to safely free Torie without fear of crushing her. This man has been in this base for all of two minutes and already accomplished his original mission.
Hardly content to go home though, he presses onward to continue his ass-kickings.

And almost immediately, the path splits based on what ending players are heading towards. The trail of blood from Kev-San leads to the game's standard path, whereas setting a flag at the start of the game will cause the white walls to vanish, opening up the way to the true ending.

Masamune's base isn't just a bunch of boss fights at least. There are a number of more typical action boards like this one with these ambiguously named foes. They're either "Guntrappers" or "EvilMantises" depending on whether you take the board name or object name to be canonical. They're positioned in such a way that they pop out, fire a shot, and return to their initial positions shown here.
With so much ammo provided to players at the start of the second file, it's easy to spend some extra ammo and quickly dispose of them.

The GunMantises are followed by the mandatory dobermans. They slowly move towards the player and bite if you make the mistake of being next to one afterwards. Only 6 damage though, so another instance of Tseng's enemies being more bark than bite.
One thing players will quickly realize is just how incredibly linear things have gotten. There are no more gems and no more keys, so no more exploration is needed. It's not even on the scale of board-to-board connections. Everything is designed for Gem Hunter to start at one end and reach the next following very strict paths forward, never deviating for any reason.

Somehow Tseng resisted the call to follow up the dobermans with an "Agh. More Dobermans" board. Instead, he calls back to the second floor of the Boys in Blue headquarters from the previous game, with a brand new "hall of puzzles".
Given how little players have needed to think to get this far, this board is a very welcome sight, even if the puzzles inside aren't all that exciting. A little variety can go a long way to preventing tedium after all.

Puzzle #1 is to guess some passwords with a hint for the first being "the nature of this room". Prompts show a small set of letters letting the player mostly guess their way forward until they realize the word being spelled is "Chaos" with some inscrutable references for non-ZZTers of the day to "Chaos is a form of Cherry Pie", a meaningless phrase for ZZTers to repeat that never caught on, unlike "Green in evil".

The second password is to answer some personal Tseng lore. Most of these names showed up in BlueMagus's library earlier, but no mention of a favorite album is mentioned there.
Thanks to November Eve though, I was able to correctly guess Wyclef Jean on my first try, knowing that Tseng named a game for the song Gone Til November.
Getting it right on the first try hardly matters. Incorrect guesses only make you have to guess again, with no actual penalty to your health or anything. It's probably for the best given the letter by letter approach to figure out the first password and needing to know Tseng's musical tastes back in 2000 for the second.

Puzzle two is Sokoban. Next.

Puzzle three is the best of the bunch. A series of switches can be flipped which rotate various arrows in different ways. Touching the blue square causes the arrow on the top right to shoot in the direction it points, with the subsequent arrows doing the same when they're shot. You need to adjust them in such a way that the targets are struck. This is something that feels different, both for this game and ZZT puzzles in general.

Puzzle four is fake wall maze where two buttons need to be touched. Next.

Puzzle five is getting through a mess of boulders while dealing with conveyors that can shove them around. I'm sure it's possible to mess up, but I got through it with no issue and tend to be bad at these things so it might also just be incredibly easy with a number of valid solutions.

Puzzle six is more Sokoban. But wait! This time touching the boulders pulls them towards the player instead. Since you can't get them stuck in corners, a third sensor is added that the player needs to stand on. The player also needs to recognize that they have to specifically stand on the purple sensor as it's impossible to pull a boulder onto it.
The effort in this room is appreciated, offering a bit of variety to what has been a pretty monotonous game. These little puzzles would have been quite welcome in the previous stages to reward players with gems or just give them something more involved to do on their journey towards a boss room.

The variety quickly comes to a halt as players find themselves fighting yet more dobermans. Tseng still refuses to say the line here, which is killing me at this point. These are more dobermans. You named the board that!
Here, once more Tseng employs the over/under pass technique with hidden transporters just as in Lemmer and Scissorman's volcano world. The straightforward path means it's still easy to realize there are invisible transporters. The visuals themselves don't really make it as apparent as the previous ones did. With how linear everything is here, even what appears to be a solid wall likely won't slow players down at all.

Invisible passages prevent the player from actually walking onto a new screen. Instead players are whisked away into a cut-scene where ZZTer craNKGod and some guards capture him effortlessly.
The previous board does actually have a defined connection to this one, so perhaps originally the player was going to get themselves caught rather than animate it instead.
The dialog here is a laughably bad treat. While Gem Hunter's one-liners have never been particularly good, these two are pretty abysmal.

The hints of Metal Gear Solid continue. Now that Gem Hunter has been captured, Kev-San gets the opportunity to perform some torture while Masamune and craNKGod discuss where Sephy went and the anticipated arrival of Mister Z.

Despite being strapped down and about to be tortured, Gem Hunter gets to ask questions here. Mister Z's identity is unknown to Kev, but he can say that whoever he is, he's Masamune's employer and somehow more evil.

Can you imagine people getting so upset about smiley faces that they liken them to torture?
I can't. :3

Lol.
Before he can be overwhelmed, Qwerty arrives in the nick of time, casually enters the room, and kills Kev-San. He says he did it because of the anime smilies rather than to save Gem Hunter, but beggars can't be choosers here.

This is followed by still more dobermans. Agh.
I have to admit that I like the way this board plays with its wall colors though.

The path leads players into a giant freezer cooling station where craNKGod is waiting. He apparently has the advantage here? Maybe he's dressed for colder weather? Otherwise nothing about crank was ever particularly icy. Once again it is cold and I demand coolzx, the guy you can cameo in cold places.

Tseng clearly wants Crank to be Vulcan Raven what with the freezer and all. He moves towards the player a bit, backs off a step, and then checks to see if he's aligned with the player. If he is, he enters a blitz attack where he'll shoot bullets until the player gets out of the way. Almost like he was wielding some sort of minigun...
Given how rapidly he fires when he does, being too close to him can be rather dangerous. You'll want to be far enough away to be able to react to the barrage when it begins.
When shot, craNKGod becomes invisible using the teleportation effect Tseng loves to give to any character that needs to teleport. From there he runs off for a bit before reappearing and resuming combat.

It ends up being an easy fight. I didn't take a single point of damage here. Once crank is up against a wall he can't run away very far, and once again with some aggressive shooting he's quickly defeated.
It's not a bad fight though. Still fairly standard stuff in terms of how you attack, but with some creative flair in his own offense. The second file definitely holds the best boss fights in the game even if they still aren't anywhere near the highs of the previous game.
One more gameplay board follows with the colors scheme changing from dark cyan to gray. Tseng rewards players with a medkit for 200 extra health in preparation for the final battle of the game. Plus, for no particular reason the ZZTer Blazer is there, acts a bit rude towards Gem Hunter, and is promptly shot for his transgression.

A short cut-scene ensues, as Gem Hunter discovers a giant laser meant to blow up Da Hood. Depending on what path players are on, it is either referred to as the "G-Wyclef Cannon" or as it is here, the "Brother Ray", parodying Final Fantasy 7's own giant cannon the Sister Ray[1].
Whatever it's called, the easiest way to prevent it from destroying Da Hood entirely is to kill Masamune before he can fire it.
It shouldn't go unstated either that aside from the first file's introduction, ending, and if you really want to be picky, the boss animations, the entire file was devoid of these cut-scenes which Tseng seemingly swore off of overdoing in November Eve's where critics hated that 90% of the game was something to watch. The ones here are happening more frequently, yes, but they aren't anywhere near as long as those in November Eve.
The real criticism here is that even when it would be very easy to let players explore these boards directly. Tseng's opts for cinematics where little happens beyond a character moving while text appears. This exact same board could have had the player in control with them inspecting the laser themselves, just as the capture by the guards earlier likely began with the player in control.

Ironically, just as I had the thought, Tseng managed to integrate story and gameplay on the very next screen. Here Gem Hunter eavesdrops on some of the villains, allowing both the player and Gem Hunter to learn together.

One last ZZTer cameo is squeezed in. Gipface is also here, and explodes for no reason.

Opting to be sneaky for a Change, Gem Hunters follows Masamune to the hangar and his ship which really struggles to look like one. My first thought was that I was looking at a broken bridge over a pool of water or something.

The final fight with Masamune is another standard run and gun, and in a big empty room no less. Like craNKGod, Masa can also go invisible for certain attacks that render him immune to damage until he reveals himself again.
It's fine.
After being defeat Masamune makes the expected revelation that just like the Masamune Kim fought, he too is another clone and the real Masamune is still out there. Then he explodes into green goop. It's a hard life for a clone.


Okay. This is very funny though. Gem Hunter, intending to confront Mister Z instead walks out of the ship entirely, only for it to take off the moment he's no longer on board. Villains in this series never really die of course, always escaping or being clones or brought back from the dead or whatever. This is just the goofiest justification for the escape.

Back in the now empty hangar, Reno calls to repeat to players what just happened. According to him, the canon has been activated remotely, set to fire in five minutes!


Well, that's an easy fix.
There are in fact two objects to interact with, one to shut the laser off, and one to activate the planet's self-destruct system. Each one opens up a passage to the ending, just slightly tweaked depending on how Gem Hunter goes about it.
After having played Jedi Knight, I was really hoping Tseng would also be bold enough to do what noachnet did in that game: have the entire cast be killed off and the villains win. It made sense after all. If you just turn the laser off, who's to say Mister Z can't just turn around and reactivate it?
Tseng is getting tired of this series and ZZT in general, so what a great way this would be to end it.

The setting of this changes depending on whether players go for the off button or self-destruct. The self-destruct ending is a bit funnier for having a few cast members very angrily say that next time Gem Hunter plans to blow up an entire planet, he should really inform his friends about the impending explosion.
For the off button, the debriefing happens with everyone conveniently in the same room together. It's the perfect opportunity to wipe out the whole canon via cannon.
- [1] I mean, FF7 itself is presumably referencing a song by The Velvet Underground. Tseng's got some pretty specific tastes in music that he loves to make people aware of, but he's also again, named after a character from Final Fantasy 7, and it is also a giant weapon so like, this one goes to Square.