Learning how to create worlds with ZZT has changed quite a bit over the past 30 years.
While there have been many resources developed over ZZT's history to help newcomers learn the ropes of the language as well as some of the more unintuitive or even unintentional features, these historical resources are likely not the ideal for new ZZTers today. ZZT's abilities to easily display text and edit any world make it great for in-medium tutorials, a rarity or outright impossibility in many other mediums. Yet, while these worlds which provide something more akin to hands on learning are a valid way to learn how to write code for ZZT world, they are not, nor should they be the only way.
Reading from these worlds today means staring at narrow windows of blocky text that fit very little information on the screen at once and provide no real cross referencing of information. Those that are aimed at beginners tend to just have some objects whose code can be studied. Those aimed for experienced ZZTers assume knowledge of the basics already.
Many guides have many revisions, and opinions on which version is the best to use are generally based on 20-year old wisdom. These guides were written in an older time, where the inner workings of ZZT could only be deduced by prodding at the engine and observing how the program behaved. Most were designed from an era in which only the default ZZT editor was available. Many are known to have (generally minor) errors that directing somebody with no ideas of what ZZT is capable of towards runs a real risk of confusion or incorrect assumptions.
Other texts outside of ZZT exist, but tend to be more clinical in nature, getting deep into the nuances of commands and how they can be exploited to the experienced ZZTer's benefit. They too are a valuable reference, but once again are aimed towards more knowledgeable readers.
This guide aims to provide easily referenced, and accurate information in a simple text focused format. Visual examples are provided, many of which are in the form of animated GIF files, though nothing contained in these images is required to understand the written material.
Everything is purposely put onto a single page so that text searches can yield results easily. Information is cross-referenced between related commands and parameters when relevant. The assumption here is that the reader has never made a ZZT world before. The goal of this document is not to exhaustively list all information about the ZZT-OOP language, but rather to provide straightforward concepts of the purpose of each command. When there are potential dangers they are mentioned, but some of the less common glitches remain unexplored here, and some of the less readily apparent techniques have been deliberately omitted.
Contents
- Stats, Cycles, And Code Execution
- A Note About Scrolls
- Syntax Formatting
- Flashing Text And Message Windows
- White Centered Text
- Hyperlinks
- Hyperlinking External Files
- Comments and Pre-Zapped Labels
- Naming Objects
- Labels: Built-In And Custom
- Moving Objects And Specifying Directions
- The #BECOME Command - Transforming An Object
- The #BIND Command - Sharing Code And Caveats
- The #CHANGE Command - Transforming Elements
- The #CHAR Command - Changing Appearances
- The #CLEAR Command - Erasing Set Flags
- The #CYCLE Command - Adjusting An Object's Speed And Reaction Time
- The #DIE Command - Destroying An Object
- The #END Command - Stopping Code Execution
- The #ENDGAME Command - Game Over... Usually
- The #GIVE Command - Making Numbers Go Up
- The #GO Command - Moving Objects
- The #IDLE Command - Wait A Cycle!
- The #IF Command - True And False Quizzes
- The #LOCK Command - Preventing Unwanted Events
- The #PLAY Command - Creating A Squarewave Symphony
- The #PUT Command - Adding Elements To The Board
- The #RESTART Command - Let's Take It From The Top
- The #RESTORE Command - Enabling A Disabled Event
- The #SEND Command - Directing Objects To Handle Events
- The #SET Command - Tracking Information With Flags
- The #SHOOT Command - Firing Bullets
- The #TAKE Command - Reducing Counters
- The #THROWSTAR Command - Throwing Stars And Second Thoughts
- The #TRY Command - Planning For Failure (To Move)
- The #UNLOCK Command - Following Events Once More
- The #WALK Command - Making Objects Walk 500 Tiles And Making Objects Walk 500 More
- The #ZAP Command - Disabling Events
- The Default Stat
- List of Counters
- List of Element Names
- List of Colors
- What Next
Stats, Cycles, And Code Execution
ZZT's elements are divided into two categories, those with stats, and those without. A ZZT board only allows for 151 stats at a time, with one of those stats being used for the player themselves. Stats are used to store information about an element. They store how often the element gets to act. They store all the code contained in an object. They store things like passage destinations, creatures' intelligence, and the direction of blink walls.
ZZT, and third party editors automatically create a stat for any element that requires one. Internally, the stat and the element associated with it are two independent concepts. Each stat created is added to the end of a list, and then during gameplay each item in that list is checked in that order to determine if it should act, and how.
A stat's cycle determines how often it gets to act. ZZT keeps a count of how many ticks of gameplay have elapsed and then checks to see if a stat's cycle is divisible by the current tick count. If it is, the element located at the stat's coordinates gets to do whatever it does. Lions move around, bullets travel forward in the direction fired, passages do nothing, etc.
When an object gets to act, it will execute its code. By default this means that all code runs automatically from top to bottom, necessitating the use of the #END command to prevent this. A common mistake by newcomers is to not realize the need to tell objects to stop running. If you find your objects immediately displaying text or anything before they should be, you probably just forgot an #END.
Commands themselves come in two varieties as well: cycle ending and non-cycle ending. The former means that after executing the command the object will not continue to execute additional code. The latter means that the object will continue executing code. Sometimes you may wish to purposely end a cycle before executing more code, which may be done by idling with /I. The command reference below will note whether a command will end a cycle or not. For most basic objects made by new ZZTers, these shouldn't be too much of a concern, but the knowledge can be helpful when programming visual effects.
A Note About Scrolls
In addition to objects, scrolls are also able to execute code, though they have a few restrictions that objects do not. Firstly, scrolls will not run their code automatically, they must be touched by the player to execute. Second, while objects can receive events from other objects that cause them to jump to other labels in their code, scrolls do not, and will always start from the first line. (You can have a scroll send events to itself though!) Lastly, since scrolls automatically destroy themselves when touched, some commands that are not intended for use in scrolls will result in either nothing happening, or worse, outright crashing ZZT. The command reference below will note if it is safe to use in a scroll or not.
Syntax Formatting
For clarity, all ZZT-OOP commands written in this article are displayed in all-caps. ZZT is not case-sensitive, and most code is written entirely in lowercase. Capitalized letters are used for clarity.
Most commands take one or more parameters. Mandatory parameters are surrounded in angled brackets (Ex: <element>). Optional parameters are surrounded in brackets (Ex: [label]). In rare instances, there are multiple possible types of parameters. These are divided with a pipe character (Ex: <flag|condition>).

Single line messages let the game keep moving and are a great use-case for onomatopoeia.
Flashing Text and Message Windows
| Syntax | Text |
|---|---|
| Scroll Support | Yes |
| Cycle Ending | No |
Text may be displayed simply by writing it in an object or scroll.
A single line of text will be displayed along the bottom of the board in flashing colors for a few seconds before disappearing.
Multiple lines of text are instead displayed in a message window that pops-up and pauses gameplay. Players can use arrow keys and page up/down to navigate the text if it cannot fit entirely onscreen.
All characters* may be entered as text, but if they begin with reserved characters such as / or # they will be parsed as commands instead.
* The sole exception is the ♪ character as it doubles as the line ending character in ZZT. Some editors may allow this character to be inserted, but it will result in a line break when viewed in ZZT.
One thing to be careful about is that label jumps via the #SEND command will continue text parsing, and end up adding a blank line to your text. In many cases, this ends up being unwanted as even if no text is found after the label jump, a single line message will end up turning into a message window. The easiest way to avoid this is to manually end the cycle with /I to idle and stop parsing before making the label jump. It can be quite annoying to have gameplay interrupted constantly by message windows when fighting off enemies!

In addition to heading and other formatting, white text is commonly used to indicate dialog being spoken by the player.
White Centered Text
| Syntax | $[text] |
|---|---|
| Scroll Support | Yes |
| Cycle Ending | No |
By prefixing a line of text with a dollar sign, ZZT uses a different method to display the text. It will instead be displayed in white rather than yellow and in addition, it will be centered.
This only applies to multiple lines of text. A single line beginning with a $ will instead flash and display the dollar sign as part of the message.
If you'd prefer the white text to not be centered, simply fill the rest of the line of code with spaces.

Hyperlinks can be used for more information, making purchases, or as an excuse to include Led Zeppelin lyrics.
Hyperlinks
| Syntax | ![label];[text] |
|---|---|
| Scroll Support | Yes |
| Cycle Ending | No |
Hyperlinks may be added to text in order to let players make choices or navigate through text.
Writing a hyperlink will display the text with an indented character followed by the text. When a hyperlink is highlighted the top of the message window will indicate a choice is currently selected. Pressing ENTER will then follow the hyperlink, causing the object to jump to the specified label.
It is possible to close a message window with a hyperlink selected by pressing ESCAPE instead of ENTER.
If a label to jump to is not provided, selecting the hyperlink will close the window in the same manner selecting any other line would. This makes code such as !;No thank you an easy way to let players know they have the option to decline to continue the text.

Even external files have their upper size limits (1024 lines), so don't go embedding "War and Peace" in your game.
Hyperlinking External Files
| Syntax | !-[filename];[text] |
|---|---|
| Scroll Support | Yes |
| Cycle Ending | No |
Hyperlinks whose labels are prefixed with a hyphen are instead treated as filenames, allowing external text files to be viewed within ZZT.
The filename must be a compatible DOS short filename. By default, the extension .HLP is used, though if one is provided in the filename it will be used instead. If the file can't be found, the link will do nothing.
External files are rendered through a special display system intended for ZZT's help files. This essentially means the entire contents will be treated as text, and no ZZT-OOP commands can be ran from external files as they will be written to the message window instead. You'll also need to make sure that the contents of the file doesn't have any lines that are too long to fit in the scroll window or else the text will overflow and not be erased by scrolling the window.
Due to the restrictions on how these files are handled, external files are mostly used to store large quantities of text without having to worry about a board's memory usage. There is no way to display these files without the player manually selecting a hyperlink.

And now we know what condition will produce that message when this object is touched!
Comments and Pre-Zapped Labels
| Syntax | '[comment|label] |
|---|---|
| Scroll Support | Yes |
| Cycle Ending | No |
ZZT-OOP supports commenting code by prefixing it with an apostrophe. It can help make it easier to follow code, especially when working with shorter named objects and labels, but most worlds do entirely without it. This is partially because of the overall simplicity of most ZZT-OOP, partially because so many authors were new to programming and didn't bother, and partially because when you're making something really complicated in ZZT-OOP that would greatly benefit from commenting, it probably lacks the memory to spare.
In one of the most brilliant/baffling design decisions (depending on who you ask) of the ZZT-OOP parser, the syntax for comments is also used to indicate a label that has been zapped with the #ZAP command. The command will replace the : with an '. #RESTORE will do the opposite.
While comments can potentially overlap with labels, this is essentially never the case. If you're worried, the @ command will function as a comment anywhere other than the first line of code and will always be just that.

Sometimes authors will use unimportant object names as a space to leave a comment. It's a bit like tags on Tumblr posts.
Naming Objects
| Syntax | @[name] |
|---|---|
| Scroll Support | Yes |
| Cycle Ending | No |
Assigns a name to an object. This is used to refer to other objects from within code, as well as something that may be displayed to the player. Names can only be defined on the very first line of code in an object.
If an object with a name opens a message window to display text their name will be displayed along the top of the window. If no name has been provided, objects will use "Interaction" and scrolls will use "Scroll".
Objects cannot be renamed later on in code. The check to determine an object's name looks at the first character in the object's code for an "@" symbol, and uses the following text if the symbol is found.
You may have multiple objects with the same name allowing them all to react to a single #SEND command. In order to refer to an object without a name via #SEND, the special names ALL and OTHERS must be used instead.
If you use the @ command later on in an object's code, the line is ignored, making it an alternative way to comment code.

Sending and receiving events via labels is the basis of interactivity in ZZT.
Labels: Built-In And Custom
| Syntax | :[label] |
|---|---|
| Scroll Support | Yes |
| Cycle Ending | No |
Labels are used to mark locations in code that can be jumped to later via internal or external events. They are the bread and butter of how objects communicate with one another, as well as how the player acts with objects.
On its own, a label doesn't actually do anything, but any (non-locked) object may receive instructions to jump to a label where it will then execute code from. Objects may send these events to themselves as well, which can be used for branching code paths or creating a loop in which an object will continually run code after a label, reach an instruction to jump to that label, and repeat indefinitely.
The way labels are parsed has a few oddities which can lead to unexpected behavior. This is most commonly ran into when using numbers in labels. In simple cases like :1 it's not an issue, but heading into double digits can cause oddities. To be completely safe, stick with using only letters and underscores in your labels. The sooner you develop this habit the less likely you'll ever have to worry about issues with label names "matching" when they don't or vice-versa.
In addition to custom labels, ZZT provides a few special labels which are automatically jumped to when certain events occur if they are found in the relevant object. These include objects being touched by the player or shot by a bullet. Those two examples in particular are by far the most commonly used labels in ZZT. A full list of built-in labels follows:
| Label | Event |
|---|---|
| :BOMBED | A bomb's explosion hitting the object. |
| :ENERGIZE | A player element touching an energizer element. |
| :SHOT | A bullet hitting the object. |
| :THUD | A walking object being unable to continue walking in their current direction. |
| :TOUCH | A player element touching the object. |

Objects can move in a number of ways, serving as random obstacles, chasing the player, or following strict paths.
Moving Objects And Specifying Directions
| Syntax | / |
|---|---|
| Syntax | ? |
| Scroll Support | No - Crashes ZZT |
| Cycle Ending | Yes |
Objects have three main methods of movement, two of which have shorthand used in most cases.
/ or #GO will cause an object to attempt to move in the following direction until they succeed. If they are obstructed they will stay in place until they are able to perform their current movement command.
? or #TRY will move the object in the same manner, but if they are unable to continue in that direction they will give up and advance to the next line of code. #TRY offers the ability to provide an alternate command which will be covered in its section below.
The main reason for using / and ? over their more standard command forms is that you are able to put multiple movement commands on a single line when using the shorthand. A non-movement command can even end the chain of commands.
For example, /S/S/S?E?E/I/I#SHOOT SEEK as a single line of code will move south three times, attempt to move east twice, idle for two cycles, and then fire a bullet in the direction of the player.
| Direction | Movement |
|---|---|
| N, NORTH | Move north |
| S, SOUTH | Move south |
| E, EAST | Move east |
| W, WEST | Move west |
| I, IDLE | No direction. Waits in place until the next cycle. |
| SEEK | Move towards the player. If the player is not aligned with the object, SEEK chooses from the two potential directions at random. If the player is currently energized, this value is reversed causing creatures and objects to run away instead. |
| FLOW | Move in the direction the object is currently walking. If the object is not walking, act as if idle. |
| RNDNS | Move randomly to the north or south. |
| RNDNE | Move randomly to the north or east. |
| RND | Move randomly in any direction, with east and west being twice as likely as north and south to compensate for ZZT's boards being wider than they are tall. |
Additionally, these directions may also be subject to a number of modifier keywords preceding them that alter how they are interpreted.
| Modifier | Effect |
|---|---|
| CW | Rotate the base direction 90 degrees clockwise. (Ex: /CW N will move east.) |
| CCW | Rotate the base direction 90 degrees counter clockwise. (Ex: /CCW S will move east. |
| OPP | Rotate the base direction 180 degrees. (Ex: /OPP E will move west.) |
| RNDP | Chooses a random direction perpendicular to the base direction. (Ex: /RNDP RNDNE will pick randomly north or east, and then pick a random direction perpendicular to that, so either east/west or north/south. This is how to do unbiased random movement.) |
Modifiers may be stacked indefinitely as well. /OPP OPP OPP OPP N is a very bad yet very valid way of saying /N.
Directional modifiers are redundant with basic cardinal directions, though they make for easily understandable examples. In practice you'll use commands like /OPP SEEK to run away from the player, /RNDP RNDNS to randomly move east or west, or /CCW FLOW to turn away from the direction an object is currently walking.
Any command which takes a direction as a parameter can use all directions and modifiers allowing you to #SHOOT SEEK or #PUT OPP FLOW RED KEY.

Using #BECOME without a color, with a color, and with a non-permitted color for the element.
The #BECOME Command - Transforming An Object
| Syntax | #BECOME [color] <element> |
|---|---|
| Scroll Support | No - Crashes ZZT |
| Cycle Ending | Yes |
Transforms the object into the specified element, using the specified color if one was provided and the element is permitted to be that color. Needless to say, any code after a #BECOME statement is lost and will not be executed.
If no color is provided, the color of the tile beneath the object is used. This can be used to apply a non-permitted colors to elements which allow some custom colorization.
Statted elements created with this command will use the default stat.
Caution: Objects that #BECOME [color] OBJECT will lose their code. Objects cannot directly change their own color and must either have another object #PUT a differently colored object over them, or change color by being matched with a #CHANGE command instead.

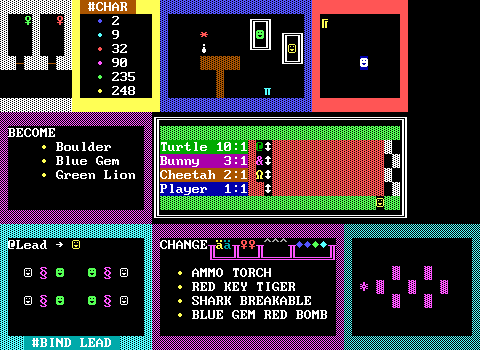
The @LEAD object loops up and down movement, while the rest of the objects merely have #BIND LEAD for their code.
The #BIND Command - Sharing Code And Caveats
| Syntax | #BIND <name> |
|---|---|
| Scroll Support | Yes |
| Cycle Ending | No |
Tells an object to discard its own code and instead point to code contained in an object named <name>.
This is not the same as copying the code into the object, something ZZT v3.2 does not support. Since the code is shared rather than copied, commands like #ZAP which modify code will end up impacting the original object as well as all objects bound to it. #BIND is intended to save memory and reduce repetition for multiple objects that need to behave in the same manner.
If the original object is destroyed, any bound objects should be expected to continue to function properly.
#BIND can be one of ZZT's most powerful commands. While code is shared, the object's other properties such as color, character, and cycle may be independently selected before executing the #BIND command. Note the crowd in the example here moving at cycle 1 while the lead object moves at a slower cycle 2.
Third party editors will allow you to manually point an object's code to another as if the #BIND command has already been used, often referred to as "pre-#binding". Be careful though! This technique can be fragile and lead to buggy behavior if statted elements are removed! It is fairly uncommon to bother with this as it is only really worthwhile in the most memory hungry boards.

#CHANGE can be used with some specially colored elements to get non-standard colors as seen in the third example here.
The #CHANGE Command - Transforming Elements
| Syntax | #CHANGE [color] <element> [color] <element> |
|---|---|
| Scroll Support | Yes |
| Cycle Ending | No |
Replaces all instances of the first element with instances of the second element.
Colors may optionally be specified for both arguments to only target elements of that color and/or to change them into an element with a specified color. If no color is provided for the target element, it will match all colors. If no color is provided for the replacement element, the color will be inherited from the changed target element provided the replacement element supports multiple colors.
If an element with a stat such a creature or passage is destroyed via #CHANGE, the creature destruction noise will be played. The lone exception is objects which will be erased quietly.
Statted elements created with this command will use the default stat.

No useful info this time, but you can easily start an argument by asking people how #CHAR is pronounced.
The #CHAR Command - Changing Appearances
| Syntax | #CHAR <element> |
|---|---|
| Scroll Support | No - No effect |
| Cycle Ending | No |
Changes the character used to represent an object. A reference table is available on the ASCII Characters page. Modern third-party editors provide ways of selecting a character when working with this command rather than require memorizing numbers, but you'll likely pick up a handful over time regardless.
There are 256 characters available to ZZT. An oversight prevents #char 0 from working, however #char 32 results in an identical blank character making the issue moot.
Today code page 437 is the de facto default character set, and the one that the vast majority of ZZT worlds past and present were designed for. Systems running ZZT under DOS may find their default character set to vary slightly in appearance depending on the video card. Some systems may use a different code page entirely which can result in incorrect graphics.
It is possible to create custom alternative character sets as well, allowing new graphics to be used on a per-ZZT world basis.

Flags can be used to track game events, items, stats, and anything else you want to represent with a single byte.
The #CLEAR Command - Erasing Set Flags
| Syntax | #CLEAR <flag> |
|---|---|
| Scroll Support | Yes |
| Cycle Ending | No |
Clears a flag that has been pre-set in the world's header or during gameplay using #SET.
Attempting to clear a flag that hasn't been set is harmless and will have no effect.
It is considered good practice to #CLEAR any flags that are no longer needed due to ZZT's limit of only ten flags being set simultaneously.

Slower cycles doesn't just mean slower movement. It also means slower reactions to events like :TOUCH or :SHOT
The #CYCLE Command - Adjusting An Object's Speed And Reaction Time
| Syntax | #CYCLE <number> |
|---|---|
| Scroll Support | No - No Effect |
| Cycle Ending | No |
Adjusts how often an object will be allowed to execute commands.
Each tick of ZZT's logic represents one cycle. The #CYCLE command can set the cycle from 1 to 255. In practice, it is rare to use cycles greater than 10 or so. A second of real time is approximately 9.1 ZZT cycles based on the timer mechanism the program uses.
Cycle 1 objects will run every cycle; Cycle 2 objects every other cycle; Cycle 3 objects every third cycle, and so on.
Objects created in ZZT's default editor operate at cycle 3. Third-party editors may allow the default value to be adjusted, though the default is usually fine for objects that don't need to cover large distances or have immediate responses to input.
Objects that adjust their cycle will continue executing code for the rest of the current cycle.
Through third-party editors, it is possible to set elements to run at cycle 0 which prevents objects from ever acting.

#DIE isn't always a literal death. Sometimes it just means cleaning up what's no longer needed.
The #DIE Command - Destroying An Object
| Syntax | #DIE |
|---|---|
| Scroll Support | No - Crashes ZZT |
| Cycle Ending | ? |
Destroys the object, replacing it with an empty element. In situations where fake walls are being used as floors, #BECOME FAKE is often used to prevent unsightly holes in the scenery from forming.
It is not possible to make the player step on an object as it dies to emulate how items are picked up which can make collecting objects as items somewhat slower.

When an object speaks long before the player arrives, the author probably forget to use #END.
The #END Command - Stopping Code Execution
| Syntax | #END |
|---|---|
| Scroll Support | Yes |
| Cycle Ending | Yes |
Halts program execution. The object will not execute any additional code until they receive an event from the #SEND command or from external events that have relevant labels such as :TOUCH from a player touching the object or :SHOT from being hit by a bullet.
#END sets the object's current instruction value to -1. As a memory saving technique, third-party editors may be used to set this value in advance, known as "pre-#ending".

Just because you can make any mistake cost the player their life, doesn't mean you should.
The #ENDGAME Command - Game Over... Usually
| Syntax | #ENDGAME |
|---|---|
| Scroll Support | Yes |
| Cycle Ending | No |
Sets the health counter to 0.
The next time the player gets to act, the game will end if the health counter remains at zero. When this happens, the gameplay speed limit is removed, but everything keeps running. Be careful not to spam the player with rapid firing popup messages when the game is over! Flashing effects should also be stopped for the sake of your players' eyes.
Note that the game doesn't actually end immediately after this command is executed, only when the player gets to act again. This can be exploited to easily set the player's health to an arbitrary value with the following code which will reduce the player's health to 0 and then increase it to 100 before the player ever knows they were dead. Spooky.
#endgame
#give health 100

One objects may be slower to collect than actual items like these keys, but getting 500 ammo from an object is far faster than collecting 100 ammo off the ground.
The #GIVE Command - Making Numbers Go Up
| Syntax | #GIVE <counter> <quantity> |
|---|---|
| Scroll Support | Yes |
| Cycle Ending | No |
Increases a counter by a specified amount.
While all counters can store values up to 32,767, note that the sidebar is only capable of displaying the first three most significant digits for torches.
ZZT offers built-in items to increase these counters, but it can be tedious to collect vast amounts. Use this command to quickly supply a player with large quantities of ammo, torches, health, and gems.

Creating a path is easy thanks to everything being on a nice rigid grid.
The #GO Command - Moving Objects
| Syntax | #GO <direction> |
|---|---|
| Scroll Support | No - Crashes ZZT |
| Cycle Ending | Yes |
Identical to using /<direction> for movement.

Here idles are used to adjust how quickly a gem and boulder change colors. Neither object actually uses #IDLE, instead using /I and /I/I/I for much quicker to write code.
The #IDLE Command - Wait A Cycle!
| Syntax | #IDLE |
|---|---|
| Scroll Support | No - The scroll will be destroyed after reaching this command making it pointless |
| Cycle Ending | Yes |
Stop executing commands until the next cycle.
Each idle only lasts for a single cycle so objects with faster cycles will require more idles than a slower cycle object to wait the same amount of real time. Due to how ZZT handles timing, a cycle 1 object with 20 idles is more precise than a cycle 10 object with 2 idles.
The actual idle command is almost never used in practice due to the option of using the far shorter movement command of /i instead.

#IF can check all sorts of things. Here the objects turn into a "Y" if their condition is true, or "n" if false.
The #IF Command - True and False Quizzes
| Syntax | #IF [NOT] <flag|condition> [THEN] <command> |
|---|---|
| Scroll Support | Yes |
| Cycle Ending | No |
Checks if a condition is true or flag is set. If so, the command will be executed, otherwise, code execution continues to the next line.
The keyword "NOT" may be include before the condition to negate its value, causing the command to be executed if the condition is false.
The keyword "THEN" may be included after the condition and before the command, mimicking other programming languages, but is optional and rarely seen.
List of Conditions
- "ALLIGNED" - NOTE THE EXTRA L! A typo that lives on 30 years later requires aligned to be spelled with a second "l". Evaluates to true if the player shares a horizontal or vertical coordinate with the object.
- "CONTACT" - Evaluates to true if the player is adjacent to the object in a cardinal direction.
- "BLOCKED <direction>" - Evaluates to true if any non-walkable element is adjacent to the object in a cardinal direction. This is all elements except for empties and fake walls, even if the element can be pushed by the object allowing it to move in that direction.
- "ENERGIZED" - Evaluates to true if the player is currently invincible from an energizer.
- "ANY <color> <element>" - Evaluates to true if the board contains at least one instance of the element on the current board. If a color is specified, the color must match as well.
Any non-conditon value (including the correctly spelled "aligned") will instead be considered a flag name. If a flag with the provided name is currently #SET, it will evaluate to true.
The command parameter may be any valid ZZT-OOP command. Interestingly, the # used to indicate a command is optional here so #IF ALLIGNED #SHOOT SEEK and #IF ALLIGNED SHOOT SEEK will behave the same way.
While #IF cannot be used to display standard text, it can be used to display hyperlinks or centered text.
@Chancellor
[...]
Have you rescued the princess?

#if saved !y;Really she saved herself.
!n;Still looking. Any ideas?
@Backpack
[...]
CONTENTS:
#if orb $Orb of Zarcon
#if wand $Wand of Wishing
#if penny $Wheat Penny
#if shield $Golden Shield
This property can be used to dynamically change text. However, if these flags/conditions evaluate to false the line will be ignored.
Depending on the editor used, lines may be limited to 42 characters in length. It is possible to run into scenarios where more characters are required to write a complete statement. Editors such as ZEdit2 support long lines, while KevEdit does not. ZZT has no trouble executing oversized commands, though text and hyperlinks may run outside of message windows or overlap the sidebar if they are too long.
You may also follow an #IF command with another, requiring both conditions to be true in order to execute the final command, similar to the AND operator in most programming languages. All of these statements are valid and will execute based on flags being proper set or not:
@Bread
#end
:touch
#if pb if jelly sandwich
#if pb if not jelly needjelly
#if not pb if jelly needpb
One cannot live on bread and water!
#end
:sandwich
You make a PB&J!
#give health 10
#zap touch
#end
:needjelly
Your sandwich plans require jelly too!
#end
:needpb
No peanut butter means no sandwich.
#end
:touch
You're not hungry anymore.

Left: A door object using #LOCK to prevent its animation from being interrupted.
Right: The same door without the #LOCK command being interrupted by :TOUCH events.
The #LOCK Command - Preventing Unwanted Events
| Syntax | #LOCK |
|---|---|
| Scroll Support | No - Scrolls cannot receive messages so locking has no effect |
| Cycle Ending | No |
Puts an object in a "locked" state which prevents it from receiving any external events.
This command is often used to prevent objects from being interrupted by the player, bullets, or other objects trying to #SEND events.
Third party editors allow this to be set in advance, known as "pre-#locking".
Running this command on an already locked has no effect.

The best joke from Mission: Enigma.
The #PLAY Command - Creating A Squarewave Symphony
| Syntax | #PLAY <sound> |
|---|---|
| Scroll Support | Yes - However the default scroll audio will play before any additional sounds |
| Cycle Ending | No |
ZZT's audio support is one of its most limited features. The engine is incapable of producing audio through anything other than the PC speaker. This means one channel square waves in which making complex pieces is quite the challenge.
The good news is because of this, ZZT games really aren't expected to have much in the way of music. Sound effects, meanwhile, are generally a lot easier for non-musicians to come up with something reasonable for.
Composing for ZZT is the sort of thing that needs an article all to itself, and it needs to be written by somebody other than me, so here are your notes and some notes.
| - | Symbol | Effect |
|---|---|---|
| Basic Notes | A B C D E F G |
Plays note |
| Rest | X | Rests |
| Accidentals (Placed after a basic note) |
||
| # | Sharp | |
| ! | Flat | |
| Basic Durations | ||
| T | Thirty-second note | |
| S | Sixteenth note | |
| I | Eighth note | |
| Q | Quarter note | |
| H | Half Note | |
| W | Whole Note | |
| Advanced Durations | 3 | Triplet: Cuts the previous duration into thirds. (Ex: Q3ABC would play the A, B, and C notes totaling the time of a quarter note.) |
| . | Time-and-a-half: Extends the current duration by 50%. (Ex: H.C would play a C-note with a duration equal to three quarter notes.) | |
| Octaves (Default: 3) | ||
| + | Increases the octave by 1 up to a maximum of 6. | |
| - | Decreases the octave by 1 down to a minimum of 1. | |
| Drums | ||
| 0 | Tick | |
| 1 | Tweet | |
| 2 | Cowbell | |
| 4 | Hi snare | |
| 5 | High woodblock | |
| 6 | Low snare | |
| 7 | Low tom | |
| 8 | Low woodblock | |
| 9 | Bass drum |
Invalid notes are ignored.
Sound produced via #PLAY takes priority over default sound effects.
#PLAY commands are processed and put into an audio buffer which allows code to continue to run without waiting for an object that played a sound to finish playing it. ZZT's #PLAY statements are converted into an internal sound format so estimating the amount of the buffer that will fill is difficult.
Most songs opt to space apart #PLAY commands with idles to keep the buffer from becoming completely filled. A full audio buffer will lead to notes being dropped if more audio is added. Third party editors such as ZEdit2 provide the ability to show how many idles at cycle one a line of audio will take to play making it easier to work with the audio buffer.
For shorter sound effects the buffer isn't really a concern.
A thirty-second note is equivalent in length to a single idle at cycle one. Some ZZT worlds will repeatedly play silence in this manner to mute noisier elements such as duplicators, though this comes at the cost of muting all other sounds as well, potentially on other boards as the audio buffer is not emptied between boards.
Pressing "B" to disable sound during gameplay will also empty the audio queue, so pressing it twice in quick succession can be used to stop any unwanted sound from continuing across boards, though this falls on the world's player to do rather than its creator.

#PUT can hand things to the player, spawn new foes, and even shove things arounds!
The #PUT Command - Adding Elements To The Board
| Syntax | #PUT <direction> [color] <element> |
|---|---|
| Scroll Support | Yes - The player can be pushed from their initial position rather than landing on top of the scroll's destination when used. |
| Cycle Ending | No |
Places an element in the specified direction using the specified color if permitted.
Statted elements created with this command will use the default stat.
If the target tile contains a non-walkable element, an attempt will be made to push it out of the way. If the element cannot be pushed, it will be overwritten entirely. An exception is made for the player which will not be destroyed in this manner.
ZZT will check if the target tile is outside of the visible board area, and if so, the command will fail.
WARNING: A bug in ZZT v3.2 mistakenly considers the bottom row to be "out of bounds" causing the command to fail regardless of what elements currently occupy those tiles.

This object will forever shoot at a ricochet and dodge its own bullet thanks to #RESTART.
The #RESTART Command - Let's Take It From The Top
| Syntax | #RESTART |
|---|---|
| Scroll Support | Yes |
| Cycle Ending | No |
Jumps to the very beginning of the object's code. This is the simplest way to create an infinite loop with ZZT-OOP. To jump to a specific section of code, a label must be defined and the #SEND command used to reach it.

Using #ZAP and #RESTORE on :TOUCH labels can allow you to loop interactions, used here to input a password.
The #RESTORE Command - Enabling A Disabled Event
| Syntax | #RESTORE <label> |
|---|---|
| Scroll Support | Yes |
| Cycle Ending | No |
Restores every zapped instance of the given label in the object's code.
Zapped labels replace the colon character with an apostrophe, meaning :SHOT becomes 'SHOT.
Labels can be pre-zapped by writing them with an apostrophe to begin with. This is particularly helpful if you want something to not be interactable at first, but able to later without writing a dummy label.
Beware that due to how ZZT reads labels for #RESTORE, you may get unexpected results if the next line of code begins with a letter or underscore. This can usually be worked around by just rearranging code slightly, or by inserting an extra #CHAR 0 afterwards as a no-operation command.
| With Pre-Zapped Labels | Without Pre-Zapped Labels |
|---|---|
@Secret
#end
'touch
Just as Miss Scarlet said, there's a
secret passage to the study!
#die
#end
:learn
#restore touch |
@Secret
#end
:touch
#end
:touch
Just as Miss Scarlet said, there's a
secret passage to the study!
#end
:learn
#zap touch |
Note that while #ZAP works with one label at a time, #RESTORE operates on all of them so you'll never need to run this command multiple times in a row, but you will likely encounter a scenario where you want to #RESTORE and then immediately re-#ZAP a few labels.

Synchronizing objects and their events can be used to create animations.
The #SEND Command - Directing Objects to Handle Events
| Syntax | #SEND [NAME][:]<label> |
|---|---|
| Scroll Support | Partial - Scrolls can use this command to send events to objects, but scrolls are unable to receive commands and always run code from the first line. |
| Cycle Ending | ? |
Sends an object to a label. It can be used both to send the currently running object to a label it has, or to other objects based on whether or not a name was provided.
The #SEND command is used to let objects have an effect on other objects on the board as well as to have the object itself jump to labels it contains.
#SEND is ZZT's "default" command. Any invalid commands are first tried as if they were prefixed with #SEND
If no object name is specified, the #SEND only applies to the object executing code. If a name is specified, and the object executing the code shares that name, it too will be sent to the label.
If an object matches the name, but doesn't have the specified label there is no effect.
There are numerous ways to shorten #SEND commands demonstrated in the table below.
| Commands | Effect |
|---|---|
| #SEND DOG:FETCH #DOG:FETCH | All objects named @DOG will jump to the label :FETCH |
| #SEND THROWSTICK #THROWSTICK | This object will jump to its label :THROWSTICK.* |
You can use labels named after ZZT-OOP commands, though this is a bad idea from a design perspective. It also prevents the shorthand variant from working as the actual command will get priority.
* When using shorthand for sending the currently executing object to a label, if the label cannot be found an error will be raised instead causing the program to halt. This can be worked around with a lengthier equivalent such as #SEND LABEL. If the label isn't found, execution continues.
Instead of providing an object name, three special names may be used instead, ALL, OTHERS, and SELF.
| Command | Effect |
|---|---|
| #SEND ALL:PANIC #ALL:PANIC | Every object on the board will jump to the label :PANIC |
| #SEND OTHERS:WAIT #OTHERS:WAIT | Every object on the board will jump to the label :WAIT except for the object that issued the command. |
| #SEND SELF:THROWSTICK #SELF:THROWSTICK #THROWSTICK | The object will jump to :THROWSTICK |

Setting flags is an easy way to gate progress, and a simple alternative to ZZT's lost-when-used keys.
The #SET Command - Tracking Information With Flags
| Syntax | #SET <flag> |
|---|---|
| Scroll Support | Yes |
| Cycle Ending | No |
Sets a flag with the given name.
Flags are boolean (true/false) values with arbitrary names. They can be checked using #if.
Flags have a maximum length of 20 characters. Only 10 flags may be set at once. Attempting to set an 11th flags will result in the 10th flag being overwritten!
Older material written about ZZT-OOP sometimes claims that setting a flag that has already been set will result in two identical flags, but this is not the case. Setting the same flag a second time has no effect.
It is possible for the player themselves to set and clear flags using the cheat prompt. Some ZZT worlds turn this into a gameplay feature.

In addition to wandering enemies, treasure hunters should be wary of poison darts fired from traps like this one.
The #SHOOT Command - Firing Bullets
| Syntax | #SHOOT <DIRECTION> |
|---|---|
| Scroll Support | Yes |
| Cycle Ending | Yes |
Fires a bullet in the specified direction.
This requires the tile the bullet is to be created on to be walkable, be water, or be destructible. (In the case of a destructible element, it will immediately be destroyed along with the bullet). This means an object cannot shoot another object at point blank range.

Don't spend all your gems in one place! You never know when you'll need to buy a key later.
The #TAKE Command - Reducing Counters
| Syntax | #TAKE <counter> <quantity> [command] |
|---|---|
| Scroll Support | Yes |
| Cycle Ending | No |
Decreases a counter by a specified amount. If the counter isn't large enough to take away the requested quantity, nothing is taken away and the optional command is executed instead.
As with #IF, the command here does not require the leading #.
You will often see this command used for programming shops in which one counter (usually, though not always, gems) is exchanged for another. In this case, the optional command should be a jump to a label to handle not having sufficient money.
:buyTorches
#take gems 2 nope
#give torches 5
Here are you torches!
#end
:nope
Sorry, you don't have enough gems!
Another common use-case is to create enemies that hurt the player by reducing health:
[...]
#if contact bite
[...]
:bite
#take health 5 endgame
#restart
Here, the optional command to end the game is crucial! If the player's health is brought to exactly zero the game will end regardless, but if they are bitten by this foe with 3 health, the command won't reduce the counter. Many older ZZT worlds run into bugs like this resulting in a player being invincible to an enemy if their health isn't a multiple of the enemy's damage.
No sound is played when taking health, unlike when the player is damaged via other methods.
The fastest way to zero out a counter with #TAKE is to take descending powers of two:
#take ammo 32767
#take ammo 16384
#take ammo 8192
#take ammo 4096
#take ammo 2048
#take ammo 1024
#take ammo 512
#take ammo 256
#take ammo 128
#take ammo 64
#take ammo 32
#take ammo 16
#take ammo 8
#take ammo 4
#take ammo 2
#take ammo 1
This code will execute in a single cycle, instantly zeroing the counter. If you are confident the counter's value won't be larger than a certain amount, you can execute fewer #TAKE commands to save time/space.

I lost 40 health in the time it takes the first star thrown here to disappear.
The #THROWSTAR Command - Throwing Stars And Second Thoughts
| Syntax | #THROWSTAR <direction> |
|---|---|
| Scroll Support | Yes |
| Cycle Ending | Yes |
Throws a star in the specified direction. Stars will chase in on the player to attack. They are immune to bullets and may be defeated by outlasting their timer.
At first glance, this dedicated command may appear to be identical to #PUT <direction> STAR, however stars produced in this way have the proper duration while #PUT results in stars that last significantly longer.
Much has been said over the years about the usage of stars in ZZT worlds. While there is no objective answer, the general consensus is that stars get out of control very quickly. Authors will often detect when a star is produced and then manually destroy them or transform them into other elements before they naturally dissipate.
Exercise caution when working with them.

This object tries to SEEK the player. If it can't, it tries to move perpendicular to the player instead. You'll get there eventually friend.
The #TRY Command - Planning For Failure (To Move)
| Syntax | #TRY <direction> [THEN] [command] |
|---|---|
| Scroll Support | No - Crashes ZZT |
| Cycle Ending | Yes, if successful. No, if not. |
Moves in the specified direction if possible. If it's not possible, and an optional command is provided, the command will be executed instead. This parameter cannot be provided when using the shorthand movement command ?.
Unlike #GO and /, code execution will not halt if the object can't move in the requested direction. This prevents having to worry about obstacles causing objects to stop in their tracks forever.

#LOCK a boss object so they aren't interrupted by shots mid-monologue. When the fight really begins, #UNLOCK them!
The #UNLOCK Command - Following Events Once More
| Syntax | #UNLOCK |
|---|---|
| Scroll Support | No - Scrolls cannot receive messages so unlocking has no effect |
| Cycle Ending | No |
Removes the "locked" state from an object. This allows a "locked" object to once again receive events from other objects and interactions.
Running this command on an already unlocked object has no effect.

Mastering #WALK, :THUD, and FLOW can immensely simplify otherwise lengthy sequences of movement commands.
The #WALK Command - Making Objects Walk 500 Tiles And Making Objects Walk 500 More
| Syntax | #WALK <direction> |
|---|---|
| Scroll Support | No - No effect |
| Cycle Ending | No |
Sets a direction to move the object in automatically. This direction is stored as a vector in the object commonly referred to as the X-Step and Y-Step individually. All objects with a walking direction set attempt to move in the direction of their step before they execute code on a given cycle.
Typically used as a shortcut to prevent counting spaces or using a loop to make an object repeatedly walk to a point. Objects which are blocked in their walking direction will be sent to the label :THUD if they they have such a label.
Directions are converted to a vector only once when the command is first executed. If the player is northeast of an object which runs #WALK SEEK, the object will calculate SEEK to either NORTH or EAST, and then store that value in its step parameters resulting in the object walking in a single direction (though you can continue to execute #WALK SEEK repeatedly to better lead the object).
Objects can stop themselves from walking with #WALK I to reset the X-Step and Y-Step back to (0, 0).
Walking differs from #GO and #TRY in that it will not push elements in the object's way. This means that #WALK E may fail to move the object when #GO E would succeed.
The direction FLOW refers to the current X-Step and Y-Step and may be used in any commands that take direction parameters. #SHOOT OPP FLOW will fire a bullet opposite the walking direction.
It is possible with third party editors to manually set the X-Step and Y-Step properties to values that let the object move diagonally or in large leaps. These non-standard step values can be properly modified with commands such as #WALK CW FLOW. However, when using values other than 0, 1, or -1 caution must be exercised as ZZT's bounds checking will fail, allowing objects to escape from the board entirely, which can lead to undefined behavior or outright crashing.

By zapping a different :SHOT label every time an object is shot, objects can take multiple hits to be defeated.
The #ZAP Command - Disabling Events
| Syntax | #ZAP <LABEL> |
|---|---|
| Scroll Support | Yes |
| Cycle Ending | No |
Zaps the given label, turning it into a comment and preventing it from firing again.
Zapping allows objects to react differently each time an event happens. You can use it to have objects provide more text when talked to a second time, to give enemies extra health, or as a way to prevent further interaction. Both built-in and custom labels may be zapped. The #ZAP command will zap the first matching label it finds and no more. Its counterpart, #RESTORE can reverse this, though ti works on every instance of the zapped label rather than just the first.
The Default Stat
One of the most limiting factors in ZZT-OOP stems from the fact that when elements that use stats are created, there is no way to specify any of the stat's parameters. This has tremendous implications for a few commands.
When a stat needs to be created, ZZT populates all of the stats values as zero, with the exception of the element's cycle which is correctly set. For elements that lack customization such as bombs this is fine. For elements such as creatures, this means that while they do function normally, they have low values for their intelligence and their other unique properties. Worst of all, many elements effectively do not work at all. Passages will lead to board 0, the title screen. Transporters, pushers, and blink walls will all have their direction set to "idle", doing nothing. Bullets humorously will disappear immediately as they collide with themselves. (Of course you'd want to use #SHOOT anyway.)
Depending on what you are trying to do, there may be alternative ways of essentially faking the intended command that go beyond the scope of this article.
List of Counters
Counters are ZZT's variables. By default worlds start with health set to 100 and all other counters set to zero. Many authors will use them for purposes other than what their name indicates. The maximum value for any counter is 32,767. ZZT tries to prevent negative values for counters from occurring.
While all counters can be adjusted via ZZT-OOP, many of them are influenced by in-game actions as well such as collecting items, being hurt, lighting torches, and shooting creatures. These standard interactions may have to be avoided or recreated entirely in ZZT-OOP when using counters for unintended purposes.
Counter names have been wrapped in quotes for clarity.
- "AMMO"
- "GEMS"
- "HEALTH" - If the player element sees that health is equal to zero at the start of a cycle, a game over will occur. Be careful when using this counter for purposes other than tracking health!
- "SCORE" - If the game ends and the player has a non-zero score it will be considered for entry into the world's high score file.
- "TIME" - Tracks the time elapsed on boards with a time limit. Set to zero upon entering any board regardless of whether or not it has a time limit. The value displayed on ZZT's sidebar is equal to (board's time limit - time counter) provided the board's time limit is not zero.
- "TORCHES"
While keys are shown on the HUD with ZZT's other counters, they are unable to be directly given to or taken away from the player via code.
List of Element Names
ZZT-OOP uses the names of elements to identify them. For most elements the name to refer to them by is obvious, but some may be easier to misidentify. A few elements do not have a name in ZZT-OOP at all as they are not intended to be manipulated directly. For more detailed information on element behavior see The Unofficial ZZT Player's Manual.
Element names have been wrapped in quotes for clarity.
- "AMMO"
- "BEAR"
- "BLINKWALL"
- "BOMB"
- "BOULDER"
- "BREAKABLE"
- "BULLET"
- "CLOCKWISE" - Clockwise rotating conveyors.
- "COUNTER" - Counter-clockwise rotating conveyors.
- "DOOR"
- "DUPLICATOR"
- "EMPTY"
- "FAKE"
- "FOREST"
- "GEM"
- "HEAD" - The frontmost piece of a centipede.
- "INVISIBLE" - Invisible walls
- "KEY"
- "LINE" - Line walls
- "LION"
- "MONITOR"
- "NORMAL" - Normal walls
- "OBJECT"
- "PASSAGE"
- "PLAYER"
- "PUSHER"
- "RICOCHET"
- "RUFFIAN"
- "SCROLL"
- "SEGMENT" - The pieces of a centipede which follow the head.
- "SHARK"
- "SLIDERNS" - North/south pointing sliders.
- "SLIDEREW" - East/west pointing sliders.
- "SLIME"
- "SOLID" - Solid walls
- "SPINNINGGUN"
- "STAR"
- "TORCH"
- "TRANSPORTER"
- "WATER"
List of Colors
Although ZZT is capable of displaying sixteen different colors, the engine does not actually intend for all of them to be accessible. Only seven bright colors can be specified from ZZT-OOP. This can cause significant limitations when designing boards where elements need to change appearance.
Additionally, many elements have hard coded colors when being created via ZZT-OOP.
| Supported ZZT-OOP Colors | Unsupported ZZT-OOP Colors | ||
|---|---|---|---|
| Swatch | Name | Swatch | Name |
| Blue | Dark Blue | ||
| Green | Dark Green | ||
| Cyan | Dark Cyan | ||
| Red | Dark Red | ||
| Purple | Dark Purple | ||
| Yellow | Dark Yellow / Brown | ||
| White | Dark White / (Light) Gray | ||
| Dark Gray / Light Black | |||
| Black | |||
Some elements have unique rules for how their colors are created. For example, #PUT N CYAN DOOR will produce a door whose actual colors are white on dark cyan. These special cases are handled whenever ZZT-OOP works with colors, so something like #IF ANY RED PASSAGE will correctly check for what ZZT thinks a red passage is (white on dark red).
What Next?
This guide should offer enough of the basics to get started creating your own objects from scratch.
It can be helpful to look at code that does what you're trying to do or something similar by checking out a world's code in an editor or the file viewer. Early worlds in particular tend to provide easily followable code that can give helpful techniques on creating items, enemies, shops, puzzles, and animations. Later worlds are more likely to contain engines of various levels of complexity that change the general style of play from that found in traditional ZZT worlds.
You may want to check out various guides to see what ZZT can do. The ZZT Encyclopedia was a staple of the late 90s and contains lots of examples of what can be done with ZZT-OOP, including more creative uses of its idiosyncrasies. (A later release, ZZT Encyclopedia Online is slightly more recent, though split across enough files that it can be a pain to navigate.)
You can also check out the Worlds of ZZT Discord! It is full of both newcomers and long time community members alike who are more than happy to answer any questions you may have, provide advice, or help test completed worlds before they're uploaded.
Don't be afraid to experiment either! Throw some objects on a board and see if they behave how you'd expect. You don't need to have an idea for an entire game to brainstorm some concepts and see what can be done!
If you have any questions or comments about this article, get in touch with its author Dr. Dos! This guide is intended to help newcomers get started and your feedback will help in making sure it effectively serves its purpose!