

Psychic Solar War Adventure Code Analysis
Published Under: Mirror Image Games
Released: Aug. 16, 2007
In the last Closer Look, I played through Commodore's exceptionally coded Psychic Solar War Adventure. Its RPG battle engine was something that went far beyond most ZZT RPG engines and so I wanted to take a, well, closer look at the engine itself and document how it works! There are a lot of ZZTisms in here, and it can get somewhat technical (at least as far as ZZT goes), but hopefully those who haven't worked with ZZT in a long time if ever can still follow along!
It might not hurt to use the Museum of ZZT beta site to view the battle scene looked at in the file viewer as well. Be sure to open the preferences tab and change the board rendering to "Object Highlight" to reveal all the invisible objects!
Most of Psychic Solar War Adventure takes place within a dungeon crawling engine like this:

In the bottom right are the controls which surround the player and make the red @ move around the dungeon. What we're concerned with here is how battles work, so first we should figure out how the game determines it's time to initiate combat.
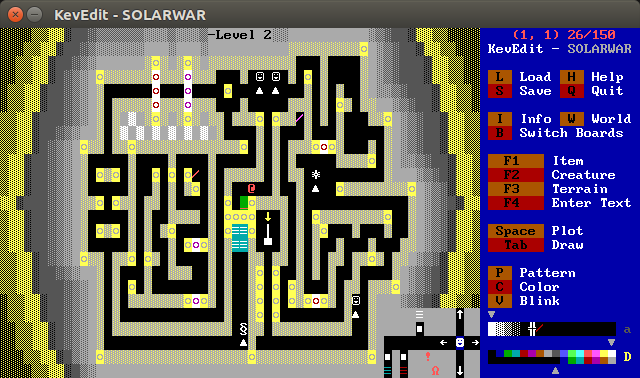
I've revealed two normally invisible components here, the red exclamation point object and the red lion.
Whenever an arrow object surrounding the player is touched, it sends a message to every object on the board named @you to jump to the label left/right/up/down. That part is just your basic remote controlled object that you can find in ZZT worlds as early as Tim Sweeney's own City of ZZT.
#end
:left
:right
:up
:down
#do
:do
:do
:do
:do
:do
:do
#zap do
#end
:do
#if blocked s #doo
#dooo
:doo
#all:en
#b:fight
#set fight
:dooo
#restore do
#restore do
#restore do
#restore do
#restore do
#restore do
• • • • • • • • •
Here however, in these dungeon screens there's a second object which shares the @you name to handle encounters. For this object, all four directions instantly jump to a :do label. The :do label in turn #zap itself, essentially erasing the label from the object's code. By having multiple :do labels in a row followed by a #zap do command, the first several steps wind up doing nothing but zapping a label, but on the 7th step, something different happens.
Here the object checks if it's blocked to the south or not. This is where the lion comes in. The lion is trapped in a 1x2 area to pace around in. The lion has its intelligence set to 0 and its cycle manually set to 1 and this is the basis of the game's RNG. With no intelligence, the lion will just try to move randomly every cycle. This sort of behavior could be trivially implemented with an object as well, but using a lion means no code has to be written which helps save space with ZZT's limited board memory.
One of the lion's two possible positions is south of the "you" object. The other is not. If the lion is NOT blocking @you, then the object will jump to a label the restores the :do labels that were zapped. Essentially every 7th step there's a check for an encounter. If you count your steps you can save your game during a safe moment and avoid any encounters by reloading saves on those 7th steps that activate a battle.
The game's overworld features encounters as well, the rate of which can be reduced by obtaining the Rocket Car which causes the space to widen to four tiles, drastically reducing encounters. It's easy to think of the chance of an encounter as being
ENCOUNTER_CHANCE = 1 / LION_POSITIONS
This isn't completely accurate. On the overworld the layout is something like
1234
V
cL c
where V is the object that checks for encounters, c are the spaces that start solid, but become empty spaces on obtaining the car, and L is the lion. So while 1/4 would look like the right odds to use when you have the rocket car, it's going to be less than that since a lion in spot 4 HAS to move to spot 3 before moving to spot 2. It's not generating a random number, it's randomly incrementing and decrementing a number until it happens to match the one the encounter checker has.
The other possibility for the "you" object is that the lion does in fact block the object, in which case a message is set to every object to say that the game is shifting to encounter mode. A "fight" flag is #set, and only by having the flag be #cleared will the dungeon controls resume normal behavior. This opens the door to the encounter passage, makes the "move left" object step aside, and makes the "move right" object move to the west, pushing the player out of the control area.
From here the player can go into the passage and start their fight.
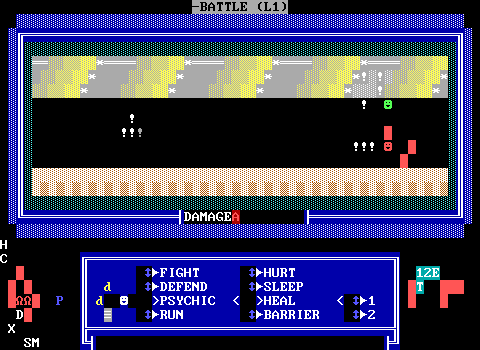
Pictured here is the battle scene from the first floor of the game's Star Tower dungeon, but with all the invisible features of the board revealed.
I've adjusted the characters of many of the objects to letters to make the mechanics easier to explain. Up top are some ! objects which are used for monster sprites and attack animations. Right away you can also see a pair of lions in an L shaped region that will once more function as RNG.
The first thing to happen is with "starter", the white S.
#if not fight #restart
#door:do
#psi:restart
#two:ck
#if blocked rnd #t2
#set t1
#hp:a
#re
:t2
#set t2
#hp:b
:re
#m:zz
#clear fight
#restore win
#end
'win
#zap win
VICTORY!
/i#give score 5
#if t1 #give score 2
#give gems 8
#if t2 #give gems 12
:ran
#zap win
#clear t1
#clear t2
#clear t3
#t:do
#all:reset
#restart
• • • • • • • • •
Starter begins with a one line loop where it checks for the lack of a "fight" flag. When "fight" isn't set, it continually #restarts its code to prevent a second battle from starting the instant a first is completed. When "fight" is #set, which happened on the previous map screen the player was on, a few objects are told to jump to specific labels.
The @door (the lowercase d's. There are two despite the fact that just one would suffice,) is sent to :do which just tells the object to put a solid wall to the right, blocking off the passage. Since the board transition pauses the game and the player has to move off the exit passage to unpause, the door will immediately push the player aside as it produces this wall and force the player to fight the encounter if they wish to leave without cheating.
Next the psi object is told to restart its own code as well. On the first encounter this isn't necessary since the psi object's code execution point will already be at the very start, but in order to have fresh battle instances it needs to be done. The psi object handles all of Jill's psychic abilities when they're selected, but it also has some code at the start to handle the party's level.
#take score 100 #stop
#give score 100
#put w blue invisible
#take score 250 #stop
#give score 250
#put n blue invisible
#take score 500 #stop
#give score 500
#put e blue invisible
:stop
#end
The psi object checks for the party's level by removing experience points for each threshold, stopping if there aren't enough points to do so, and then immediately giving those points back. Each set of points it can take (100, 250, 500) is one more level the player's party is at. For each extra level the player has above the first, invisible walls are placed to slowly surround the psi object. Later on when the player tries to use psychic powers, the object will usually check if it's blocked in a random direction to see if Jill could concentrate. Each level increases the chances of being blocked and this is where and why the success rate increases by 25% each level.
The starter object then tells @two which is the object that represents Jill in combat to jump to :ck to check if she's alive for this fight. This is done by trying to take 1 ammo (her hitpoint counter) away. If there was ammo to take, it's given back since she's alive, and the object tries to move west a few spaces and then east again to take her position on the field back. There's attempted movement done even when she's alive in case she was dead in the previous battle and is now alive and in need of a position update.
Similarly, if she's dead, she tries to move to the east in case she was alive in the previous fight in this dungeon, but was killed in a different one. A normally invisible wall a few spaces east is used to keep the object from straying too far in its movements, making it safe to try to move east for a dead Jill battle after battle without her continuing to move closer and closer to the right edge of the screen.
• • • • • • • • •
#set t1
#hp:a
#re
After these objects have all been told to set up for the new fight, the starter object handles choosing what the party is going to encounter. This is another coin flip via checking for being blocked in a random direction. Since the starter is on the bottom row of the screen and has another object directly east of it, there's a 50/50 chance of the check passing. Some areas like the overworld have more than two enemies to fight which gets handled by making more of these checks. Basically when the coin flips heads, that enemy gets picked. So enemy one is flipping a heads. Enemy two is flipping a tails and a heads. Enemy three is flipping tails tails heads, and so on. At the very end of these RNG checks is a default choice which is also the rarest encounter since it's the last one.
A flag gets set, "t1", "t2", etc. for what type of enemy is being fought. Then the enemy HP object (the H on the far left) is told to jump to a label to set the enemy health that's appropriate for the chosen enemy encounter.
(As a quick aside, there's an unused object to the right of starter called @music. It has no code other than a name. Perhaps Commodore intended to compose music for the rest of the game. It would probably have gotten pretty tedious. Having to listen to short repeating PC speaking music for several hours to complete this game sounds awful.)
#end
:a
/e/e/e/e
:b
/e/e/e/e/e/e/e/e/e/e/e/e
#a:un
#end
#walk i
• • • • • • • • •
The HP object moves itself to the east one space for each hitpoint the enemy is meant to have. To save space Commodore has the HP setting labels listed longest to shortest so the code can just run down past other labels. Here :a moves east four times, but the code keeps running and it hits the twelve east commands after the :b label as well. A has 4 + 12, 16 HP while B just has 12.
Once the HP object has moved, it sends @a to :un. It's probably not obvious what objects are named A! Those ones are the FIGHT, DEFEND, and RUN arrows that execute those options in combat. @a is the first set of commands that Jack can use, and @b are all the psychic abilities that Jill gets. :un likely means unlock, and those objects all put an empty tile to the west, erasing the sliders that block the player from touching them.
At this point the battle is almost ready to commence, but there are still a few loose ends. @starter has stopped the initial sending other objects to labels, but jumps to a :re label itself.
• • • • • • • • •
#m:zz
#clear fight
#restore win
#end
• • • • • • • • •
:re has one more object to send to a jump, @m is told to jump to :zz. @m is the series of objects that are used to create the enemy sprites. :zz is slightly different for every @m object. The object will change its character based on the flag that was set to indicate which enemy is being fought. They also will place objects on top of exist ones sometimes due to a quirk of ZZT's #put command!
If you have a red object, and you want to make it blue, #become blue object is a valid line of code, but #become wipes out whatever is executing it and places a fresh blue object with no code and default stats (and thus invisible since the default character for an object is character 0). This prevents objects from changing color themselves, but they can use the buddy system! If you have two objects lined up horizontally and have the left one execute #put e blue object ZZT will see that there's already an object there and keep its stat information which contains just about all its info other than its color! This lets you use one object to recolor another as long as they're next to each other.
Okay, @starter is almost done starting everything up finally. Next up, it removes the fight flag that got the player forced into this room to begin with since it won't be needed anymore. Either the player wins and the flag needs to be cleared anyway or the player dies and the flag doesn't matter.
Then the object #restores the label :win. Restoring is the opposite of zapping so prior to this there is no valid :win label, but instead a 'win line which ZZT treats as a comment. Having pre-zapped labels like this is a more advanced form of coding with ZZT-OOP that rarely gets used. It's used because #zap zaps the first matching label found while #restore restores every matching zapped label found. It's easier to get things out of sync with #zaps, but #restore will always put an object in the same state afterwards regardless of the current state of all its matching labels.
At this point, we have our party, our enemy, the enemy's HP is set, the party's level is recorded via invisible walls, the player is locked into the room, and the first set of commands is open for Jack to take his turn. Now the fight is ready to commence!
But how does the game know whose turn it is? I mean, it's Jack's since it's the first turn of the battle, but that sort of thing needs to be tracked. The turn is handled by the four objects on the far right of the command list. The 1, 2, and E are objects for handling Jack's turn, Jill's turn, and the enemy's turn. The @t object below them is which one is currently active. In order for a turn object to activate it has to be blocked from the south. Once it is, it then enters a loop checking for when it's no longer blocked to the south before restarting its code.
As each combatant takes their turn, the turn tracking object moves to the east. After the enemy has attacked and it can no longer move east, it moves itself south, west three spaces, and then back north to reactivate the @turn1 object. The three turn objects are extremely simple, other than this looping behavior their only other command is #all:turn1, #all:turn2, or #all:turnM for the monster respectively. Even this is more complex than it needs to be, since those three labels are in one object each and using #all is overkill.
So @one (Jack) jumps to :turn1 which tells the first row of commands to unobstruct themselves so the player can have Jack take his turn. The code then flows into a :reset label which restores a few pre-zapped labels, :win, :fight, :defend, and :run.
At this point everything is ready for the player to input a command for Jack (and then Jill) so let's go through the commands:
#unlock
#end
:touch
#lock
#all:fight
#all:block
:block
:win
#put w blue sliderns
#restart
:un
#put w empty
#restart
• • • • • • • • •
Each of these buttons is a dumb object that just sends every object to a :fight, :defend, etc label. They have no idea whose turn it is when they're touched, and their only other function is to block themselves with sliders or remove said sliders.
FIGHT causes whichever character has its :fight label un-zapped to activate.
JACK ATTACKS!
/w#sword1:do
/i/i/i/i/e
#if w11 #d:b
#if w12 #d:d
#if w13 #d:f
/i/i/i/i/i/i/i/i/i
:next
#zap run
#zap fight
#zap defend
#t:turn
#end
The character begins animating, moving towards the enemy and telling the character's weaponry to swing/stab. The game then checks for a flag for which weapon the character has equipped and sends the damage object to a letter label based on how strong the weapon is. The party's level has no impact on their damage.
@d handles damage calculation for the player's attacks with labels running down from :f to :a. The labels look like this
:f
#if blocked n #hp:hit
/i
#if blocked n #hp:hit
/i
:e
#if blocked n #hp:hit
/i
:d
#if blocked n #hp:hit
/i
#if blocked n #hp:hit
/i
:c
#if blocked n #hp:hit
/i
:b
#if blocked n #hp:hit
/i
:a
#if blocked n #hp:hit
/i#end
• • • • • • • • •
:f and :d make two checks for damage, while the others make one. To calculate damage the object tells the enemy's health object that it took a hit every time it's blocked to the north. Like the lions used to determine if there's an encounter, the battle system uses a pair of lions trapped in an L shape as he RNG which should tilt things slightly in favor of successful hits.
For Jack, his potential damage looks like
Default sword: 2
Sword from Robert: 5
Star Sword: 8
For Jill,
Default spear: 1
Steel Lance: 3
Holy Partisan: 6
The hits move the enemy @hp object to the west as well as telling the damage meter in the center (I made it an A) to put a boulder to the right which is used to give the player visual information on how much damage was done.
Back in the Jack/Jill objects, after they send the damage object to calculate damage, the object purposely idles a bit to make sure the damage has time to finish its thing and reduce the enemy health enough before it zaps its :run, :fight, and :defend labels once again to make sure those commands won't cause any actions to be taken until it's their turn again, and finally advances the turn counter.
DEFEND is simpler since we'll get to its actual effects when we take a look at enemy attacks.
#end
:do1
#put n red invisible
#end
:do2
#put e red invisible
#end
:pro
#put e red invisible
#put n red invisible
• • • • • • • • •
This causes Jack/Jill to display a message about defending and then tells @defend to jump to :do1 for Jack or :do2 for Jill. These do labels simply put an invisible wall to the north for Jack or east for Jill. The @defend object is the X that's southwest of the damage calculator.
RUN takes Jack/Jill to the :run label where they check if they're not blocked in a random direction.
#if not blocked rnd #n
JILL ESCAPES!
#all:ran
/i/i/i/i/i/i/i#end
:n
JILL CAN NOT ESCAPE!
/i/i/i/i/i/i/i#next
Both Jack and Jill have three free sides. Jill has a normally hidden wall above her to keep her from having four. If the check determines the object isn't blocked, running fails, a message is displayed, and the turn is wasted. If the object is blocked, the party runs successfully. This causes every object to jump to :ran to handle the escape from combat and then waits idly for a moment before stopping execution. The extra idling doesn't seem necessary.
A few objects have a :ran label. All the enemy sprite objects have :ran to turn themselves invisible to be ready for the next fight. @hp has it to make it walk to the west, essentially depleting the enemy's health. Lastly, @starter handles some cleanup with its own :ran label which is at the end of its :win code for when a battle is won. :win handles the experience and gems received after a battle, but :ran only does the cleanup of zapping the :win label, clearing the flag for which type of monster is being fought, tells the turn counter to reset itself so that it will be Jack's turn again, and lastly sends the Jack and Jill to :reset before it restarts its own code. The Jack and Jill :reset zaps their command labels so they'll be ready to be restored at the start of the next fight when they take their turns once more.
In addition to the FIGHT, DEFEND, and RUN commands, Jill receives a second set of commands for her psychic abilities. These all have a chance to fail if she's unable to concentrate which is handled by the blue P object on the left. @psi was mentioned earlier as checking for the party's level at the start of the encounter (and whenever it's told to restart and check again for subsequent encounters).
By the time the player can select a psychic ability, the @psi object has anywhere from 0-3 invisible walls placed around it to adjust the odds of successfully concentrating. These walls are placed west, north, and finally east if they're needed.
HURT is the first power and was one that I used the least as the offensive boost was too minor over a standard attack.
#if not blocked rnd #fiz
#two:psi
/i/i/i/i/i/i/i/i/i/i/i/i#if blocked w d:c
#if blocked n d:e
#if blocked s d:f
#end
The power (along with every other psychic power) first checks if the object is not blocked in a random direction. If the space is empty, Jill cannot concentrate and the :fiz label is jumped to which displays the message and advances the turn counter.
If the ability succeeds, Jill is told to play her casting animation and then damage is rolled. At level 2 it rolls for three possible damage (:c on the damage object). At level 3 it rolls for six more (:e on the damage object). Lastly at the max level 4 it rolls for eight (:f on the damage object). These three checks for blocked directions happen one line after the next.
At first glance it looks like the damage should actually add up since a level 4 Jill should pass all three blocked checks and hit for a maximum of 17 damage! (3 + 6 + 8) In reality, ZZT-OOP commands come in two types, cycle ending, and non-cycle ending. Something like movement can only happen once per object cycle, but commands like #if don't stop the object from processing more code, so what actually would happen at level 4 is the damage object would have its code execution point moved to :c, :e, and finally :f before the @psi object finishes its cycle. The next cycle when @d acts for damage it would execute starting at :f for just 8 possible damage.
Except what I just wrote is a lie because the @psi object has a bug here! The invisible walls placed for each level are placed west, north, east. The @psi object that checks for these walls to determine what damage to roll checks west, north, and south. So in reality Jill's HURT can never do more than six damage which is no more powerful than her final weapon, and comes with a chance of failing entirely.
SLEEP is next and actually has some more complex success checks than the standard 25% per level!
:hyp
#if not blocked e #weak
#if blocked rndp w #fiz
#sle
:weak
#if not blocked rndp n #fiz
#if not blocked rndp n #fiz
:sle
#two:psi
#m:sle
#end
• • • • • • • • •
@psi jumps to :hyp (for hypnosis) and first checks if it's blocked to the east which would mean whether or not Jill is max level. If she is, we get a line of code "#if blocked rndp w #fiz". That rndp means "random perpendicular to..." and then is followed by another direction. So the random directions possible to check are only north and south. This means at max level there's a 50/50 chance of Sleep succeeding. At a lower level, @psi checks for a random direction perpendicular to the north twice which will be a 50/50 chance for each coin flip, both of which have to pass to actually cast SLEEP. This explains why I had such poor results with the ability!
If the SLEEP cast succeeds, what happens next is the most ZZT code I have ever seen written. In ZZT-OOP what Commodore does here is brilliant. In any other language... not so much. Jill sends the master @m object for the enemy to :sle to specify that it's now asleep. The object then #locks itself which prevents it from receiving any outside messages. Jill's turn having ended causes the turn counter to increment and it's now the enemy's turn. The monster turn object is blocked to the south by the turn counter and tries to send the monster to take its turn, but it's locked! The message is never received! The monster instead is still in the :sle label where it idles for a little bit before advancing the turn counter again and the engine recognizing Jack's turn to act. The master monster object then unlocks itself and its own AI is effectively skipped because it had its ears plugged! I love this so much. This also explains why only Jill can use powers in combat because the sleep code would have to be completely different if Jack had the option of using it.
The next ability is the ever critical HEAL power. This is split across two objects to select who to heal. Despite having the same effect on either target, the code has to be handled differently between the two since Jack's health is ZZT's health, and hitting 0 will cause the game to end. HEAL still has the standard 25% per level success rate, but its amount healed is based on randomness as well as the level of the party. It's also the only numeric calculation that can never be zero.
#if not blocked rnd #fiz
#two:psi
#if blocked e #give health 10
#if blocked n #give health 5
#if blocked rnd #give health 5
#if blocked w #give health 5
#if blocked e #L4
#if blocked n #L3
#if blocked w #L2
#take health 35 #end
#endgame
#give health 35
#end
:L2
#take health 45 #end
#endgame
#give health 45
#end
:L3
#take health 60 #end
#endgame
#give health 60
#end
:L4
#take health 75 #end
#endgame
#give health 75
#end
Heal checks a few directions and gives health back to the target if it's blocked in them. East (level 4) gives 10 health, north (level 3) gives another 5, then there's a random check for 5 health which will follower the 25% per level rate. Lastly is a west check for 5 health.
Level 2: 5 or 10 HP restored (25% chance of getting 10)
Level 3: 10 or 15 HP restored (50% chance of getting 15)
Level 4: 20 or 25 HP restored (75% chance of getting 25)
After healing the target, the object checks what directions it's blocked in again to determine the player's level and figure out the maximum HP for the character. For Jack this is capped by taking away the player's maximum HP, ending the game to force health to equal zero, and then immediately giving the player the max HP's worth of health back, bringing the player back from the dead before ZZT realizes they died. If the target didn't have their HP at max after being healed the #take command to remove it will fail since ZZT will only take the exact amount specified and everything else can be skipped over.
#if not blocked rnd #fiz
#two:psi
#if blocked e #give ammo 10
#if blocked n #give ammo 5
#if blocked rnd #give ammo 5
#if blocked w #give ammo 5
#if blocked e #J4
#if blocked n #J3
#if blocked w #J2
#take ammo 20 #end
#max
:J2
#take ammo 35 #end
#max
:J3
#take ammo 40 #end
#max
:J4
#take ammo 50 #end
:max
#take ammo 1 #done
#max
:done
#if blocked e #give ammo 10
#if blocked n #give ammo 5
#if blocked w #give ammo 15
#give ammo 20
#end
For Jill this is slightly different since dropping her HP to 0 only means getting rid of ammo which won't end the game when it's the depleted! Here after trying to take the max amount of health Jill can have for her level, the @psi object then drains 1 ammo away until it can't, ensuring that she has 0 HP left and then checks directions its blocked in again to give the max HP back to her.
The last power is BARRIER, which reduces damage taken from enemy attacks for a round. It runs the standard concentration check. Afterwards, the @defend (white X) object jumps to :pro and places two invisibles, making it so that the engine will see a defense being taken by both Jack and Jill when the enemy attacks.
And speaking of that, at this point all of Jack and Jill's combat abilities have been covered, so it's time for the enemy to attack back!
Enemy turns happen through one object of the enemy sprite which I've dubbed the master monster as the object is one of many named @m, but it's the only one with more code than color/character changing.
#end
:turnM
/i/i/i/i/e
#if t2 #a2
THE TANKBOT ATTACKS!
/i#if not blocked rnd #do1
#d:bb
#re
:do1
#d:aa
#re
:a2
#if blocked rnd #a3
#if blocked rnd #a4
THE STARMAN ATTACKS!
/i#if not blocked rnd #do2
#d:dd
#re
:do2
#d:cc
#re
The master monster is also RNG based for attacks. The code first checks which monster type flag is set to ensure the correct messages and attacks are selected. It checks random directions and whether it's blocked to determine which attack gets used. This is done like the process for selecting which monster to fight where it checks random directions until it happens to be blocked by one, with a default action if all the checks for being blocked fail.
Basic attacks are the default actions taken when blocked checks fail. However even a basic attack still needs a random check to determine which target should be attacked. The master monster tries to take one health from Jill first to see if she's a valid target. If she is, the health is given back and the random check commences. Otherwise it can safely default to attacking Jack.
#take ammo 1 #aa
#lock
#two:hit
#if not blocked s #take ammo 4 #ga
#if blocked n #take ammo 4 #ga
#restart
• • • • • • • • •
The damage object has an additional set of labels for each enemy attack to figure out how much to damage the selected target. As mentioned in the previous article, these damage labels are split into two halves, the first is the check for if the target is defending. If they aren't damage is dealt. If they are, that first half is ignored. The second half is a random check that works like player damage and is based on being blocked by a lion above or not. If the player defends (or BARRIERs) and there's no lion occupying the space north of the damage object it's possible to take zero damage from an enemy attack.
Other attacks like beams that hit both party members work similarly, just with the damage taken being split between the two party members. These attacks can often ignore defenses as well. Regeneration is handled by just telling the @hp object to step a few tiles to the east, acting as healing.
One other special enemy ability is running away. The gold scorpion enemy in the Star Tower does this, and its code couldn't be simpler.
• • • • • • • • •
THE GOLD SCORPION RUNS AWAY!
/i/w#all:ran
#end
It displays the message, and then calls #all:ran, exactly the same as when Jack or Jill successfully run. The engine sees no difference here.
Some enemies have two turn charge attacks like the emperor worm in the volcano.
#end
:turnM
/i/i/i/i/e
/i#if not blocked rnd #do1
THE EMPEROR WORM TAKES A DEEP BREATH!
/i#zap turnM
#re
#restore turnM
/i/i/i/i/e
THE EMPEROR WORM BELCHES CORROSIVE GAS!
/i#d:ff
#re
This gets handled by making the default attack the charge attack and having it zap the :turnM label that activates on the monster's turn. By zapping it and having a second :turnM that just always does the second half of the charge attack and restores the label its easy to create a two parter.
Once the enemy finishes its attack, the damage object restarts its code from the top which causes it to erase the invisible walls that indicate a defending party member. After the damage object is told to calculate damage, the master monster idles for a bit to let the damage code execute and then can advance the turn counter, giving control back to Jack once more! This continues until Jack dies or the enemy is defeated. Once the enemy's been killed a counter object (the white C) below the enemy @hp object sends everything to :win which handles the cleanup.
#zap win
VICTORY!
/i#give score 8
#give gems 15
:ran
#zap win
#clear t1
#clear t2
#clear t3
#t:do
#all:reset
#restart
• • • • • • • • •
:win causes the commands to all block themselves with sliders, the door to remove the solid that traps the player, the monster sprites to hide themselves, and lastly for the starter to give rewards based on the enemy defeated. The starter runs into the :ran label from running away which zaps the win label until the next fight, clears the encounter, and resets everything else as mentioned in the run section.
Final Thoughts
All in all Commodore's RPG engine for Psychic Solar War Adventure is unparalleled in ZZT. It's a bit RNG heavy, but it works extremely well. Many of the engine's features have been implemented in other ZZT RPGs, but combining them all really makes it stand out. Various weapons, an assortment of special magic attacks via Jill, statuses with SLEEP/BARRIER/DEFEND, enemies with multiple possible attacks and damage variance. All of these together make for an impressive combat system within ZZT. It's already a rather impressive piece of tech, but when you realize that it can be used for multiple fights it rises to some of the most impressive code I've seen in a ZZT world.
Oh, and these battle boards are only something like 10 kilobytes of board data. It's just hitting 50% of the space a board can use. For comparison, the game's title screen which is completely codeless except for the music is 5 kilobytes. That Commodore crammed so much into so little space is simply incredible. It's really something else. Commodore arrived in the ZZT community late enough that while his games got recognition, I don't think his name was ever really solidified as one of ZZT's greats but Psychic Solar War Adventure really demonstrates what he's capable of. As a 2007 release, the game didn't get much attention. There are just two reviews, no featured game, no MadTom's pick, nothing. It's a lost gem of a world and stunning example of what can be done within the confines of something as crude for making games as ZZT.