
Red bears round out the room and put Charlie into a Sweeney's Gambit situation. Open the door and hope that the bear doesn't get to act on this cycle.

It's no Nick's funeral, but the Shanty is actually a pretty impressive piece of architecture itself. I think this island is my favorite overall.
The path splits, but without the grappling hook the villagers spoke of the only option is to continue going upward.

A return to the classic cloudy sky background. There's some more variety in the enemies introduced here as well.
Firstly the red "Sparky". They actively run away from the player, but if the player lines up with them they'll begin firing at the player as they flee. It's very unusual to see enemies designed to run away from the player like this, but the tight spaces work nicely with them as they can't really run so far as to allow Charlie to just ignore them.
The green betas are "Droids". They move towards the player, perpendicular to the player, and then randomly which can make them difficult to hit as they tend to slowly but surely approach the player, taking an erratic path to do so. They hit quite hard as well, dealing 16 damage.
Lastly are the blue "Polemechs". These simply move randomly and round out the enemies on this floor. Their damage also deviates from the usual 10, but in the player's favor, dealing 8 damage and destroying themselves in the process.

Lastly are these tigers which in screenshots certainly look like regular tigers, but are actually statues!
...until the player examines them, then they turn into tigers. Kind of a weird choice since the player is going to be right next to them. There's no secrets behind them or benefit to bringing them to life. If the player knows the deal with the statues they'll ignore them. If they don't, they'll activate them.

Things take a turn for the creative as the next room is an elevator sequence where the player needs to survive as various creatures are duplicated in. The duplicators are a little too generously tuned here. Things are easily cheesed once you realize you can let the ammo and gems form walls and trap the creatures inside. If you run across fast enough it's possible to ignore the fight here entirely as the ammo and gems will create natural columns just before any enemies are created. Even if you opt to play the board as intended though, the exit will open before a second set of creatures can fully duplicate in.
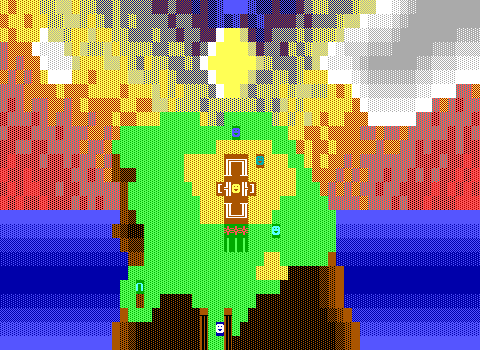
The background here takes on a more detailed scene than just cloud with a view of the islands below. It does a nice job creating a sense that you're really high up, ironically more-so than being among the clouds, partially owing to the fact that you'll sometimes just enter a house and get a cloud background.

The upper levels really get a stronger sense of identity. There was a hint of green on the entrance board, but now things are much more lush with vegetation. The use of simple green walls as opposed to common vegetation characters like ♣, ♠, or τ pull off the effect while not being as distracting. The characters here made the plants a background element with objects being better served as something the player should be focusing on.
Sure enough this board has "Spadebots" which get dibs on the spade character rather than using it as a more common glyph for trees. They more randomly, randomly vertically, randomly horizontally, and randomly vertically again before finally trying to attack the player.
The other enemy here is the brilliantly named "Candycane" that just moves randomly and attacks for five health.
Location of Keycards-
1.-Jungle of Doom, off of the Native's
Isle.
2.-Smuggler's Shanty treasure room.
3.-Somewhere in the Ruins.
4.-Atop the Palm Tree.
5.-Somewhere in the Treasure Isle.
• • • • • • • • •
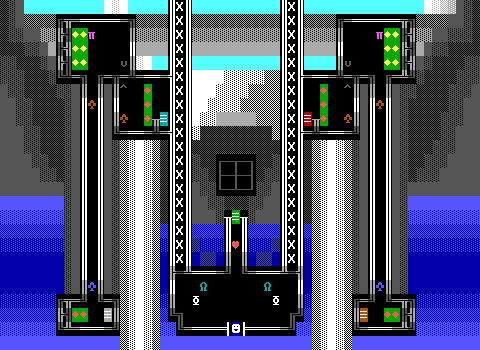
In the center on the room is a massive computer that can be interacted with to get this list of keycard locations. I managed to completely miss doing this somehow, but it's hardly critical information. It confirms that each area has a keycard but none of them actually provide enough detail to really guide the player. Even if they did, the cards aren't particularly hidden.

This is definitely one of the nicest looking dungeon boards. The vegetation continues to be a focus, with some water features as well ranging from a few pools to to large centerpiece fountain. I like how even the collectibles are tied into this aesthetic with the gems getting dark colored backgrounds to make them look like a more natural part of the environment rather than a pile of collectibles thrown into a few corners.


Also appreciated are the touches that help the location have some meaning within the world itself. This isn't some weird obstacle course solely for the sake of gameplay. This is a massive tower controlled by the pirates that offers them a high vantage point as a useful benefit.

The fountain actually has no messaging, which was a bit unexpected with this game's general commitment to detail. This strange device gets quite the explanation however.

Charlie is such a fun character honestly. This is such a fun game to explore.
Best of all, Charlie's request for nachos is not only fulfilled, but the object doesn't simply give health or points or anything, it actually spits out a few gems.
Are all gems just nachos? One can only hope.

One final oddity is this series of flashing orbs. They don't seem to do anything other than blink on occasion. Their purpose is unclear for the time being.

The next board instantly makes their purpose clear before the player can even read the scroll. This is a simple puzzle to hit the orbs in the correct sequence that matches the blinking colors on the previous board.

What isn't as clear though is where to start in the sequence. The orbs on the previous floor blink endlessly, but also at a consistent speed making it unclear which one is actually the starting one. I lucked out and guessed the starting spot correctly, though the scroll explains that if you make a mistake you can just start over. Pressing the wrong input will bring up a message saying that the answer was incorrect. There's no penalty for picking a wrong orb so once you write down the pattern you only need to find the first input to be able to get the rest.

Another magnificent looking board. These backgrounds are really unmatched and Drelick deviates from the basic sky background often enough that every passage is met with anticipation of what scene you'll come across next.
And again for small details, check out the way that the linewalls on this board unfurl at the edges using some white objects. In this era, these are objects which does limit how overboard one can go with this effect, but the same month as Overflow 2.0's release we also get the earliest known release of Chronos's More STK that provides text to create this kind of decoration without having to worry about the stat limit (provided that it's white, but Drelick is very much into monochrome linewalls in this game where text can substitute just fine).

The background returns to clouds but this board still has a trick or two up its sleeve. The water towards the top left is animated flowing down into a lower level. The sense of upper and lower levels isn't really communicated well normally. I've been interpreting every board as as flat space at least, but the idea that there's supposed to be a sense of height as well is a nice addition to the kind of effort Drelick's been putting it. It just doesn't really get explored enough to be made obvious.
This board specifically doesn't have any object based enemies which I have a hunch is because of the energizer. While objects can check if the player is energized and also have an optional label they can use that they'll jump to when the player picks up an energizer, they can't be plowed through like a pile of creatures.

At last the roof is reached. Like the barracuda on the previous isle, here the "devil" just immediately goes into attack mode. Once again there's no dialog. It's another shootout with a bullet aggressive foe that once again is kept in check by the sheer quantities of health and ammo Charlie has obtained.

Cementing the player's victory is a slow set of duplicators that provide additional and and gems, plus bombs that can be used as an alternative method of attacking. These duplicators run way too slowly to have an impact on the fight, and even the bombs only do as much damage as a single shot would.
Once the devil has been killed, a door opens allowing access to another passage.

I'm quite impressed with the visuals here as well. Most of the dungeon floors are far too winding to make any sense architecturally, but this board takes a previous floor and rotates the perspective a bit. You can still see the massive leaves from an earlier floor, but with a different angle now to focus on this sort of runway or incomplete sky bridge.
Ammo is placed in such a way that the player can control their approach into the ruffians and lone tiger in the room here. They serve as the last guardians to the treasure chest whose contents should be obvious if the player has been paying attention to the villagers in Amatena.


No need to walk back to the tower's base this time. A convenient jumping point here will let the player gracefully land back outside the dungeon by the entrance to Amatena village. It's kind of a goofy way to get back to the start without any attempt of justifying itself by having Charlie rappel downwards with his new grappling hook or anything, but it's definitely preferable to the alternative.

The dungeon isn't yet complete though as there's still crossing the gap that the grappling hook was intended for in the first place.

A little bridge is formed which despite working fine both ways there's still a second grapple point to throw the hook back the other way, although the first one never goes away so it's like there are two hooks in action.


Psyche! The devil wasn't the actual boss. It's a GIANT MECH... shuttle. This is a game with flying titanium fortresses, but I can't help but feel this giant mech in the background is out of place. It looks excellent, especially for some art that doesn't use any objects, relying purely on walls.
The shuttle enemy is heavily biased towards moving and shooting towards the player, and although there aren't any duplicators to provide resources this time, again, Charlie can easily match the shuttle with his own offense.
(Actually you might be fighting a giant mech, the object has "shuttle" in its name which would make me think it's something else, but a later boss also has a larger appearance in the background but it's much more obvious that you're supposed to be fighting that giant boss.)

The treasure room is packed with gems and dollars. Makes sense given that this is a major base of operations for the pirates after all.

Brilliantly, the treasure can't be collected. In a gem-based economy this ancient currency is worthless.
And finally at the back of the treasure room is the next keycard. This one is marked as keycard three. Despite the order presented to the player in their mini-fortress, the locations aren't actually coded in the order presented.

Internally, the game is structured Native's Island, Ruins, Smuggler's Shanty, Palm Tree, and then Treasure Isle. Even that doesn't tell the full of story of the order of development. It's only after the first three locations that the hut on Native's Isle that leads to Achalon and the other world gets added. Its inclusion there is kind of a bold statement. Were it directly attached to the first island it would make sense as something planned from the beginning. Were it added at the very end it would make sense as cramming in an extra ending, but smack in the middle of the game to me is really risky.
Overflow is a game that's massive in size and had an even grander scope intended. This is definitely the sort of game that a ZZTer would start and lose interest before finishing. Skip including this alternate ending and the only thing really lost is a bullet point of "two endings", but spend that time coding it in and then get bored before doing the final island and you're looking at having to cut roughly 20% of the main game or potentially just never finishing anything.
There's a legit possibility that the inclusion of the second ending was itself Drelick getting bored of these islands, which I'd honestly kind of believe as the two islands afterwards (Treasure Isle and the Palm Tree) don't quite reach the same highs the the earlier locations do. If so, kudos to him for managing to pull through and finish this game.

Anyway, it's time to go after a third keycard in the ruins. A robot on Native's Isle makes it clear that this was once New York City and I'm really surprised that aspect isn't played up more. It ends up just being a generic city with tall buildings that are uninhabitable because so much of the city is consumed by raging fires.
That robot says everybody fled when the ruins burned and not when New York burned so the implication is definitely that the city has been in shambles for quite some time with its inhospitability being much more recent.

A scroll draws the player's attention to the heavily polluted Atlantic ocean the city is build upon.

It isn't quite clear that the brown portions of the ruins are just fake walls. The lack of any breakables in the blending should tip you off, but I was sticking to the path until I noticed some of the creatures walking across it.


What looks like a red key also catches my eye and turns out to be a fire hydrant. This is a pretty good character to use for one although in Overflow there have been enough built-in elements that mistaking it for an actual key is to be expected.

Did you laugh at this board? I laughed at this board.
The ruined city is honestly in really good shape structurally. These buildings all look fine to me.
Drelick's background game is getting a little rougher here, likely due to the stark black background instead of a smoky sky or anything. Even on an empty background though the skyline that does make up the background helps sell the idea that this is a massive city and not just a few buildings sprinkled across a few boards.
But why "Friendly's"?

One thing that didn't click was that this area breaks away from the format of the other two areas visited so far. The ruins aren't divided into a village and a dungeon and from the very first board the player is under attack.
Now then, tell me about the Friendly's please.

So these fellows are the Nu that were mentioned back at Nick's funeral. How they're different from humans I don't know, but they're the only living sentient beings in the ruins now. They say "nu" a lot.
Also the Friendly's bathroom is haunted.

Welcome to level three: Friendly's.
Sadly no, really the entire ruins section is meant to just be a dungeon area, but there are going to be a few boards of this restaurant.
First off, the lobby, which contains a payphone that thankfully can't be used, and an abandoned pair of shoes that's covered in snow. I'm very curious what the deal is with snowy shoes in a city caught in an endless inferno.
Behind the lobby door are a few wild cats doing wild things in the dining area. There's a bomb against the wall as well which is actually a "Tigerbomb" that instantly destroys all the tigers on the board. With only five tigers to begin with half of them or more will likely be dead already before the player ever gets to it making it kind of moot. It would be a bit more understandable if this was meant as a tutorial to teach the player to seek out these bombs elsewhere on boards that are more hazardous, but this is a one time event.

Despite earlier inside views of buildings still keeping the fancy background design, Friendly's is much more traditional with a simple gray gradient that makes you wish you were dining somewhere else. That's not to say that there's no extra detail as two of the rooms here are locked away and serve only as decoration, but visually Friendly's is underwhelming.
In this puzzle, you need to touch the gun
to shoot, hit the Directional Shooters,
and try to shoot the 3 switches on the
wall. To accomplish this goal, you also
need to maneuver the little grey Richochet
Ball, so it can reflect the bullets, and
hit those 3 switches. You win when all 3
switches are hit, and all 3 gates are
down.
The back of the restaurant opts for another puzzle. I suppose that makes this game 3 for 3 with each area having a puzzle, but the orbs of Smuggler's Shanty were lackluster enough that I almost forgot about it already.

What follows is kind of an interesting take on a traditional "shoot the targets" puzzle. Charlie can operate this device to shoot a bullet which will be redirected by these tubes. The goal is to get a bullet to reflect back and hit that gray ricochet ball behind the blue water which in turn will fire a bullet in the opposite direction at the targets.
You have infinite shots so you can't actually lose unless you cause the soft-lock mentioned in the scroll where you push the ricochet ball against the top wall causing it to get stuck. This is the sort of thing that more modern titles would either include a check to prevent from happening or some way to reset the ricochet's position, but in 1997 "It'll break if you do this, so don't." was a perfectly acceptable way to handle known issues.

The puzzle starts off fairly reasonably. One of the red tubes moves on its own accord so at first you can make a save by quickly pushing the ricochet into position to turn a miss into a hit.
After you get two targets though the last one just has to have everything cooperate. It's made worse by the fact that the reflecting happens in such a way that it's possible for the pipe to intercept what would be a clean hit.

Even this can be mitigated to some degree though! The moving tube has a set pattern of movement which gets interrupted and restarted from scratch every time it's shot. If you hold down the firing button you can drag it to the south and out of the way.
The only problem with this though is that early on when you're missing shots you'll probably unintentionally pull it down at least a little and have to wait for the pattern to run several times to climb back up. The pattern moves the pipe eleven times which results in a full loop moving the pipe up by a single tile. The pipe runs at cycle 2 so you're looking at about 2 seconds of idling to finish a loop which can get kind of dull!

Overall the puzzle is more comparable to the swiftmud puzzle rather than the orbs. Nothing groundbreaking, but different enough to serve as a quick change of pace from the action that makes up most dungeons.

Finally, it's the haunted Friendly's bathroom. The keycard for the ruins is locked away, blood is pouring out of a sink, and several ghosts haunt the room and hopefully will haunt the dining area instead of a bathroom now that the tigers are gone because what a horrible afterlife otherwise.

One ghost offers up some interesting Achalon details that will go unexplored. The sun itself is breaking down and bits of it rained down upon the city (which had been frozen before despite Achalon being responsible for the ice caps melting?) and just really ruining things.

Confirmation that the ghosts are former New Yorkers.

And a goal of defeating the Sun Spark to get that keycard.

Lastly a ghost provides some direct aid. This canteen is necessary to proceed.

A what

The back half of the city is always open, canteen or no. It's the center of the city that's restricted which is accessed by the passage in the middle of the flames.
The building shapes get a little more playful here adding some contours to the perfect rectangles at the entrance, plus some variety in color with that one weird cyan building.
The other cyan rectangle I think is meant to be a car that's way out of proportion based on it having windows only on what would be a single floor if it were a building. It's tough to say for sure.

One last nu gives a final warning to Charlie before he mistakenly ventures deeper into the city.
There's no way anybody wouldn't instantly make a direct line to Friendly's though so I can't imagine anybody not having the canteen yet.

Suddenly the board design shifts dramatically. The environment is made almost entirely of fire which is of no consequence to the monsters here. If Charlie doesn't have the canteen he'll talk to himself about how he can't stand the heat for much longer. Trying to move through that narrow choke-point a few tiles north is the cutoff. Touch an object there without the canteen and Charlie collapses and the game ends.

Meet the Sun Spark. This time it's clear that you're getting a closeup via the background art and are actually fighting such a creature. In this case, a sentient piece of the sun. The outline it has flashes between colors of red, yellow, and white to signify the intense heat.
As far as the boss goes, the Sun Spark fits the basic mold of moving randomly, shooting at the player a bit, and repeating. However, despite its simple attack pattern, this fight plays out differently as Charlie's goal isn't to shoot the Sun Spark, but to douse it.

Instead Charlie's job is to use these fire hydrants which look nothing like the previous hydrants to pour a handful of water and then touch the Sun Stone to put it out. There's a timer on the water though and if Charlie can't deliver it fast enough it will evaporate in the heat. To succeed Charlie has to wait by a hydrant for the Sun Spark to get reasonably close and then quickly pour and run.

It's pretty silly, but it gets the job done. It takes one handful of water to save New York City.

The fires immediately extinguish.


While I wanted to relate this before/after with the melting of the ice and snow in The Three Trials this one is way less integrated into the world. The fire simply fades to blue and is then erased leaving black patches where it once stood resulting in some rather ugly scenery in a game that's been excelling at such things normally.

MEANWHILE IN THE HAUNTED BATHROOM OF FRIENDLY'S
Nothing much to say here. The ghosts are thankful and Charlie can collect his third keycard.

Because of the extra stop at Friendly's being necessary there's no quick return to the ship like with Smuggler's Shanty, though like the Native's Island before it it's not a very long walk. In this case though it's more that the area itself was quite small.

Just two keycards remain before Charlie can get to the pirate fortress and find that time machine!
One thing I've yet to mention that's actually quite important is that despite being free to travel to any island and despite being able to leave any island at any time, doing so absolutely runs the risk of breaking the game. An object on this board is constantly clearing flags used by each area. If you still haven't done something with a flag and turn around to say, use the shops found on two islands so far, you'll lose access to it and break the game. So do keep in mind that you're very much committed to these areas and can't guarantee the ability to safely go back for supplies or to try a different island.
Not Yet Final Thoughts
This seems like a nice spot to cut things off. So far, Overflow has been great. It's taking your basic ZZT action game and really going the extra mile by combining that with some of the best looking backgrounds I've seen in ZZT. I've played the game all the way through before I started writing this and confirming that it would be way too long for a single-part article so I can assure you that the praises I have for this game won't be going away in the second half.
Admittedly, the next area, "Treasure Isle" is undoubtedly the weakest. The back half of this game doesn't hold up as well as the first, though again you can pick and choose your locations in whatever order you like. Just flip Treasure Isle with the Ruins in a playthrough and you'll get a less front-loaded experience. Not to say that the rest of the game is bad because that's by no means the case. It's just that at this point we've really seen everything Drelick is going to bring to the table here. The other areas aren't as impressive because we've already seen their style of gameplay and visuals and I'm sure if I had gone from the bottom to the top in the island list I'd be warning that "Native's Island" isn't all that special after "Treasure Isle".
For now though, while you're waiting for the second half of this article, it's a great opportunity to try this one for yourself. The story is hard to take seriously and rarely amounts to anything that dictates Charlie's actions, but everything in this game from start to finish has a polish rarely seen. While action games centered around collecting keys never completely went away, Overflow feels like a bit of a swansong to the classic ZZT action/adventure that would be seen as old-fashioned in the years after its release. If you've ever found yourself enjoying ZZT worlds that focus more on shooting than thinking, Overflow is incredibly recommended. It is propelled from a solid action title to something that I'm quite surprised I hadn't actually heard of in all my days in the ZZT community. This is a genuine classic (it did get a Classic Game of the Month award in January 2000) that holds up incredibly well more than decades later.
Cyan key in hand, Charlie is able to head Smuggler's Shanty proper and is promptly ambushed by some "Guys" that move randomly and shoot towards the player.