This rules! The moving volcano, the trailing lava, and the fire effects all make this an amazing looking cut-scene for a game this early in ZZT's history. This is the real endgame here and the mood is quickly established.

...and promptly discarded as the first board of the volcano consists of an invisible maze with centipedes.

The maze is pretty open, more along the lines of Town's Room of Extreme Annoyance than something like the mazes in Link's Adventure 3.
Still, it's not a good start.

Climbing upwards leads to this group of passages as the player has to find their way up to the summit. It's not really a maze itself, as all roads lead where you need to go, but rather a pleasant bit of non-linearity where you get your choice of paths to take, or at least it will be after this last mandatory part of the ascent.

The volcano arena, while more of a welcome sight than an invisible wall maze, is another half-baked concept. It's another race against duplicators like Lake Hikcha, though this time all the keys need to be collected rather than picking up a "true" key. A large ping-pong-path takes up most of the board daring players to run through it rather than going around the outer perimeter.

I almost ignored the scroll expecting just a cheeky remark about wasting time, only to receive a vital clue for how to complete the final battle.

Although, you're probably going to have to take the ping-pong-path once as one of the duplicators is just creating pushers that eventually block the shorter path entirely.
Really this board doesn't amount to much. As long as you recognize the importance of getting keys through the shorter path while it's available, you won't become overwhelmed by enemies. The shape of the board also means that those enemies will rarely make it into the main area so once you've reach the slow part, you're at least pretty safe.

Now though comes the split path. I wound up taking both paths not so much to see all the content as much as I expected one path (or both) to have some game critical item necessary to defeat the spirits.

The "Wierd Bombs" path is the superior of the two in my opinion, just because it's a lot faster. This feels like a room whose purpose was scrapped due to the stat limit as it's maxed out from the start with the left half of the board looking pretty barren.


The second scroll reveals another weak point, and the pre-activated bombs finish exploding by this point. There's no reason the player can't just stick to the outer walls and not touch the inner boulders, thus completely ignoring the lions that could actually be a threat.

But I can't help myself and open up a tiny spot to be able to use the bombs to take them all out anyway.
Except, the destruction of the lions causes more lions to appear! As expected by the abandoned flood-fill of lions, this board was hit with a bug in ZZT's fill function where stats are sometimes not erased. What this means here is that some lions are basically standing on top of additional lions. When the bomb explodes and kills the top layer, the lions underneath are then free to begin roaming around.
But again, if you're not pushing boulders you can just go around the lions' den.

The alternate path is the "button maze" which claims to be very simple.
It was not. The buttons shift certain walls around and the goal is to make a path to the red key and then to the exit, stopping at the scroll for the final hint along the way.
This isn't some extremely frustrating puzzle or anything, it's just possible to get things positioned in a way that you'll never be able to access certain buttons again. I had to reload and then correctly stumbled onto the solution in about two seconds. Normally this would be the preferred path to take to the top of the volcano, but since it's so trivial to avoid the lions on the bomb board, this puzzle where the player can't be harmed actually ends up being the worse option.

Of course, these hints definitely encourage taking both paths. Although you can just read the scroll here and then do the bomb room instead without actually solving the entire puzzle.

Ah, but it's not over yet. While the art for the volcano is great, a this point I was really getting tired of these bland boards and definitely disheartened to see a three-way split path.

Fortunately, this one really is just a passage maze, and hardly one at all! Two paths will lead to the purple passage, and the purple passage leads to yellow, which leads to white and the exit. Blue is the only "wrong" path and even then it just leads promptly to a dead-end. I feel like this maze exists entireley to make the volcano a little bit taller.

Finally the summit is reached and the fool foolishly enters into the lava covered passage.

And prepares for the final battle!
The fire wizard, the ice dragon, and now the evil spirits have all joined forces to kill the king and take over the world.

The fight starts out alright. Each boss is fought individually, with the spirit simply shooting at the player. This is pretty standard for "giant bosses" that can't really move. The spirit's claws will slash at the player if they're aligned, moving downward a bit and shooting as well, but everything here is counteracted by shooting north. The clues in the volcano reveal the weak spots where you should be aiming, in this case, the mouth.

The ice dragon gets a turn next, and the fight stops being winnable almost immediately. You need to run around to the neck, but it's spewing so many stars that you'll just be destroyed once you stand still to start firing. If the objects to shoot were up top it would be possible to shoot and be safe from the stars, but there's nothing to do here other than tank all the damage.

Lastly, the wizard who also just summons a bunch of stars with their wand. This ends up being even more annoying since the wand that needs to be shot is also the part that's making stars in the first place which will block any bullets.
They also have a "laser" attack if you line up with the bottom of them which is what that strange not quite vertical line is meant to be, but there's no reason to ever get in the way of it.

Oh, and then once you defeat the wizard there's a final phase where all three bosses come back to life and have to be fought simultaneously this time.
It's not good and demands excessive cheating to survive.

But finally they die and drop the keys to the room where the king is being imprisoned. One last ominous message makes me suspect that this is going to be a fake king.
I absolutely fell for the twist here and let the king get shot and killed at the last moment by an unknown assailant. So much for the good ending.

Oh boy this is gonna be awkward to have to explain.
It's a great downer of an ending.
Sucks you couldn't save the king and all, but the entire planet was doomed to extinction and now it's not.
I love the king's reaction and how it's just kind of let go. His final words are still pretty ominous, though I suppose this guy has had a rough reign on the throne with multiple apocalyptic events occurring.
Thanks to Snorb as well for pointing out that this song is the introductory song from Phantasy Star III (and is openly declared as such in Janson's Music Box collection of soundtracks for her ZZT games).

The game comes to a close on this ending screen somewhat reminiscent of Town again.
There's also a recurring theme of this music note object which can be seen on the end boards of other early Janson games like Bugtown and Gemrule as well as the title screen of Cannibal Island. It's a cute little consistency that I've seen often enough now to recognize it as a sort of symbol of Software Visions.
One final object awards some bonus points for any leftover supplies as well as a 5000 point bonus if you save the king.
Final Thoughts
On The Fool's Quest side of things there isn't much to say. The April Fool's Day gag happened and the historical record of ZZT wasn't rewritten, which makes sense as anybody wanting to play all of Janson's games would realize pretty quickly that it's just a copy of The Three Trials. A more devious trick could have been to claim that this was an early revision of The Three Trials and the game was renamed in an update. With how many actual revisions of Alexis Janson games have been uncovered in recent years, this could have been a far more insidious plot, but I don't think Wells nor Kracken who wrote the Classic Game of the Month review were trying to do anything of the sort. There are are surprising number of instances of "fool" throughout the game, so this was definitely a great choice for a game to receive this treatment.
As for The Three Trials itself, it was overall a lot of fun, but definitely a flawed work. Its Best of ZZT influences make it pair quite well with Cannibal Island, making them feel like cousins with regards to their similarities to each other. Cannibal Isle definitely feels more polished, and while it's a challenging title that suffers from early ammo problems, it seems like it's more forgiving to the player overall. With The Three Trials, you're going to have to cheat. If you're really willing to push yourself you can put off that cheating until basically the end of the game, but the overall balance just isn't there.
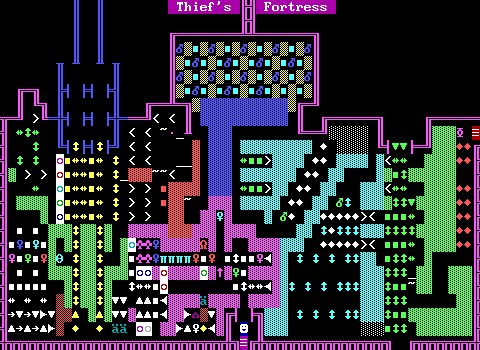
But don't think the experience isn't an enjoyable one! In terms of amateur game development, it can't be understated how ZZT"s tools of cheats and an editor can make it very possible to turn a frustrating experience to a pleasant one. When Janson is putting in the effort there's a fair share of excitement here. The thief's fortress is a very impressive board for such a young author. The world transforming itself from winter to summer is a great effect. There's a good sense of scale here in how it feels like you're exploring a very large world that fits in these roughly 50 boards. The player always feels like they're making progress towards quest after quest, and while the end game gets a little bland, by that point it's well worth sticking around to finish it.
What The Three Trials really comes down to is whether or not you're willing to embrace cheating as necessary. A better designed game wouldn't require going to such lengths, but ZZT makes it simple to do so. I think by skipping out on this one due to its sub-par balance you're missing out on quite a lot of good. Don't hesitate to try this one for yourself, but don't go into it thinking it's a game that can be "mastered". Even the best players are going to have to deal with that final boss fight, and I really feel like there's nothing to be done there, regardless of how many gems you pour into health. Let yourself fast-forward through the weaker parts and focus on what works well to transform The Three Trials into a quite worthwhile classic adventure. You'd be a fool to let this one pass you by entirely.
But What About the Super Rube Board?
Not to worry, I figured it out eventually. Here's how to get the white Prosek gem:
Click to reveal spoilers!
Now now, don't be too disappointed! Is this an intended solution? I genuinely think so. This kind of alternate solution might not be the most moral one, but having it included shows a lot of foresight. It lets the player skip the most obvious stopping point in the game. It presents a different challenge. I also trust Janson's ability to handle the complexities of attacking guards, talking to the princess, and going through the dungeon properly. She absolutely could have prevented the princess from reaching the gem giving code without having pulled the lever after finishing the super rube board.
It's... still buggy though as you can tell by the guards that refuse to die and love running into walls. This is just a straightforward bug though and the un-killable guards are supposed to be killable. The guards of Gemrule are split into "guard1" and "guard2" objects with "guard2" being the ones that have a patrol to rush to the princess's aid. Since they all have different paths to take they all have to have unique code. The rest of the guards have identical behavior and just use #bind to share code. The issue here is that the first guard to be shot will yell "Attack!" and then zap its :shot label, but due to the shared code, this means every guard runs that line and so #zap shot runs on the same set of code multiple times leading to the guards becoming immune to being shot as all their labels are zapped.
Luckily, they don't zap the :touch label at all, so touching a guard pacifies it and they return to their initial stopped state. Except their attack loops mean that they also are #walking already which means they just continue to walk in that direction even if they're no longer actively hostile to the player.
That all of this works the way it does is very fortunate and gives you a clean conscience to skip the Super Rube Board in your own playthrough. Assuming you don't mind killing half of Gemrule castle that is.
Of course if anybody happens to record a video of them being the Super Rube board legit...
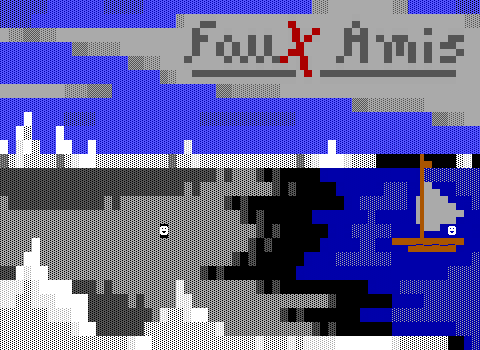
And sure enough the solution actually lies with Captain Dread whose boat has a new location available now that the seas aren't almost completely frozen over.