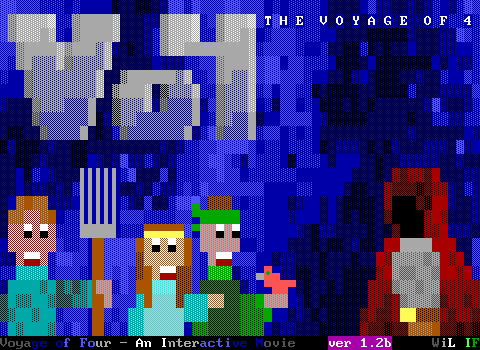

A quick reload and staying far far away from the princess to pick up the purple Prosek gem and get out of Gemrule.

Next up, the significantly less terrifying Shiensy castle.

It's very similar on the inside with its own vault, shop, and throne room. Luckily this king doesn't have an heir yet.


Between the eight guards, there are only two lines among them.

Shiensy's own shop is kind of an odd addition. Really it exists so that the player can buy a Prosek gem, but it still offers the same items as the one in Gemrule, except with worse pricing. I would've expected the prices to vary so that one castle is superior for torches, one for ammo, and one for health, or perhaps for equal unit prices with different quantities. Instead you get a store that discourages you from shopping in it.


The Prosek gem is quickly purchased in order to avoid the possibility of spending too much. This game has certainly been generous enough with gems, and while some different routing could have gotten me to the shops earlier, it's pretty clear that you need the money to buy this thing.
Strangely though, the gem doesn't show up as being available to purchase unless a guard has told you about it.
Also in checking the code to make sure I didn't miss any guard dialog, I learned you can shoot and attack the guards to have to fight them. This is pointless. I mention it here because I then assumed that perhaps as a way to get around the money issue perhaps you could shoot the shopkeeper and take the gem, but no such luck.

The king doesn't have much to say here. He's friendly, but he's not about to offer up any Prosek gems.

The plants are far more important. One of which reveals a cryptic clue that will be essential later, and the other reveals the blue key needed to reach the vault.
So to be clear, you are robbing this kingdom.

I fully expected there to be a penalty for picking up all the gems, but it's fine to do so. The passage in the back leads to quite a lot of extra gems (the border however is blocked off by invisible walls) and another Prosek gem.
Shiensy is so much nicer than Gemrule.

Next is Yoo-far.

Yoo-far is far-more lacking, at least in the context I was exploring it.

This is the king that wants the player to acquire the Golden Banana from the cave. Instead the reward is given instantly without even being asked about the quest.
This is also some changed dialog between The Three Trials and The Fool's Quest! Normally you're told that you proved your worth. Talking to the king again results in an "I cannot help you any further" message.

But the line is made more silly in this version of the game.

The reward is three more Prosek gems. Not bad at all.
The final castle is Elmwood, which is helpfully labeled as "EVIL" according to the board name.


This castle is just a straight up boss fight with the fire wizard who was said to be teaming up with the ice dragon.
The ice scroll from the caves is mandatory to be able to harm him, and without it the player's bullets will just bounce right off him.

With the scroll, the fight is simple enough. The wizard paces back and forth at the top of the castle and fires at the player endlessly, making a sort of vertical sine wave pattern.
It only takes five shots to defeat him, which with the current abundance of ammo and the lack of a restriction on how many bullets can be on screen on this board means that just firing a bunch of shots is an effective strategy.


It's not quite that easy though. After the wizard's defeat, the passage opens to a small cavern beneath the castle.

The underground is another dark room with a slapdash arrangement of enemies. Although there are a few tigers that can surprise the player by shooting from a distance, the area is overall open enough that this room isn't all that threatening.

For a reward, the player doesn't receive a Prosek gem, but instead the fire scroll needed to defeat the ice dragon.

The fire scroll at least opens up a new path to explore by fighting the ice dragon next.
It might be for the best that the last attempt was unwinnable, since it revealed that I'd be dealing with a terrible number of stars. This time, I showed no mercy and began to shoot at the mouth as soon as I was in the chamber, before the dragon could even properly begin to attack. This worked quite nicely and the first part of the fight was over before it began.
After the mouth is destroyed, the eyes begin moving around and shooting, but they're far more manageable making for a quick fight if you're overly aggressive, and a frustrating one if you're polite enough to wait before firing.

Alas, beyond the ice dragon is the altar where the Prosek gems need to be placed. The guardian won't let the player enter without all of them so there's only one thing left to do...

...zap your way through the Super Rube Board.
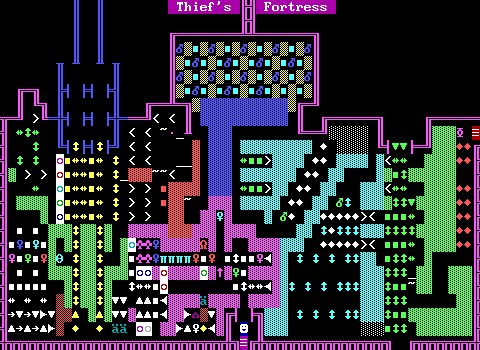
Sorry folks, I don't want to play this board at all. Janson has shown some great skills with puzzle design in the Thief's Fortress earlier, but this board looks so incredibly unappealing. The complete lack of color makes it incredibly difficult to comprehend the layout. The use of transporters means that rerouting them by blocking paths is probably a part of the solution. I'm on a deadline here.
Maybe I'll go back to it. It does feel a bit cheap to just skip right over it, but we've got a Prosek altar to fill up with gems.

Coming up from the basement means two levers can be pulled to undo the lock-down and also connect this top half of Gemrule with the rest of the castle.

Having conquered the dungeon in the most intended way possible, the princess gives up and just gives the player the Prosek gem.

One long walk later, and it's time to place the gems. The guardian here will tell the player to place each gem by its color on the altar. The solution was handed to the player back in Shiensy behind the throne with each letter corresponding the colors of the gems.

There's some room for error with a three-strike system for placing gems. If you make that third mistake, the altar is destroyed and the game becomes unwinnable.
There really isn't a puzzle here. Either you write down the solution when it's presented or you don't. The only requirement is to make the logical leap that the layout of the altar matches the layout of the text which isn't much of a jump. As a puzzle it feels flat. I think this scene would've had more impact if the player just went around the room automatically placing the correct gem, letting the ritualistic nature of laying seven gems on an altar take the focus over following a walk-through the game itself provides.
Also because this is ZZT each of the gem objects are there at all times, just invisible until placed which makes it easy to accidentally bump into one unintentionally and have a mistake counted against the player.
The barrier to the weather tower is lowered, and the guardian runs off. This feels like the lead-up to the final battle, but there's a decent amount of game still to go.

This is also the point in the game where it feels like Janson was getting tired. I think the rest of the game (mostly) looks more generic and doesn't feel like as much thought was put into it compared to earlier locations like the thief's fortress or that canyon board with all the ricochets.
This board could appear in any Sweeney-inspired world and doesn't really give off the vibes of ascending a tower.
It's also really shoddy to play. The spinning guns do fire at a pretty decent rate, and the intended solution is to use boulders to make the trip to the yellow passage in the center safe, but the breakables provide enough of a buffer that you can just run across the bottom and then shoot straight up and potentially take no damage.

Another board that can be removed from context. This object matches the appearance of the guardian but their actions towards the player make me suspect otherwise.

It's one of those collect-a-thon boards. The board connects to itself in all directions and while the transporters restrict movement, there's no way to get stuck. Oddly, all the yellow gems immediately disappear so the player doesn't need to take the time to pick them up. This is good in that it would considerably lengthen the time spent on the board if they had to be collected as well. An argument could be made that the gems could be useful to buy health and ammo as well as naturally giving the player a lot of health, but we'll soon see why that won't be the case.
A few tigers also add some danger that force you to be dexterous enough to transport into a cell and start shooting before the tiger does.

You're killing me Janson.

Then, just to be spiteful, the object takes all the gems and the score and the health back. The only mercy is that if taking the health would kill the player, they get one health back.
It is possible to descend the tower and spend all your gems in the shop. The object assumes it can take 78 gems, but won't complain if it can't.

Well here's the problem. Somebody turned down the thermostat.

A gentle nudge and the world becomes green once again. the ice melts away and water flows freely. Things are finally looking up.
...but I have to know what happens if you play around with it some more.
A lot of game overs is what happens. That third message can't actually display due to a bug in the code (using @panel1:messed rather than #panel1:messed). If it did work, it would display if you set the temperature correctly and then adjusted it again which in turn would prevent the "nuclear meltdown" ending.
The precipitation is a bit more bland as it can only be turned down. Anyway I'm beginning to understand why there was a magical barrier protected by seven gems to prevent anybody from wandering into the tower.


Nature is healing.

Really though, I love the effect. The willingness to essentially have to design each board twice over and deal with the limited constraints of what colors and elements can be referenced with ZZT-OOP make this a challenge. That more details actually get brought on on boards like the throne room is what impresses most of all. These winter to summer objects aren't as simple as changing white to green. Thanks to the clever trick of having some of the snow be made of normal walls and some of fakes Janson is able to do more complex effects like making the trees have foliage once more.
Again, this seems like a natural stopping point for the game, but there's that whole "The sun and moon have been merged" thing that really hasn't been given nearly as much attention other than being mentioned in the mage's book. I wasn't really clear where I'd need to go, but there was one location whose thawing I suspected would at least offer up somewhere new to explore.

Lake Hikcha is looking a lot better.

Underwater mission time. The suspicious man has been pretty helpful so far.

But he doesn't have to be. He moves after giving the player the diving gear in order to force the player to get the grail, but his movement pattern makes it very easy to lock the player out rather than in. Be sure to talk to him from the south or east rather than the more natural left.

The thought of an "underwater" ZZT board sounded like a cool one to me. I hoped that there'd be something a little more interesting than this.
What you actually get is just some walls and fake grails, and some encouragement to move quickly before too many enemy fish spawn in.
The actual grail is quickly collected. The fast paced nature of the board may have honestly fared better with a time restraint and having the fool hold their breath.
Very suspicious. The man grabs the grail and runs off the board leaving the player to give chase.

The guards are no help at all, and if anything just slow the player down with the awkward turns needed to navigate through this board. The thief meanwhile runs off to the west where Captain Dread is docked.

The thief takes an unexpected turn through the grass rather than to the boat or cave. That empty column is carved by the thief through some actual walls, so while the player can actually hit the first fake wall, they are correctly blocked from heading north until this point in the game.

The thief's hideout isn't the prettiest board, but it looks like there's something to it. It's been a bit since there's been an action/puzzle board like this, but there's a real big catch.

A very tight time limit.

The board opens with a slider puzzle that's a lot more basic than the one in the thief's fortress or... Gemrule.
I don't think sliders mix well with a time limit. You really need to keep moving if you're going to beat the clock on this one so the strategy turns into "push anything and reload when it doesn't work".
This leads to a small room with some ruffians. Without the timer the smart thing to do would be to just sit where the player currently is and let the ruffians make their way to you, but due to the deadline, brashly pushing forward is the way to go.

Until you get hit by one and realize that the player is warped to the entrance when they get hit which combined with the slider puzzle means that you don't get a second chance.
You have to complete this board flawlessly and in less than two minutes.

On a later attempt, getting through the boulders comes next where once again your options are to succeed or reload.

Followed up with the rarely seen close quarters transporter maze. Again though, rather than make these puzzles about saving time, they either let the player progress or make them have to restart.
I kind of get what Janson's going for here. Obviously you're supposed to move quickly but keep your focus. It just doesn't feel very satisfying to get through these chambers.

This section with the centipedes, cyan keys, and boulders works the best for me. The way centipedes move makes it possible to avoid them or maybe trap them with boulders. Shooting is an option but splits them up and makes things more chaotic, and while you can still softlock yourself by pinning a key behind boulders there's a lot more openness to how one gets through the chamber.

The tiger + ricochet room though. Yikes. This is far more dangerous an arena than the ruffians had, and you also run into the risk of shooting yourself. Any shots that miss are just going to go bouncing back and in the small confines of this room it can be difficult to "follow" the bullets as there's no indication of their direction of travel other than by observing how they move.
Take the two bullets in the top left here. They could be my own shots heading north in which case they'll hit the ricochet and destroy each other when one bounces back. They could be bullets from tigers that are bouncing east and west. They could be one of each and depending on the stat order they may intersect and destroy each other or not. It's impossible to read in a still screenshot, and not much better in real-time as the longer you take to comprehend how they're moving, the more likely you are to not notice other bullets headed your way.

In the end, I wound up resorting to cheating for some more time.
Sliders. Ruffians. Boulders. Transporters. Centipedes. Tigers. Spinning guns.
I confess I wasn't really moving as fast as I could, knowing I'd prefer to cheat for time rather than getting hit and having to reload and repeat sections over and over, but that's seven sections to get through in 120 seconds. You won't easily get through this one legit.

Lastly, the spinning gun gauntlet. This one is only annoying because your time is going to be really low and navigating this final stretch safely is mostly a matter of getting the guns to cooperate. The worst part is definitely when you move above the first set of guns as there's that two tile gap that has to be crossed where you won't be able to react to a bullet being fired to the north. For the horizontal portions that make up most of the threat, you can burn some time and fire a wall of bullets at the guns solely to deflect their own shots.
With my extra 30 seconds of time I was able to reach the goal with 14 to spare, pick up the grail, and pull the lever.

The lever will destroy all the obstacles on the board, and turns a lot of them into gems. Alas, the destruction of all the transporters means that once time runs out and the player is sent to the start, there's no longer any way to get back inside and collect them. I can't imagine getting through this board fast enough to be able to reach any of the gems with leftover time if you don't cheat for more.

Forgetting my Three Trials lore, I continue to wander around rather than giving the grail to the king's mage.
The thaw also opened up this path to the west of the canyon. There's no telling what's over here, unlike the lake where you're moving to a constrained space, there could be any number of boards off in this direction.

It ends up being a curvy action board in the style of Town's own forest. Duplicators provide an infinite (without purposely taking damage) supply of enemies, but unlike Town taking damage here doesn't return the player to the start.
The enemies populate slowly enough and mercifully the tigers are the first enemy to deal with.

And then I am attacked by... this thing.
Again the book is essential to knowing what you're actually doing. This is the vortex that can only be harmed with the mage's wand. So finally that hut from the start of the game becomes relevant.

The fight isn't too exciting, but conceptually it's great. The book describes the vortex as being a portal to another dimension and the source of the evil creatures in the forest, and sure enough as the vortex swirls around other enemies are spawned in. It's a very flashy monster generator and it certainly looks neat. The outer swirls that summon enemies go down to a single shot, and the core itself in three.

Once defeated the remaining enemies are turned into gems, which also applies on the forest path the player has to traverse again to get back to the castle. Janson also made sure to destroy the duplicators with the vortex which prevents turning the monster spawners into gem spawners for a source of infinite health and gems (and ammo/torches via the shops).

Can we take a moment to appreciate how well coded the king is?
This guy is kind of the core logic handler for the game and properly handles the introduction to the mage, the restoration of the climate, the sun and moon being split, the destruction of the vortex, and the acquisition of the grail. It would have been so easy to have a fatal bug here that just makes the game unplayable, but Janson almost has it perfect. (There is one bug when the king gives the player a blue key where touching them again will give them more blue keys.)
A lot of ZZT worlds that try to handle this many states just don't work period, so seeing the king function through all of this, and even be able to combine messages when multiple quests are completed before checking in is an impressive feat.

The mage is ready to fix this perpetual eclipse thing. I hope having a fully functional sun combined with turning up the planet's heat doesn't cause any problems...

The grail is a bit of a macguffin in that how it functions is never remotely explained. It just so happens to do the job when put on the altar.


"May the wind blow fair on your coxcomb." What a powerful line.
The reward for separating two celestial bodies is eight torches. Finding this guy's stolen stuff gave a reward of ten of them!
Also, there are zero dark boards remaining in this game.

Okay, so surely now the game is over. The vortex is gone, the weather is fine, the sun and moon are apart. Nothing remains right?
Sigh. It's always something with this guy.
I really like how the board goes dim when the spirits arrive. Janson really does some nice work with these background effects, and the best is yet to come.
Except of course, I have no idea where to go. I wound up breaking out the file viewer to look things up rather than start exploring the entire world in hopes of finding something that's changed.
Hey. I hate this. A lot.
I immediately noped out of there and restored my save. I would get back to this one? Maybe?